The Notes App on Mac provides the option to Lock Notes with a password and prevent the possibility of your confidential or personal information from being viewed by anyone else.
Similar to regular unlocked notes, password protected Notes can also be accessed from any of your Apple device (iPhone. iPad) and they continued to be protected by the same password.
With this understanding, let us go ahead and take a look at the steps to Password Protect Notes on Mac and also the steps to Change and Reset Notes Password on your MacBook.
1. Password Protect Note on Mac
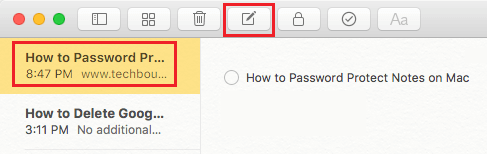
1. Open the Notes App on your Mac > open the Note that you want to Password Protect.
Note: If you want to create a New Password Protected Note, click on the New Note icon, located in the top-menu bar.
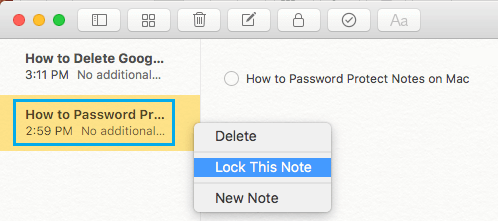
2. Once you are in the Note, click on the Lock icon, located in the top-menu bar and select Lock This Note option in the drop-down menu.

3. On the next screen, Type Password, Verify Password, Type Password Hint and click on Set Password button.
Note: The Password for the Notes App can be the same as your Lock Screen Password.
4. Once the Password is set, you will be greeted with “This Note is Locked” message, whenever you try to open any Password Protected Note on your Mac.
2. Unlock or Open Password Protected Note on iPhone
The only way to access Locked or Password protected Notes on Mac is to enter the Password that was used to protect the Note.
1. Open the Notes App on your iPhone > select the Password Protected Note that you want to open.
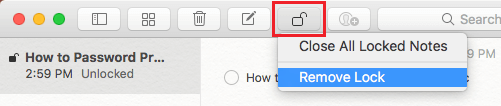
2. Next, click on the Lock icon and select Remove Lock option in the drop-down menu.
3. On the pop-up, enter the Password that was used to Lock this Note on your MacBook.
3. Change Notes Password on Mac
You can follow the steps below to change the Notes Password on your MacBook.
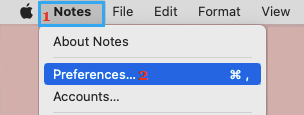
1. Open Notes App > click on Notes tab in the top-menu bar and select Preferences in the drop-down menu.
2. On the Preferences screen, click on Change Password option.
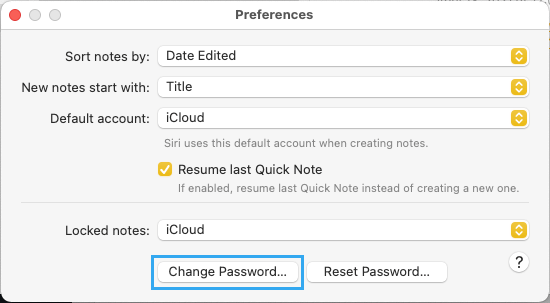
3. On the next screen, enter old password, new password, verify new password and click on change password button.
4. Reset or Remove Notes Password on Mac
At any time, you can Reset or Remove the Notes password from your Mac by following the steps below.
1. Open Notes App > click on Notes tab in top-menu bar and select Preferences in the drop-down menu.
2. On the Preferences screen, click on Reset Password option.
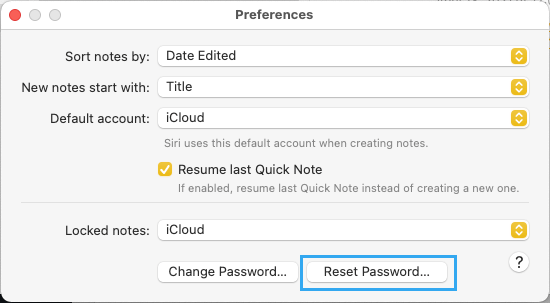
3. On the Confirmation Password, select the Reset Password option to Confirm.
What You Need to Know About Protected Notes
Now that you know the steps to Lock or Password Protect Notes on Mac, you also need to be aware of the following information about Protected Notes on Mac.
1. Even if a Note is Password Protected, the first line in the Note will be visible as the Title of the Note. Hence, it is important to make sure that the first line of a protected Notes is not giving away any personal information.
2. When you try to open Notes on Mac, only the Protected Notes will be prompting for a Password. You will be able to access all unprotected Notes on your device, without entering any password.
3. Only a single password can be used to protect all your Notes on Mac. There is no provision in the Notes App to create different passwords for different Notes.
4. Once a Password is created for the Notes App, you will be able to Lock any existing unprotected Note on your Mac by right clicking on the Note and selecting Lock This Note option in the side-menu.
5. When you are finished reading or editing a Password Protected Note, make sure that you either Quit the Notes App by clicking on the Red Close Button in the top-menu bar or click on the Lock icon and select Close All Locked Notes option.
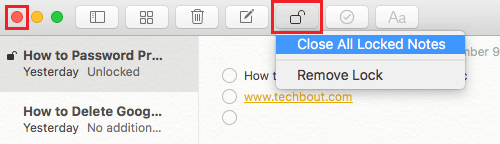
This will ensure that all you Password Protected Notes remain Locked on your device.