If you are looking for a way to prevent deleted files from going to the Recycle bin, it is likely that you have your own reasons for not allowing the deleted files to remain available in the recycle bin.
As you must be aware, the default setup on a Windows computer is to move deleted files to Recycle bin, where they remain waiting to be permanently deleted by the computer during system managed cleaning of the Recycle bin.
This default setup is designed to help users recover deleted files by going to the Recycle Bin, in case they end up accidentally deleting files on their computers.
Prevent Deleted Files from Going to Recycle Bin in Windows
If you do not like the idea of deleted files being available in the Recycle bin, you can setup your computer to immediately remove deleted files, instead of keeping them in the Recycle bin.
This ensures that deleted files are immediately removed from the computer, which totally rules out the possibility of anyone being able to access or recover deleted files on your computer.
Steps to Prevent Deleted Files from Going to Recycle Bin
You can follow the steps below to prevent deleted Files from going to the recycle bin on your Windows 11/10 computer.
1. Right-click on the Recycle Bin icon located on the Desktop and click on Properties.

2. On Recycle Bin Properties screen, select Don’t move files to Recycle Bin option.
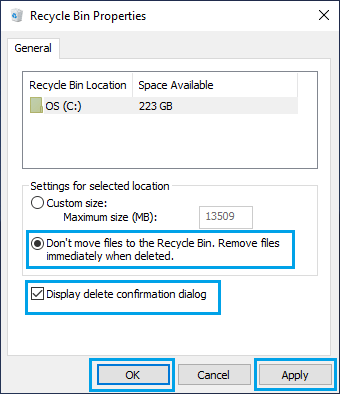
Note: You can also check Display delete confirmation dialog option, to make your computer come up with a confirmation pop-up, whenever you try to delete files from your computer.
3. Click on Apply and OK to save this setting on your computer.
After this, deleted files will be immediately removed from the computer and you will no longer find deleted files landing in the Recycle bin.
As mentioned above, you can prevent the possibility of important files being accidentally deleted from the computer by selecting “Display delete confirmation dialog option.