If your Windows computer is not automatically connecting to Wi-Fi, it will prompt you to enter the Wi-Fi Network password, every time you try to connect to internet.
While the reason for this annoying issue is most likely due to the computer not being setup to automatically join Wi-Fi networks, it can also occur due to other reasons.
Windows Computer Not Connecting to Wi-Fi Automatically
You can find below the steps to fix the problem of a Windows computer not automatically connecting to your Home or Office Wi-Fi Network.
1. Select Automatically Connect Option
If your computer is not automatically connecting to Wi-Fi, the problem may simply be due to “Connect Automatically option” not being selected.
1. Click on the Network Icon (1) in the Taskbar > click on your Wi-Fi Network (2) and make sure Connect Automatically option is selected.
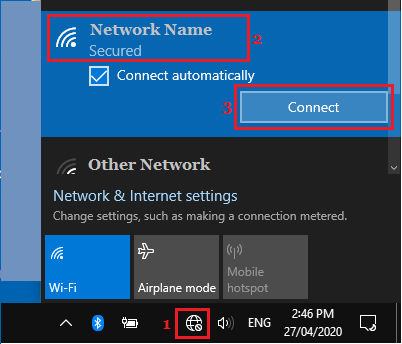
2. After enabling the Connect Automatically option, try to connect to the Internet by clicking on the Connect button.
3. If prompted, enter your Wi-Fi Network Password and click on the Next button.
2. Forget Wi-Fi Network & Rejoin
Note down the Password for your Wi-Fi Network and follow the steps below to forget Wi-Fi Network and rejoin the Network.
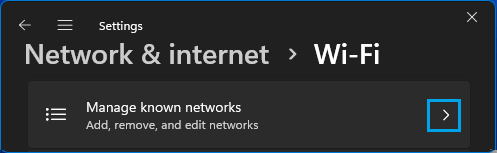
1. Go to Settings > Network & Internet > Wi-Fi > scroll down in the right-pane and click on Manage Known Networks.
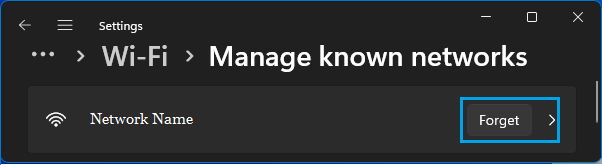
2. On the next screen, click on the Forget button, located next to your Wi-Fi Network name.
3. After this, click on the Network Icon in Taskbar > select your Network > check Connect Automatically option and click on Connect.
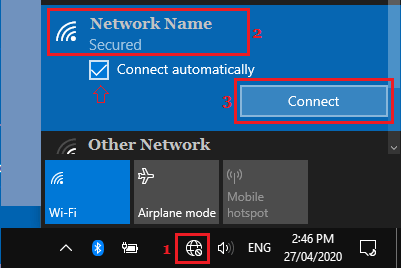
4. Enter your Wi-Fi Network Password and click on Next to connect your computer to Wi-Fi Network
This should fix the problem and you should now find your computer automatically connecting to Wi-Fi Network.
Windows 10: Go to Settings > Network & Internet > Wi-Fi > Manage Known Networks > select Wi-Fi Network and click on the Forget button.
3. Stop Computer From Turning OFF Wi-Fi Adapter
Sometimes, the problem is due to the Wi-Fi Adapter being frequently Turned OFF by the computer in order to conserve battery life.
1. Right-click on Start button and click on Device Manager.
2. Expand Network Adapters entry > right-click on the Network Adapter for your computer and click on Properties.
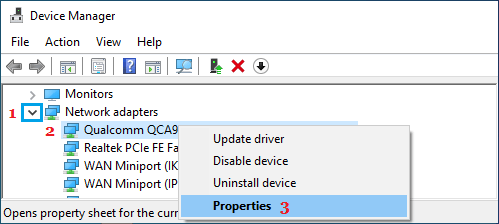
Note: If you see too many entries, look for something that says Network or 802.11b or has Wi-Fi in it.
3. On Network properties screen, switch to Power Management tab and uncheck Allow the computer to turn off this device to save power option.
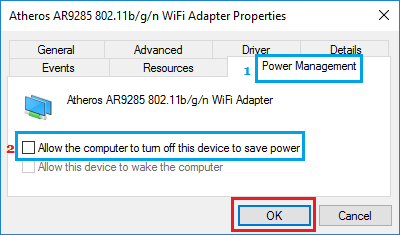
4. Click on OK to save this Power setting on your computer.
This will prevent the computer from switching OFF power supply to Wi-Fi Adapter, which should prevent the Wi-Fi Network password from being erased.
4. Uninstall Network Adapter Driver
The problem of Wi-Fi Not connecting automatically in Windows might be due to the Network Adapter Driver on your computer becoming outdated or corrupted.
1. Open the Device Manager on your computer.
2. On Device Manger screen, expand Network Adapters entry > right-click on the Network Adapter for your computer and click on Uninstall.
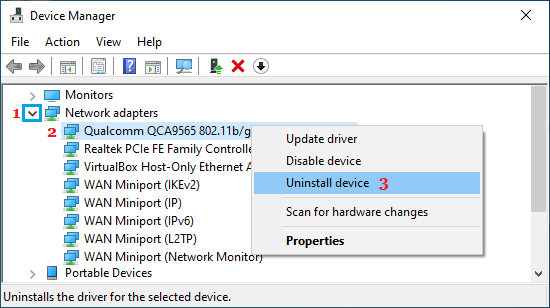
Note: In case you see too many entries, look for something that says Network or 802.11b or has Wi-Fi in it.
3. On the Warning pop-up that appears, click on OK to Uninstall the driver.
After this, Restart the computer and it should automatically search for the right driver and install it back on your device.
5. Disable Microsoft Wi-Fi Direct Virtual Adapter
The purpose of Microsoft Wi-Fi Direct Virtual Adapter is to support the sharing of internet connection on your computer with other devices (Hotspot).
Users have reported fixing Wi-Fi connectivity problems by disabling this feature, especially on older computers that do not support the Hotspot feature.
1. Open the Device Manager on your computer.
2. On Device Manager screen, switch to View tab and select Show Hidden Devices option in the drop-down menu.
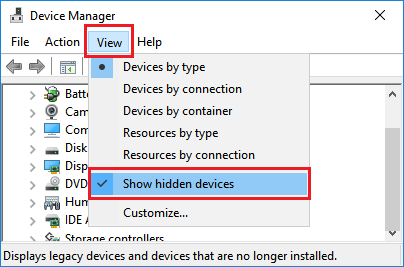
3. On the Device Manager screen, right-click on Microsoft Wi-Fi Direct Virtual Adapter and click on Disable Device option.
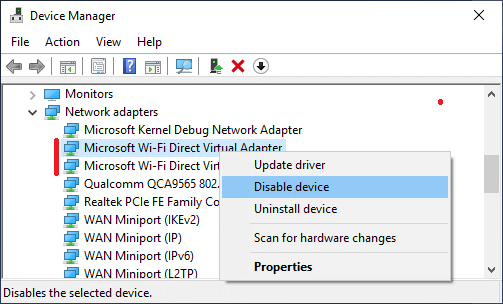
Note: After disabling Microsoft Wi-Fi Direct Virtual Adapter, you won’t be able to use Mobile Hotspot feature on your computer.