The default setting on a Windows computer is to securely store the Network Name, Password and other details of every Wi-Fi Network that the computer connected to. This makes it easy to find the Wi-Fi Password on a Window computer, if it is required to connect a new Phone, TV or Laptop to Wi-Fi Network.
The Network Names and Passwords are stored by Windows in an encrypted format in the registry, which prevents them from being read by hackers and malicious software. However, the passwords for Wi-Fi networks that are stored on a Windows computer can be unlocked, viewed and copied by using the Admin Password.
Related: How to Find Your Wi-Fi Password on iPhone & Mac.
View Wi-Fi Password in Windows 11/10
You can find below the steps to find the Password for your Wi-Fi network on a Windows computer by using Settings, Network Connections, Command Prompt and Control Panel.
Note: If your computer is connected to internet via an Ethernet cable, use the Command Prompt method (#3) or the last method (#5) to find the Wi-Fi password for the same network.
1. Find Wi-Fi Password Using Settings
If you are using the latest version of Windows 11, it provides the option to view Wi-Fi password and connect your phone to the Wi-Fi network by scanning a QR Code.
1. Press Windows + I keys to open Settings.
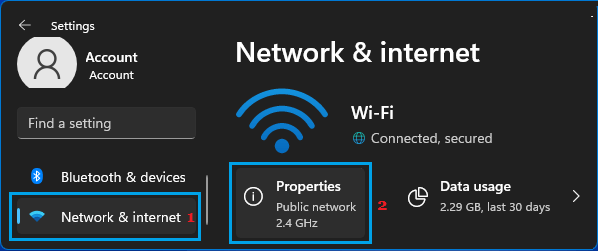
2. On the Settings screen, select Network & Internet in the left-pane. In the right-pane, click on Properties tab for the currently active Wi-Fi Network on your computer.
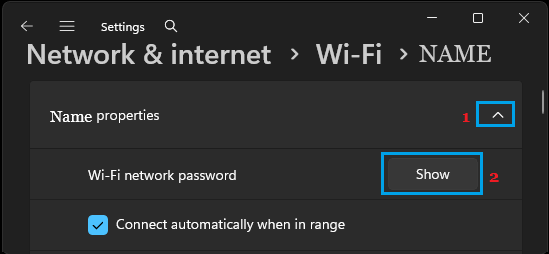
3. On the next screen, expand the Wi-Fi Network Tab (if it is not already open) and click on the Show button, located next to Wi-Fi network password entry.
4. On the User Account Control screen, enter the Admin Password and click on the Yes button.
5. On the next screen, you will be able to view your Wi-Fi password along with a QR Code.
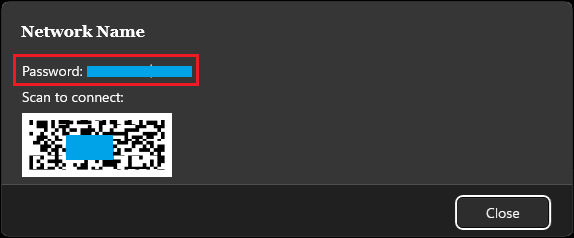
You can note down the Wi-Fi password and enter it manually to connect any new device to Wi-Fi network or scan the QR code to connect a new phone, tablet or computer to your Wi-Fi network.
2. Find Wi-Fi Password Using Network Connections
On both Windows 11 and Windows 10 computers, you can find the Wi-Fi password for the currently active or connected Wi-Fi Network by going to “Network Connections” screen.
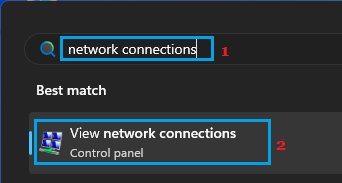
1. Type Network Connections in the Search bar and click on View Network Connections in the search reults.
2. On the next screen, double-click on your Wi-Fi Network.
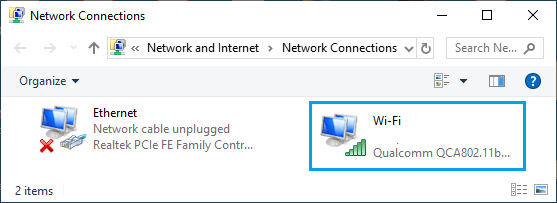
3. On Wi-Fi Status screen, click on Wireless Properties button.

4. On Wireless Network properties screen, switch to Security tab and select Show Characters option.

5. Once you select the Show Characters box, you will be able view the Wi-Fi password in Network Security Key box.
After you copy or write down the Wi-Fi password, make sure that you uncheck the little box next to Show Characters, in order to prevent your Wi-Fi Network password from being openly displayed on the screen of your computer.
3. Find Wi-Fi Password Using Command Prompt
You can make use of Command Prompt to find the Password of the current Wi-Fi network and also the password of other Wi-Fi networks that are available on the computer.
1. Type CMD in the Search bar > right-click on Command Prompt in the Search results and click on Run as administrator option.
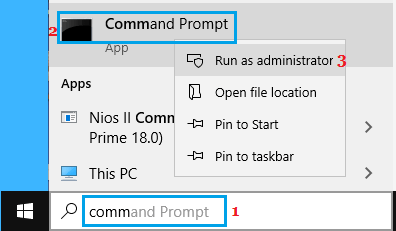
2. On the Command Prompt screen, type netsh wlan show profiles and press the Enter key on the keyboard of your computer.
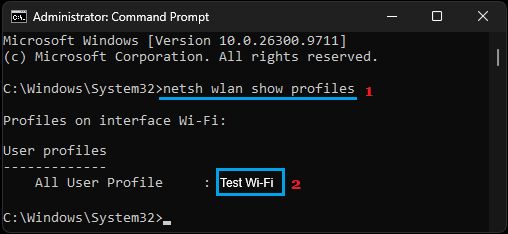
This will bring up the Names of all Wi-Fi networks that are available on the computer.
3. After finding the Name of the required Wi-Fi network, you can find its password by executing the following Command.
netsh wlan show profile name=“Network Name” key=clear and pressing the Enter key.
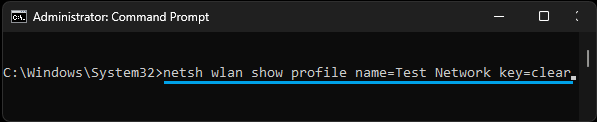
Note: Replace “Network Name” by the actual name of your Wi-Fi network.
4. After the Command is executed, scroll down to Security Settings section and you will see the password of the Wi-Fi network listed next to the Key Content entry.
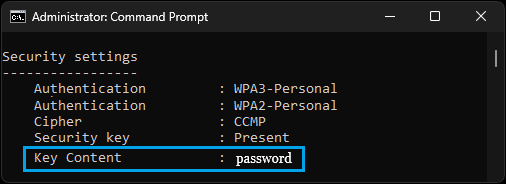
Note: Passwords for other Wi-Fi (if available) will also be listed on the Command Prompt screen.
4. Find Wi-Fi Password Using Control Panel
On both Windows 11 and Windows 10 computers, you can find the Wi-Fi Network password by using Control Panel.
1. Open the Control Panel on your computer
2. On the Control Panel screen, switch to Large Icons view and click on Network & Sharing Center.

3. On Network and Sharing Center screen, double-click on your Wi-Fi Network.
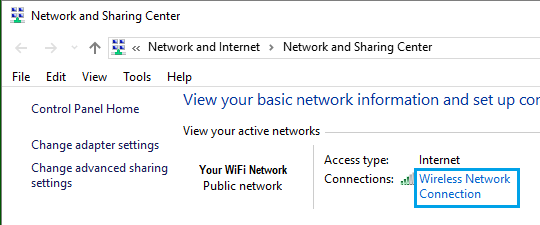
4. On the next screen, click on Wireless Properties button.

5. On the Wireless Network properties screen, switch to Security tab and check the little box next to Show Characters.

6. Once you check the Show Characters box, you will be prompted to enter the Admin Password, after which you will be able view your Wi-Fi Network Password.
Note: After you are done, make sure that you uncheck the Show Characters box and prevent the possibility your Wi-Fi Network Password being seen by others.
5. Find Wi-Fi Password While Using Ethernet
You can use this method, if your computer is connected to internet through an Ethernet cable and you need the Wi-Fi password for the same network.
1. Press Windows + I keys to open Settings.
2. Select Network & Internet in the left-pane. In the right-pane, click on the Wi-Fi Tab.
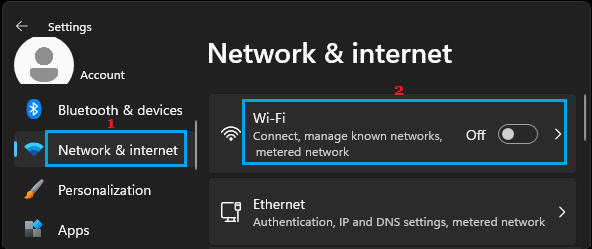
3. On the Wi-Fi screen, click on Manage known networks tab.
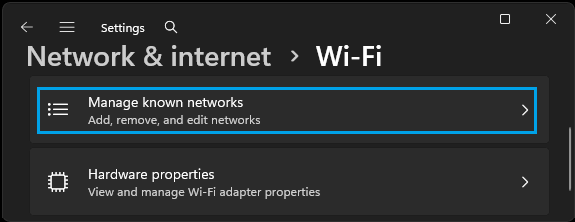
4. On Manage Known Networks screen, click on the Wi-Fi Network tab.
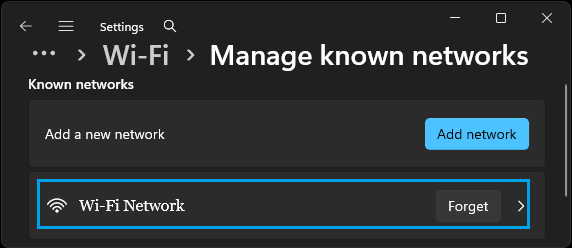
5. On the next screen, click on the Show button, located next to “Wi-Fi network password” entry.
6. On the UAC screen, enter your Admin Password and click on the Yes button.
7. On the next screen, you will be able to see the Password for Wi-Fi network along with a QR Code; which can be used to connect a new mobile device or computer to the Wi-Fi network.