The purpose of BIOS (Basic Input Output System) or UEFI (Unified Extensible Firmware) on a Windows computer is to initialize the hardware during the boot up process and provide run-time services for operating systems and programs installed on the computer.
While both BIOS and UEFI are designed to serve the same function, UEFI (modern replacement for BIOS) is faster, supports larger drives and offers better security (Secure Boot).
Reset BIOS/UEFI to Default Settings
In general, users find the need to reset BIOS to default settings in order to fix incorrect date/time, fix incompatibility issues after hardware changes (RAM or CPU changes), fix a computer with blank screen and to remove forgotten BIOS password.
In case required, you can reset the BIOS/UEFI firmware on your computer to its original or factory default settings by using any of the following methods.
- Reset BIOS from the computers BIOS/UEFI Menu.
- Reset BIOS by removing CMOS Battery
- Reset BIOS by clearing the motherboard jumper
1. Reset BIOS Using BIOS/UEFI Menu
This method requires you to enter the BIOS/UEFI Settings on your computer and click on Reset, Restore Settings, or Load Default option.
1. Enter the BIOS/UEFI Settings on your computer by using any method as provided in this guide: 8 Ways to Enter BIOS/UEFI in Windows 11/10.
2. On BIOS Settings screen, click on Restore Settings button to Reset BIOS/UEFI to its original or Factory Default Settings.
If you do not see Restore Settings button, press the F9 key to bring up the “Load Default Options” prompt and click on Yes to Restore BIOS to default settings.
3. Make sure that you click on the Save option, before clicking on Exit to close the BIOS Settings screen
Note: Your computer may have its own menu option to Reset BIOS.
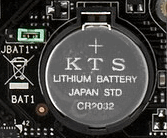
2. Reset BIOS Using CMOS Battery
If you are using a desktop computer, you can reset the BIOS firmware on the computer to its original or default settings by removing its battery for a short period of time.
1. Power off the computer and disconnect the computer from its power supply source.
2. Wait for 60 seconds > open the casing and remove the CMOS battery from the motherboard.
3. After removing the battery, wait for 60 seconds and put the CMOS Battery back into the Motherboard.
4. Close the casing > connect the computer back to its power supply source and switch ON the computer.
Note: Sensitive computer parts can suffer damage due to static shock. Hence, make sure that you do not touch any part with your bare hands (Wear gloves).
3. Reset BIOS Using Motherboard Jumper
You can also reset BIOS by using the motherboard jumper.
1. Power off the computer and unplug it from its Power source.
2. Wait for 60 seconds and remove the casing to access the motherboard.
3. On the Motherboard, locate the CMOS Jumper, which is usually labelled as CLR_CMOS or RESET.
4. Move the jumper from its current position to Reset position for few seconds and return the Jumper back to its original position.
5. Close the casing > reconnect the computer to power source and switch on the computer.