Dealing with a slow mouse response on a Windows 10/11 computer can be frustrating, especially if you are under pressure and trying to get some work done in a short period of time.
This problem could be happening due to a variety of reasons, ranging from weak batteries, faulty mouse, incorrect Settings to other reasons.
Slow Mouse Response in Windows 11/10
In most cases, the problem of Slow Mouse on a Windows computer can be fixed using the following troubleshooting steps.
1. Remove and Reconnect Mouse
If you are using a wired mouse, unplug it from the computer and connect it back again. If it is a wireless mouse, remove its USB Receiver from the computer and re-connect it back again.
This should help the computer to recognize the mouse and you may find it working faster than it was before.
2. Check Mouse and Mouse Pad
Clean the bottom part of the Mouse to make sure that no debris, bread crumb or dirt is stuck in the laser opening of the Mouse.
Also, make sure that the Mouse Pad is not dusty, damaged or worn out.
3. Replace Batteries
A simple reason for a Wireless Mouse becoming slow or getting stuck is due to its battery being weak. To confirm, replace the battery of the Mouse with a new one and see if this helps in fixing the problem.
4. Disconnect USB Devices
Sometimes, other devices connected to the computer can interfere with proper functioning of the Mouse. This is especially true if a USB 3.0 device is attached to your computer.
Users have reported fixing Slow Mouse Response issue in Windows 10 by disconnecting Portable Hard Drive and USB Flash drives connected to the computer.
5. Connect Mouse Receiver to USB 2.0 Port
If your computer has both USB 2.0 and USB 3.0 ports, try connecting the Mouse to USB 2.0 port and not to USB 3.0 port.
Users have reported fixing Mouse lag by connecting the wired mouse to USB 2.0 port and connecting the USB Receiver) of a wireless mouse to USB 2.0 port.
6. Change USB Port
Unplug the wired mouse from its current USB Port and plug it back into another USB Port. If it is wireless mouse, unplug its Receiver from the USB Port and Plug it back into another USB Port.
If you are using a USB Hub, remove the Mouse from USB Hub and plug it directly into the USB Port of the computer.
7. Update Mouse Driver
Make sure that the mouse is using the latest driver software.
1. Right-click on the Start button and click on Device Manager.
2. On the Device Manager screen, expand Mice and other pointing devices entry > right-click on HID-complaint mouse and select Update Driver option.
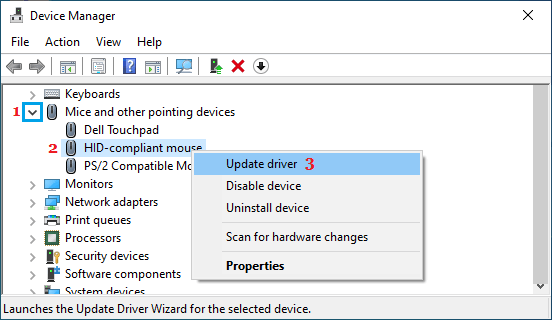
3. On the next screen, click on Search automatically for updated driver software option and allow Windows to automatically search and update the driver software.
7. Disable Improve Inking & Typing
Users have reported improvement in Mouse Response after disabling Improve Inking and Typing option.
1. Go to Settings > Privacy & Security > Diagnostic & feedback.
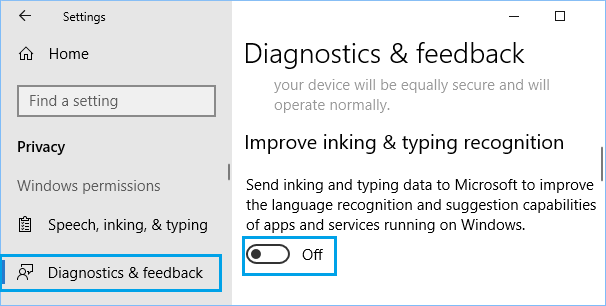
2. On the next screen, switch OFF Improve inking & typing option.

Windows 10: Go to Settings > Privacy > Diagnostic & feedback > disable Improve inking & typing recognition option.
8. Disable Scroll Inactive Windows Option
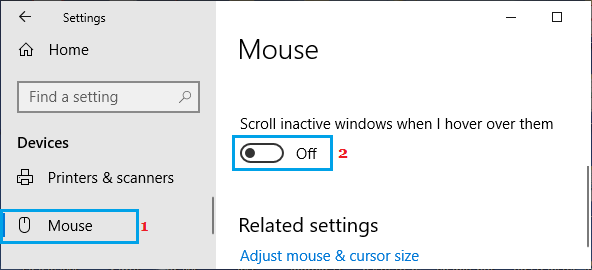
Preventing Inactive windows from scrolling when mouse is hoovered over them can help in improving the speed of mouse.
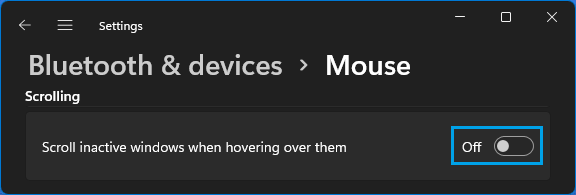
1. Go to Settings > Bluetooth & Devices > Mouse.
2. On the next screen, disable Scroll Inactive Windows option.
Windows 10: Go to Settings > Devices > Mouse > Disable Scroll Inactive Windows option.
9. Disable Fast Startup
While the Fast Startup feature is helpful on HDD drives, it is known to cause problems with both wired and wireless Mouse.
Hence, disable Fast Startup using steps as provided in this guide: How to Disable Fast Startup in Windows 10.
After disabling Fast Startup, Restart the computer and see if this helps in improving the performance of Mouse.
10. Prevent Computer from Turning OFF Mouse
1. Right-click on the Start button and click on Device Manager.
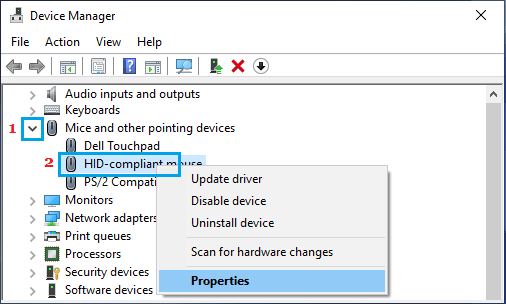
2. On the Device Manager screen, expand Mice and other pointing devices entry > right-click on HID-complaint mouse and select Properties.
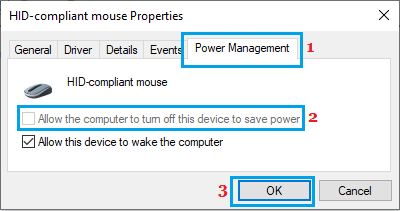
3. On the next screen, switch to Power Management tab and uncheck Allow the computer to turn off this device to save power option.
11. Check for Updates
The reason for mouse running slower or getting stuck could be due an update waiting to installed on your computer.
1. Go to Settings > Update & Security.
2. Select Windows Update in the left pane and click on Check For Updates button in the right-pane.
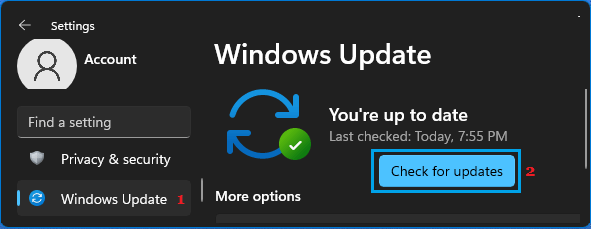
Allow Windows to check for updates and follow the instructions to download and Install Updates (If updates are available).
12. Is the Mouse Defective?
Plug in another Wired or Wireless Mouse into the computer and check its performance. If the new mouse works perfectly fine, it points to the possibility of your mouse being defective.
Now, plug the Defective Mouse into another computer (PC, Mac or Chromebook).
If the Mouse is still not working properly, it confirms that the Mouse is defective. If you recently bought the mouse, return or exchange it as soon as possible.