All that is required to take screenshot of the entire screen on a Windows computer with a dedicated Print Screen key is to press and hold down the Windows Logo (Win) and hit the Print Screen key. If the Print Screen key shares functions with another key (F10 or another key), you can take screenshot by using Fn + Print Screen keys.
On most Laptop and Desktop computer, the Print Screen key is located at far right-corner of the keyboard (near F12 Key) and it is usually labeled as PrtScr, PrntScr or as PrntScrn.
Take Screenshot in Windows 11/10
While you can take screenshots on a Windows computer by using Snipping Tool, the easiest way to take screenshot of the entire screen and also specific portions of the screen is by using Windows Logo + Print Screen key.
You can also find below the steps to take screenshots using Game Bar, while playing Games on your Windows 11/10 computer.
1. Take Screenshot of Entire Screen
On most computers, you should be able to capture the entire screen of the computer in a screenshot by pressing the Print Scr key, while holding down the Windows (Win) key .
1. Press/Hold the Windows Logo key and then press the Print Scr key located at top-right corner of the keyboard.
Note: On certain computers, you may have to hold down the Function (FN) key and press the Print Scr key,
2. If you pressed the right key combination, you should see the screen of your computer dimming and you will also hear the shutter sound, confirming that the entire screen has been captured in a screenshot.
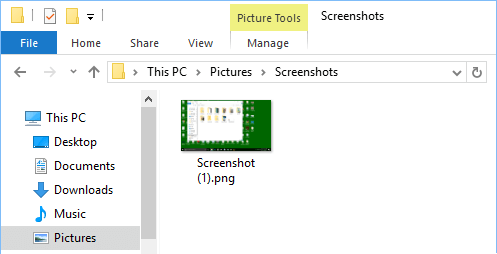
3. After the screenshot is taken, you can go to This PC > Pictures > Screenshots Folder and you will find the screenshot.
2. Save Screenshot to Clipboard
If you are not good at remembering keyboard shortcuts, simply press the Print Screen key on the keyboard of your Laptop and the entire screen will be copied to the Clipboard.
1. Open the webpage or Image that you want to copy in a screenshot and press the Prnt Scr key. This will take a screenshot of the entire screen and save it to the Clipboard.
2. Once the screenshot is saved to Clipboard, it can be pasted to Paint, Word, Excel and other Apps.
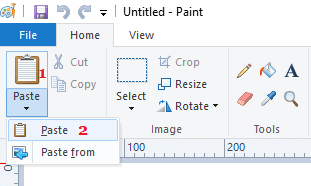
3. Open the Paint App on your computer > click on Paste icon and select the Paste option in the menu that appears.
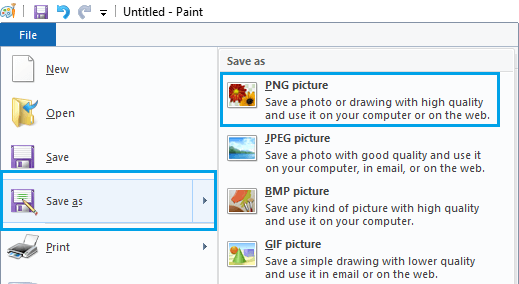
4. After the screenshot is pasted, click on File > Save As > PNG or JPEG to save the File.
5. On the next screen, select Desktop or any other location, where you want to save the screenshot.
3. Take Screenshot of Specific Part of the Screen
1. Press Windows + Shift + S keys on the keyboard of your computer. This will make the screen grayed out and the Mouse cursor will change into a Cross-hair pattern.
2. Press the Left key on the Mouse and select the part of screen that you want to capture in the screenshot. Once, the Area is selected, release the Mouse Key and this will copy the screenshot to clipboard.
3. Next, open Paint and Paste the screen shot by pressing Ctrl + V or by clicking on the Paste Icon > Paste option.
Once the screenshot is pasted in Paint, it can be edited as required and saved to any location on the computer.
4. Take Screenshot of Active Screen While Using Dual Monitors
If your computer is connected to dual monitors, using Prnt Scr or Win + Prnt Scr keyboard combination captures screenshots of both screens attached to the computer.
In such cases, you can capture screenshot of the active screen by using Alt+Prnt Scr key combination. However, in this case, the screenshot will only be copied to Clipboard and not saved to Screenshots Folder.
To save the screenshot, you need to Paste the Screenshot to Paint, which allows you to save the File in PNG, JPEG and other formats.
Note: On some computers, you may need to press Alt + Fn + Prnt Scr keys, in order to capture a screenshot of the active screen. Check your Laptop or computers manual for the right keyboard shortcut.
5. Take Screenshot Using Snipping Tool
Windows computers come with a built-in Snipping Tool utility that can be used to take screenshot of the entire screen and also screenshot of selected or specific area of the screen.
1. Open the Snipping Tool on your computer and click on the New option.
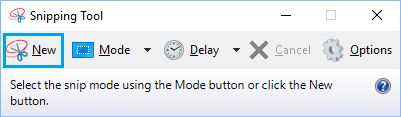
2. Once you click on New, you will find the screen of the computer becoming faded and you will see the mouse cursor turning into a cross-hair pattern.
3. Press/Hold the Mouse key and drag the cursor around the specific area that you want to capture in a screenshot. Once the desired area is selected, release the Mouse Key and the screen shot will be copied to clipboard.
4. Next, click on the File tab and select Save As option in the drop-down menu.
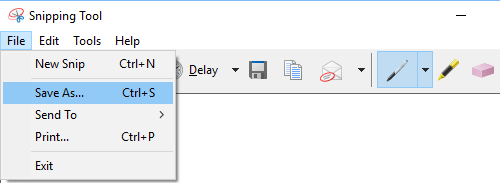
5. On the next screen, select Desktop or any other location, where you want to save the screenshot.
6. Take Screenshots During Game Play
If Game Mode is enabled on your computer, you can take screenshots while playing Games on the computer using Xbox app.
The Gaming Mode in Windows 11/10 allows you to capture screenshots and even record Game Play Footage while playing Video Games on the computer.
1. Click on Start button > Settings Icon.
2. From the Settings screen, go to Gaming > Captures > Enable Allow your controller to open Game Bar option.
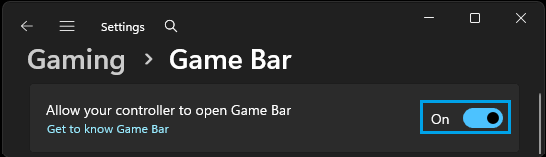
Window 10: Go to Settings > Gaming > Game Bar > Enable Game Bar for recrding game clips option.
After this you will be able to take Screenshots while playing games using the Xbox app on your computer.
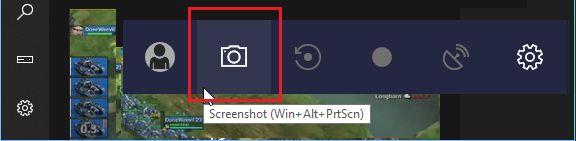
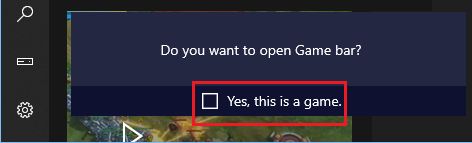
3. While playing a Game, you can take a screenshot by pressing Windows + G keys to bring up the Game Bar and take screenshots during Game Play by clicking on the Camera icon or by using Windows + Alt + Prnt Scr keys.
Note: The keyboard shortcut will only work if you have previously checked the “Yes, this is a game” option
4. Once you take a screenshot, you will see “Screenshot Saved” notification, letting you know that the screenshot has been saved on your computer.
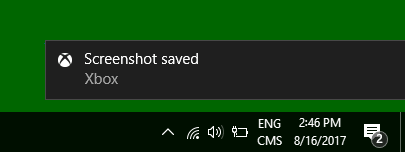
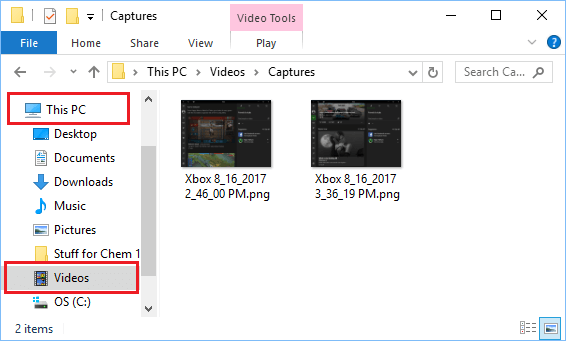
5. You can see the saved screenshot by navigating to This PC > Videos > Captures folder on your computer.