If you are running the 32-bit version Windows on your computer, you are eligible for upgrade to 64-bit version of Windows using your existing Windows 10 License.
While you won’t be getting any additional feature by upgrading from 32-bit to 64 bit Windows, you should certainly notice a difference in the overall performance of your computer.
The 64-bit version of Windows can handle up to 2TB of RAM, which allows it to run several apps at the same time. In comparison, the 32-bit version can only handle up to 3.75 GB RAM and it prevents you from running 64-bit gaming apps.
Upgrade From 32-bit to 64-bit Windows 10
Before going ahead with the steps to upgrade from 32-bit to 64-bit Windows 10, you need to make sure that the processor on your computer is capable of supporting 64-bit programs.
1. Open Settings and click on the System tab.
2. On the next screen, click on About in the left pane. In the right-pane, scroll down to “Device Specifications” section and check the entry next to System Type.
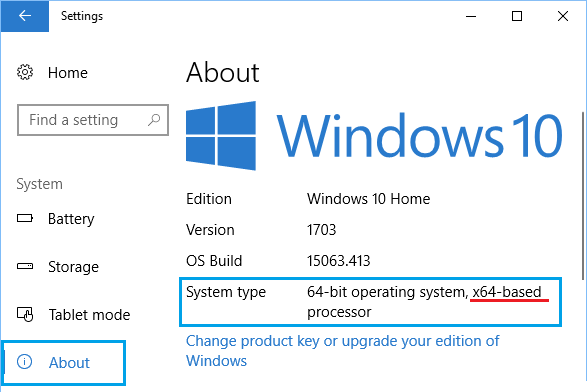
3. Your device is compatible with 64-bit programs if the entry next to “System Type” reads X64-based processor.
If it says x86-based processor, your computer is not suitable for upgrading to 64-bit Windows operating system.
4. Next, check Installed RAM entry to make sure that your computer has enough RAM to run 64-bit programs.
Although, the minimum requirement for upgrading to 64-bit version is 2 GB RAM, 64-bit Windows 10 is more suitable if your computer has a high RAM capacity (over 6 GB).
Verify Driver Compatibility
If your computer is only a few years old, it should already have the required 64-bit drivers. However, it still a good idea to make sure that the drivers for the Graphics and Sound cards on your computer are compatible with 64-bit version.
You can do this by visiting the device manufacturers website to see if you can find 64-bit version drivers.
Steps to Upgrade from 32-bit to 64-bit Version Windows 10
The only way to get 64-bit version of Windows 10 running on your computer is by performing a clean Install of Windows 10.
This means, you need to reformat your hard disk, install the 64-bit version and reinstall back all the programs and files that you had on your computer.
Hence, the process to upgrade from 32-bit to 64-bit Windows 10 can be divided into the following 4 steps.
- Make a Backup of Files on your computer
- Create Windows 10 USB Installation Drive
- Install 64-bit Windows 10 on your computer using Windows 10 USB Installation Drive.
- Install Updates on your computer
1. Backup Files on Your Computer
The clean installation of 64-bit Windows 10 is going to wipe out all the files and programs located on the hard disk of your computer.
Hence, it is important that you make a backup of your computer to an external drive using steps as provided in this guide – How to Backup Windows 10 Computer
2. Create Windows 10 USB Installation Drive
First make sure that you have an empty USB Drive of 8 GB capacity and follow the steps below to Create Windows 10 USB Installation Drive.
1. Connect the USB Drive (8 GB) to the USB Port of your computer.
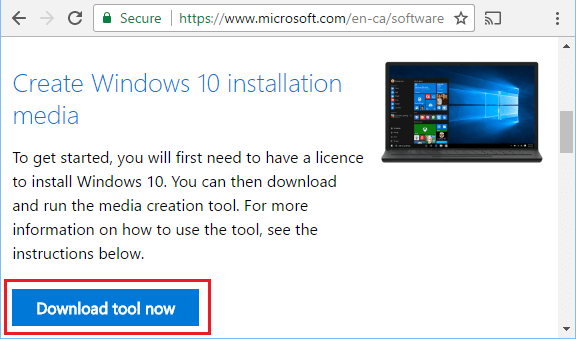
2. Next, download Windows 10 Media Creation Tool to your computer from Microsoft’s Website.
3. Once MediaCreationTool.exe File is downloaded to your computer, right-click on the File and select Run As Administrator option in the contextual menu.
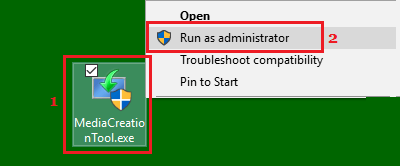
Note: you can just double-click on the File in case you are already signed into Admin Account.
4. When prompted, enter your Admin Password.
5. On the next screen, select Create Installation Media for another PC and click on Next.

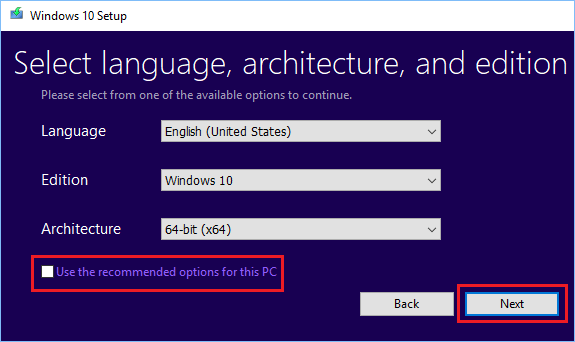
6. On the next screen, uncheck Use Recommended Options for this PC, select Language, Edition of Windows 10 and the Architecture of your computer and click on Next.
7. On the next screen, choose USB Flash Drive as the download destination for Media Creation Tool and click on Next.
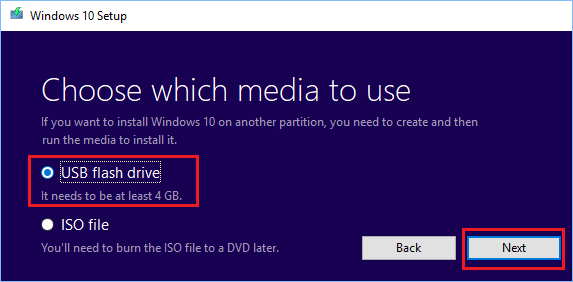
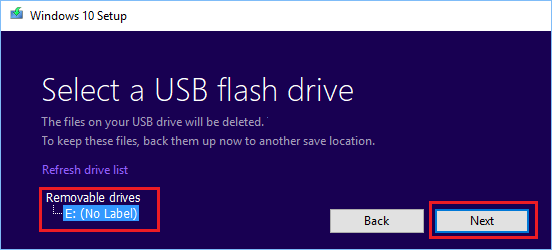
8. Next, select the Removable Drive where you want to download the Media Creation Tool and click on Next.
Wait for Windows 10 Installation Drive to be created and close the Media Creation Tool once the process has been completed.
3. Install 64-bit Version of Windows 10 on the Computer
The final step is to install the 64-bit version of Windows 10 on your computer using Windows 10 USB Installation Drive that we just created.
First make sure that your computer is not connected to any external drives and follow the steps below to Install 64-bit version Windows 10 on your computer.
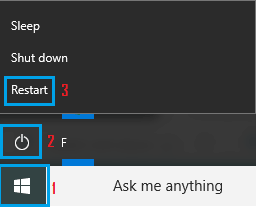
1. Insert the Windows 10 USB Installation Drive into the USB port of your computer and Restart your computer.
2. Your Computer should start with Windows Logo (See image below).

Note: In case your Computer does not start with Windows Logo, you will have to change the boot sequence on your computer, in order to make it boot from USB Drive.
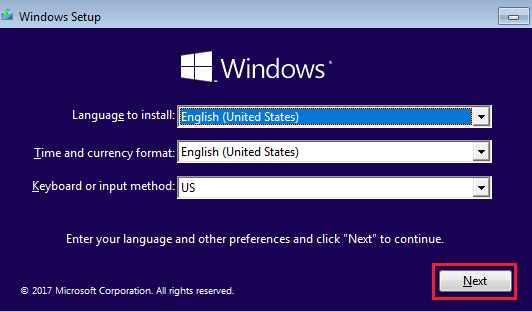
3. On the Windows Setup screen, select Language, Time & CurrencyFormat, Keyboard Layout and click on Next.
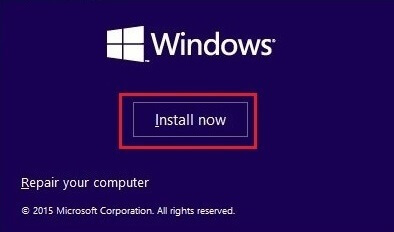
4. On the next screen, Click on Install now option (See image below).
5. Skip the option, in case you are prompted to enter your Windows Product Key.
6. Accept Licensing Agreement and click on Next.
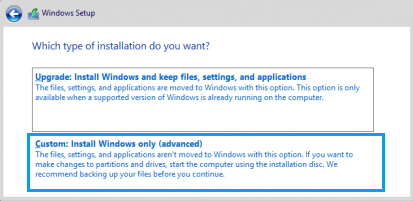
7. On the next screen, click on Custom: Install Windows only (advanced) option.
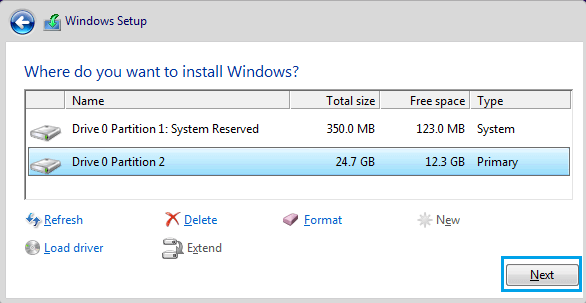
8. On the next screen, select the Drive where you want to install 64-bit version Windows 10 and click on Next.
9. Follow the next set of on-screen directions to complete the installation of 64-bit Windows 10 on your computer.
4. Install Updates on your computer
After the installation of Windows 10 is completed, make sure that you manually download the updates and drivers for your computer by following the steps below.
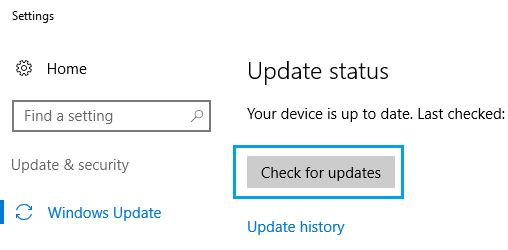
1. Go to Settings > Update & Security.
2. On the next screen, select Windows Update in the left-pane and click on Check for Updates button in the right-pane.
3. Wait for Windows to Check For available Updates and Drivers.
If some of the drivers are not available through Windows Update, take a look at the website of the manufacturer of your computer to download and install available 64-bit drivers to your computer.