Apple’s iCloud Photos service is tightly integrated with the native Photos App on all Apple devices, which makes it really easy to upload photos to iCloud from iPhone, iPad and Mac.
However, you need to be aware that the limited storage space (5 GB) as availbale in your free iCloud Account is only good enough for Automated iCloud Backups and not capable of handling photo uploads.
Hence, if you are interested in storing your photos and videos on iCloud, you need to think in terms of upgrading to a paid iCloud Account, which is not really expensive (50 GB for $1.29/month).
1. Upload Photos to iCloud From iPhone
All that is required to upload Photos from iPhone to iCloud is to simply turn ON the option for iCloud Photos as available on your device.
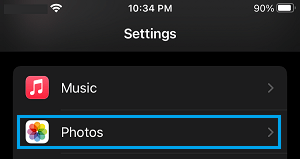
1. Open Settings > scroll down and tap on Photos.
2. On the Photos screen, move the toggle next to iCloud Photos to ON Position.
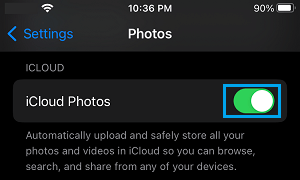
On the same screen, you can choose either to ‘Optimize iPhone Storage’ or ‘Download and Keep Originals’ to your iPhone.
Optimize iPhone Storage: Original Photos on iPhone will be replaced with compressed versions. A copy of original full resolution images will be available in iCloud.
Download and Keep Originals: Original full resolution images will be kept both on iCloud and also on the internal storage of your iPhone.
Once the option for iCloud Photos is turned ON, all the Photos that you shoot on your device will be automatically uploaded to your iCloud Account.
2. Upload Photos From Mac to iCloud Photos
Similarly, it is easy to Upload Photos from Mac to iCloud Photos.
1. Open the Photos app on your Mac.
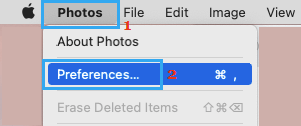
2. Click on Photos tab in top menu-bar and select Preferences… in the drop-down menu.
3. On the next screen, select the iCloud tab and check iCloud Photos option.
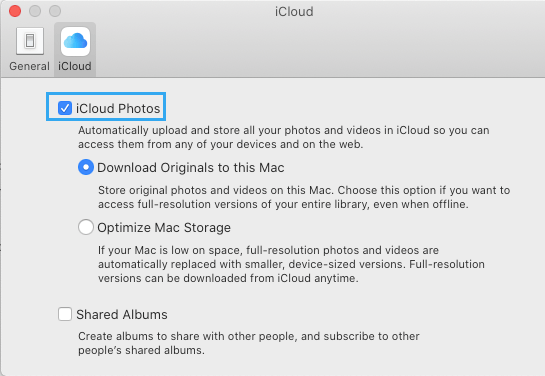
On the same screen, you can select from any of the following options.
Download Originals to Mac: This option keeps a copy of original Photos & Videos on Mac, in addition to those uploaded to iCloud.
Optimize Mac Storage: Saves storage space on Mac by replacing original full resolution Photos on Mac with compressed images. Original Photos will be available on iCloud.
iCloud Photo Sharing: Allows you to create a Shared Folder on iCloud to share photos with your family and friends.
Once iCloud Photos option is enabled on Mac, the Photos App will begin the process of uploading all the Photos on your Mac to iCloud Photos.
Advantages of iCloud Photos
The main advantage of iCloud Photos is that photos that you upload to iCloud get automatically synced across all your devices and they can be acessed from any device from anywhere in the world.
Also, storing photos on iCloud allows you to take as many photos as you want on your iPhone, without having to worry about the storage capacity of your device.
If your iPhone becomes full while shooting photos, you can simply delete Photos from your device and they will still be available in your iCloud account.