In case you are interested, it is possible make your iPhone use Google DNS to connect to internet, instead of using the DNS Servers of your Internet Service provider.
This can be helpful, if you are noticing the issue of the Wi-Fi network on your iPhone being slow at certain periods of the day, which usually happens due to DNS Server of the Internet Service providers being busy or becoming over-crowded.
Depending on the area where you are located, switching to Google’s free DNS service can result in significant improvements in network connectivity and the performance of the Safari browser on your iPhone.
Use Google DNS on iPhone and iPad
Before going ahead with the steps to switch the DNS servers on your iPhone to Google, you might be interested in knowing a bit more about using third-party DNS services on your iPhone.
1. DNS Servers can only be changed for the Wi-Fi Network on your iPhone and not for Cellular Network.
2. The change in DNS Server is Network specific, there is no Global option available on iPhone that can change DNS Servers for all the Wi-Fi Networks on your iPhone.
For example, if you use “Home Wi-Fi” network at Home and “Work Wi-Fi” network at your office, changing DNS Servers for “Home Wi-Fi” will have no impact on the “Work Wi-Fi” network.
3. Once you change the DNS Servers for a particular Wi-Fi Network, your iPhone will remember the settings and use the same DNS settings, every-time you connect to that particular network.
1. Steps to Change DNS Server on iPhone to Google
You can follow the steps below to change the DNS Server on your iPhone to Google.
1. Go to Settings > Wi-Fi > tap on the “i” icon located next to your Wi-Fi Network Name.
![]()
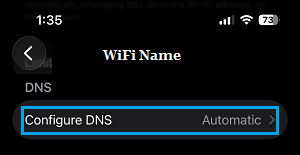
2. On the next screen, scroll down to DNS section and tap on Configure DNS option.
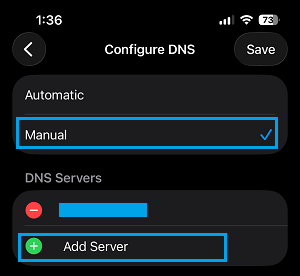
3. On the next screen, select the Manual option and tap on +Add Server.
4. Type 8.8.8.8 as the New DNS Server address and tap on Save.
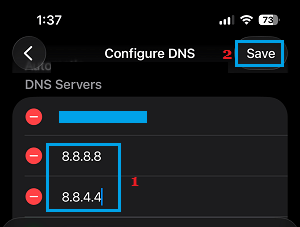
Similarly, add 8.8.4.4 as the second Google DNS Server on your iPhone.
5. After adding the address of Google’s DNS Servers, you can delete the DNS Servers of your service provider by tapping on the Red Minus icon.
6. Make sure that you tap on Save to save the changes made to the DNS Server Settings on your iPhone.
After switching to Google DNS, you should be able to notice an improvement in the browsing speed of your iPhone.