You are not alone, if the battery of your Laptop is draining quickly and not lasting as long as it should be. The issue of Fast Battery Drain on Windows Laptop computers has been reported by other users.
Based on our own experience, a common reason for Windows Laptops quickly losing their battery life is due to the default settings that computer come with.
Depending on the case, the reason for fast battery drain on your Laptop could be due to Background running apps, Fast Startup feature being enabled by default, your computer not going into sleep mode and other reasons.
Fix Fast Battery Drain in Windows Laptop
You can find below the steps to fix the problem of fast battery drain on your Windows 11/10 Laptop. After implementing these steps, you should find a considerable improvement in the Battery life of your computer.
1. Disable Background Running Apps
You can take a look at the list of background running apps that are draining the battery of your Windows 11 Laptop by following the steps below.
1. Go to Settings > System (left-pane) > click on Power & Battery card in the right-pane.

2. On the next screen, select Sort by Background option to take a look at the Apps that are running in the background on your laptop computer.
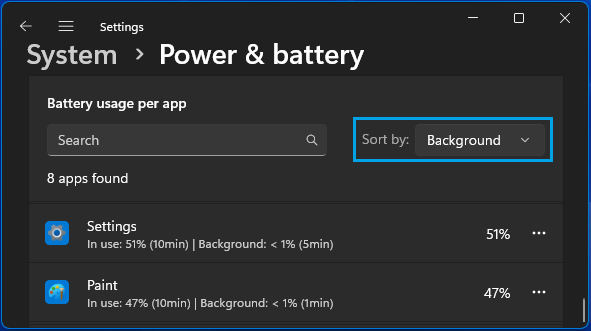
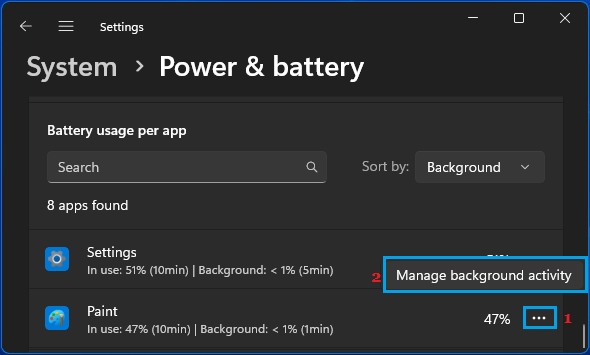
3. Now, click on 3-dots icon located next to the App that you want to stop from running in background and select Manage Background Activity option.
4. On the next screen, select the Never option to prevent this particular app from running in background on your computer.
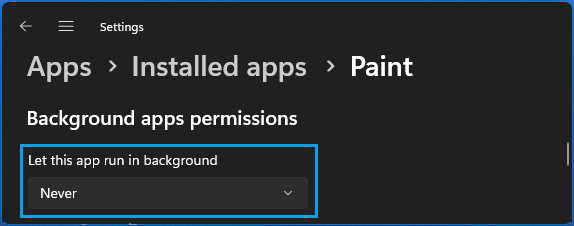
After this, this particular App won’t be able to use the Battery on your Laptop for background activities.
Note: You can repeat the above steps for other Apps that are consuming a high amount of Battery.
2. Disable Fast Startup
Disabling the Fast startup feature can help in extending the battery life of your Windows 11/10 Laptops.
1. Right-click on the Start button and click on Run.
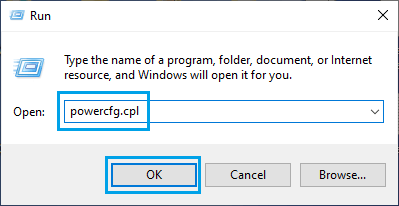
2. In Run Command window, type powercfg.cpl and click on OK.
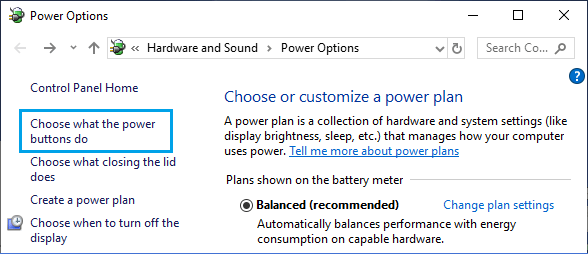
3. On Power options screen, click on Choose What the Power Buttons Do link.
4. On the next screen, scroll down to “Shutdown Settings” and uncheck Turn on fast startup option.
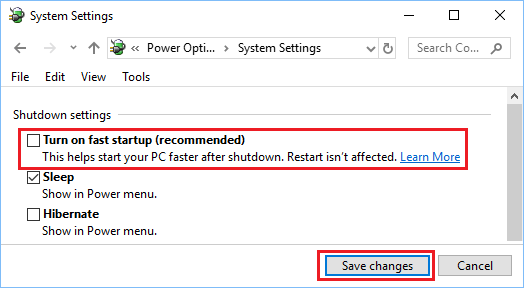
5. Click on the Save Changes button.
3. Make Sure the Laptop Goes to Sleep When Lid is Closed
Another reason for the loss of battery life in both Windows 11 and Windows 10 laptops is due to the computer not going into sleep mode, when its Lid is closed.
1. Right-click on the Start button and click on Run.
2. In Run Command window, type powercfg.cpl and click on OK.

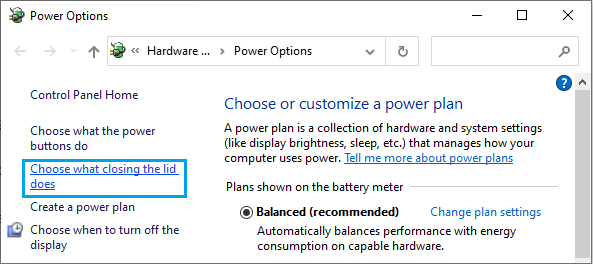
3. On Power options screen, click on Choose What Closing the lid does link in the left-pane.
4. On the next screen, set ‘When I Close the lid‘ setting under ‘Battery’ & ‘Plugged in” to Sleep or Shut Down.
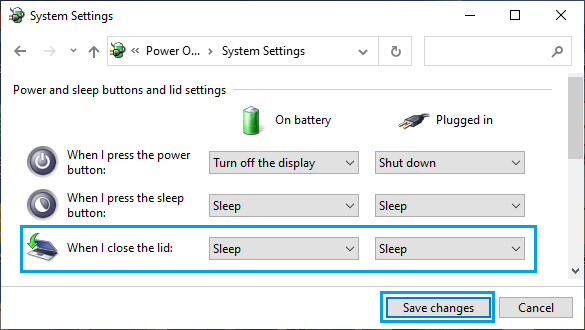
5. Click on Save Changes to save this setting on your computer.
After this, you should no longer find the Laptop Battery draining faster when its Lid is closed in Sleep Mode.
4. Play Videos At Low Resolution While Using Battery
If you watch a lot of videos, you can extend the battery life of your laptop by setting your device to play videos at lower resolution, when
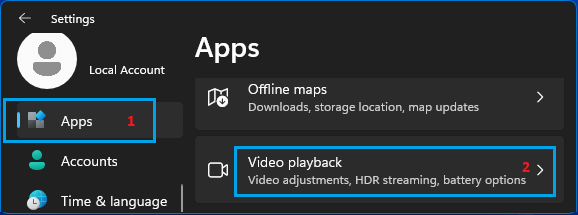
1. Go to Settings > Apps (left-pane). In the right-pane, scroll down and click on Video playback.
2. From the drop-down menu, select Optimize for battery life option.
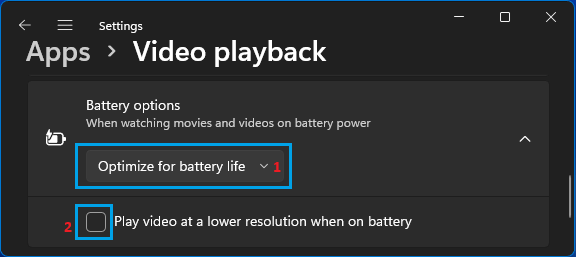
You can also select the checkbox next to Play video at a lower resolution on battery option to make the battery last even more longer.
5. Check Battery Health
If you are still not happy with the Battery life of your Laptop, the problem might be due to poor health of the battery installed on your Laptop.
You can confirm this by generating a Battery Health Report on your computer checking the current health status of the battery installed your Laptop.
1. Type PowerShell in the Search bar > right-click on Windows PowerShell in the search results and select Run as Administrator option.

2. On the PowerShell screen, type powercfg / batteryreport and press the Enter Key on the keyboard of your laptop.

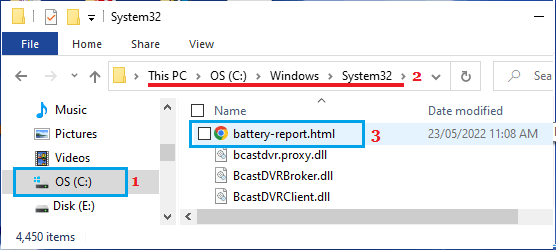
3. Once Laptop Battery Health report is generated, open File Explorer and go to C:\Windows\System32\battery-report.html to view the Battery Report for your Laptop.
4. The Battery Report will provide information about the the Designed and Full charge capacity of the Battery installed on your Laptop.
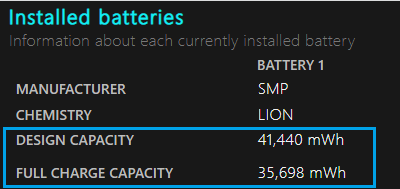
If you see a big difference between Designed & Full Charge capacity, it is time to replace the battery installed on your Laptop.