The default setting on a Windows computer is to come up with “Windows Has Stopped This Device Code 43” error message, whenever a software or hardware related problem is detected on any device installed on the computer.
As you can imagine, this default setting in Windows is designed to prevent the computer from suffering hardware or software related damage due to a faulty device.
Fix for “Windows Has Stopped This Device Code 43” Error
In most cases, the reason of Code 43 error on a Windows computer is usually due to the device driver failing to load, crashing or the driver software becoming outdated or corrupted.
Hence, in many cases the problem can be fixed by taking a look at the Device Manager screen and updating any device that appears faulty or shows up as an unknown device.
1. Restart the Computer
The Code 43 Error on your computer might be due to temporary glitch. This can be fixed in most cases by powering off the computer and restarting it back again.
1. Shut-Down the computer.
2. Wait for your device to completely power-off.
3. Wait for 60 seconds > Restart the computer.
After the computer restarts, you might be pleasantly surprised to find the problem fixed.
2. Unplug the Device & Reconnect
If external devices are connected to the computer, disconnecting and reconnecting them back can help in fixing the problem.
1. Remove All External Devices from the computer (Except Mouse & Keyboard).
2. Wait for 30 seconds > Reconnect the Devices one-by-one.
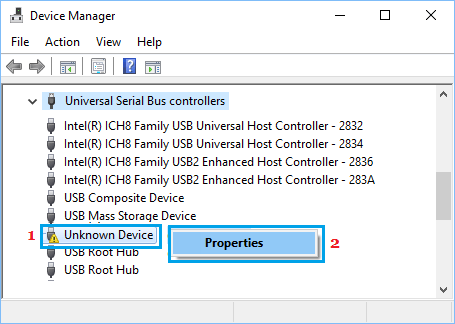
3. Check Device Manager
Follow the steps below to open the Device Manager on your computer and see if any device needs attention.
1. Right-Click on Start button and click on Device Manager.
2. On Device Manager Screen, right-click on the Faulty or Unknown device and click on Properties.
3. On the next screen, go to the Driver tab and click on Update Driver button.
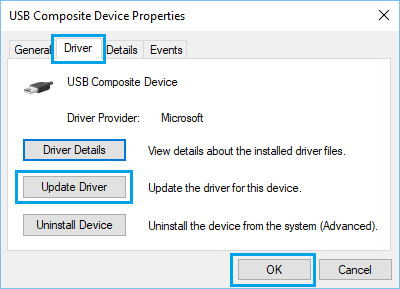
4. On the next screen, click on Search Automatically for updated driver software option and wait for Windows to search and install the driver software.
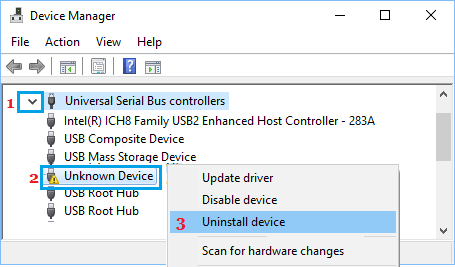
4. Uninstall & Reinstall Device Drivers
If the above step did not help, uninstalling and reinstalling back the drivers might help in fixing the problem.
1. Open Device Manager > right-click on the Faulty Device and click on Uninstall Device option.
2. After this, right-click on the Action tab and click on Scan for hardware changes.
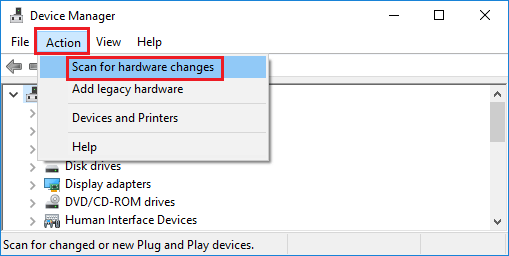
3. Also Restart the computer and this will make Windows install the required drivers.
5. Install Updates
Make sure that your computer is up-to-date with the latest available updates.
1. Go to Settings > Windows Update > In the right-pane, click on Check For Updates button.
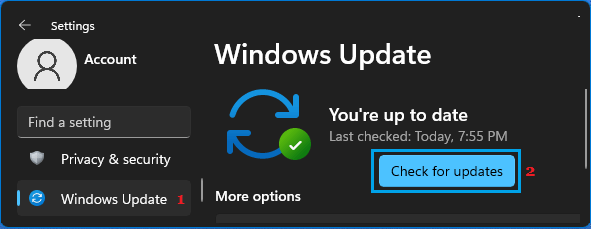
2. Wait for Windows to check for updates > click on Download/Install option (if an update is available).
If Updates are available, the latest available device drivers will also be installed on the computer.
6. Prevent Windows from Turning OFF The Device
In the case of USB connected devices, the problem might be due to power supply to USB port being switched OFF by the computer.
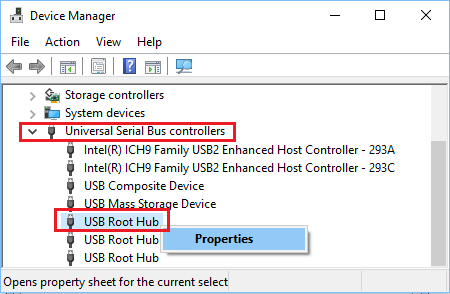
1. Open Device Manager > Right-click on USB Root Hub and click on Properties.
2. On USB Root Properties screen, go to Power Management tab and uncheck Allow the computer to turn off this device to save power option.
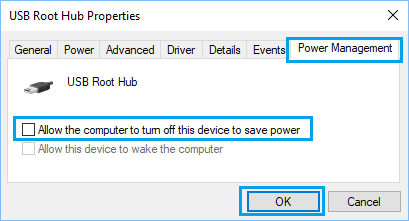
3. Click on OK to save this change on your computer.
Repeat the above steps for other USB Root Hubs (If any) and Restart the computer.