The AirDrop feature on Mac works almost flawlessly and allows you to wirelessly transfer Files, Photos and Videos from Mac to any supported Apple Device.
However, many users still run into a variety of problems while trying to use AirDrop on Mac, especially when they are trying to use AirDrop for the first time.
Even if you had previously used AirDrop on Mac, it can stop working due to Network related problems, iCloud glitches and other issues.
AirDrop Not Working on Mac
If you are unable to send or receive files using AirDrop, you can find below the steps to fix the problem of AirDrop Not Working on Mac.
1. Check Device Compatibility
In order to use AirDrop, both sending and receiving devices need to be 2012 or later versions of Mac, running OS X Yosemite or later version of macOS.
Also, the device to which you are trying to transfer files using AirDrop must be an AirDrop compatible device.
If you are trying to AirDrop from Mac to iPhone, the receiving device (iPhone) needs to be an iPhone 5 or later version, running iOS 7 or later versions of iOS software.
If you are trying to AirDrop from Mac to iPad or iPod, the iPad must be iPad 4 or later and iPod needs to be 5th generation or newer.
2. Make Sure WiFi and Bluetooth are Turned ON
AirDrop uses Bluetooth to locate nearby devices and WiFi to transfer Data between two Apple devices. Hence, make sure that WiFi and Bluetooth are enabled on both sending and receiving devices.
1. Open the Finder on your Mac.
2. Click on AirDrop tab in left-pane. In the right-pane, click on Turn ON Wi-Fi and Bluetooth button.
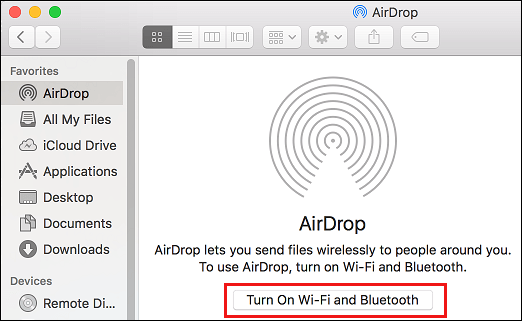
Make sure both Wi-Fi and Bluetooth are enabled on your device.
3. Allow AirDrop from Everyone
AirDrop provides the option to Share Data with “Contacts only” and with “Everyone”. However, selecting “Contacts only” option can sometimes lead to problems.
1. Open the Finder on your Mac.
2. Click on AirDrop tab in the left-pane. In the right-pane, click on Allow me to be discovered by and select Everyone in the drop-down menu.
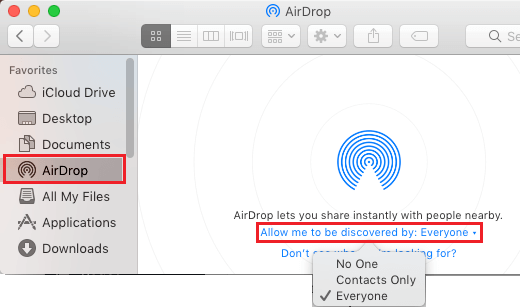
If you are having problems sending Files via AirDrop, make sure Allow Everyone option is enabled on the device that you are transferring files to.
4. Sign into iCloud on Both Devices
If you want to use “Contacts Only” Mode in AirDrop, you need to make sure that both sending and receiving device are signed into iCloud.
Also, the Email ID or Telephone Number associated with iCloud Accounts must be available in the Contacts List on both devices.
5. Turn OFF Do Not Disturb Mode
AirDrop does not work if Do Not Disturb Mode is enabled on your device. Hence, make sure that your device is not in DND Mode.
1. Click on the Notifications Icon located at top-right corner of the screen and move the Do Not Disturb Slider to OFF position.
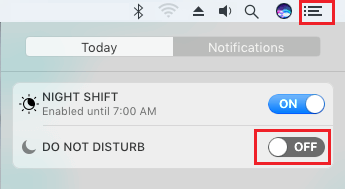
2. Similarly, make sure that the device to which you are transferring files is not placed in Do Not Disturb Mode.
6. Check Firewall Settings
Sometimes, the problem is due to Incoming Communications being blocked in the Firewall Settings on your device.
1. Click on the Apple Icon in top-menu bar and select System Preferences in the drop-down menu.

2. On the System Preferences screen, click on Security & Privacy Icon. on the next screen, switch to Firewall tab and click on Firewall Options button.
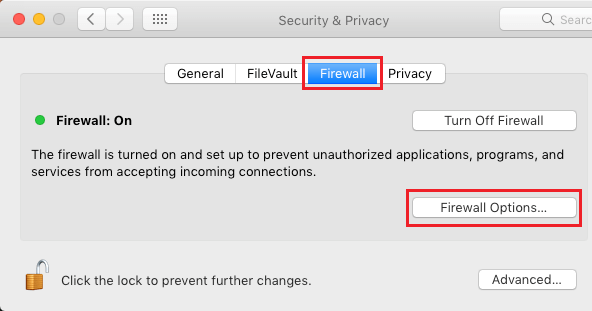
3. On the next screen, uncheck the little box next to Block all incoming connections.
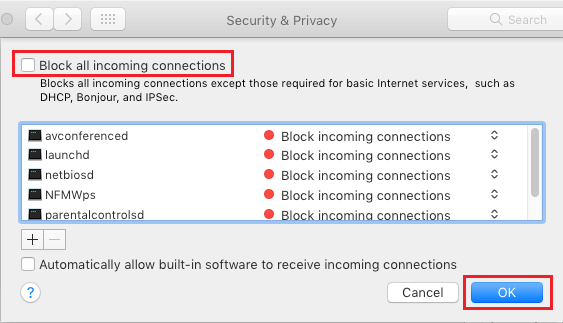
4. Click on OK to save this setting
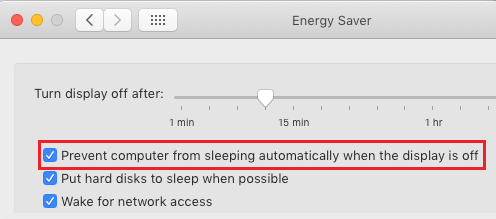
7. Prevent Mac from Going to Sleep
AirDrop can fail if your Mac goes to sleep during the file transfer process. Hence, follow the steps below to prevent Mac from going to sleep, when the display is OFF.
1. Click on Apple Logo in the top-menu bar and select System Preferences in the drop-down menu.
2. On the System Preferences screen, click on Energy Saver Icon.
3. On the next screen, select Prevent computer from sleeping automatically… option on the next screen.
8. AirDrop Option Not Available on Mac
In certain cases, you may not be able to enable AirDrop due to the AirDrop option not working, being greyed out or not being available on your Mac.
For more information and the steps to fix this problem, you can refer to this guide: AirDrop Icon Greyed Out on iPhone and Missing on Mac.