Current generation of computers come with Face Detection and Biometrics built-in to Windows Hello login & Photos App. If you do not want to use this feature, it is possible to Disable Face Detection & Biometrics, both in Windows Hello and the Photos App.
The purpose of incorporating Face Recognition technology and Biometric sensing in Windows is to allow users to login to the computer using Face ID, Fingerprint and Iris scanning.
In the case of Photos App, Face Detection technology is used to identify people appearing in Photos stored on the computer and put them together in groups for your convenience.
According to Microsoft, the process of Face Detection in Photos App happens right on your device and all the Face Detection Data can be erased by disabling the “People” setting in Photos App (see below).
Disable Face Detection in Windows 11/10
If you do not want to login to computer using Face ID or Finger Print scanning, you can find below the steps to Disable Face Detection in Photos App and also in Windows Hello.
You can also find below the steps to disable Face Detection, Fingerprint and Iris scanning by using Device Manager and Registry Editor.
1. Disable Face Detection in Photos App
If you do not want the photos App to use Face Detection to recognize people, you can disable this feature by going to Photos App Settings on your computer.
1. Open the Photos App on your computer.
2. Click on 3 Dots Menu icon and select Settings in the drop-down menu.

3. On the Settings screen, scroll down to “Viewing and Editing” section and move the People setting to Off position.
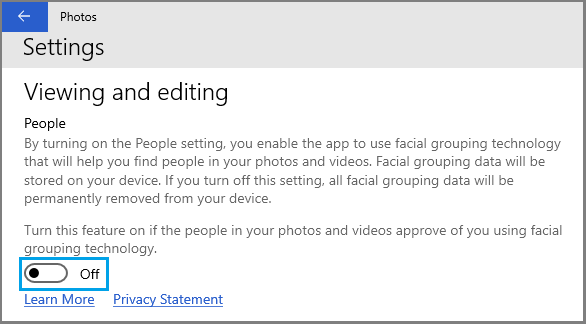
After this, you will no longer find the Photos App using Face Detection to identify and group people in Photos.
If you happen to change your mind, you can Enable Face Detection and Recognition back on your device by moving the People toggle to ON position.
2. Disable Face Recognition in Windows Hello Login
Windows Hello provides the option to login using Face ID. If you do not want to use Face ID, you can disable this feature by going to the Sign-in Options page.
1. Go to Settings > Accounts > click on Sign-in options in the right-pane.

2. On the next screen, expand Facial Recognition (Windows Hallo) tab and select the Remove option.

Next, click on Fingerprint Recognition (Windows Hallo) tab and click on the Remove option.
Windows 10: Go to Settings > Accounts > Sign-in options > Select Face Recognition in the right-pane and click on Remove.

3. Disable Biometric Devices Using Device Manager
You can disable the use of Biometric Devices on your computer by using Device Manager.
1. Right-click on the Taskbar and select Device Manager.
2. On Device Manager screen, right-click on Biometric Devices and select the Disable option.
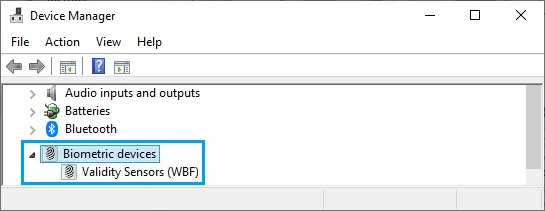
After this all Biometric scanning options should be disabled on your computer.
4. Disable Biometrics Using Registry Editor
Another way to totally disable Face Detection, Fingerprint and Iris scanning on a Window computer is by using Registry Editor.
1. Open Run Command (Press Windows + R keys).
2. Type regedit and click on OK or press the Enter key.

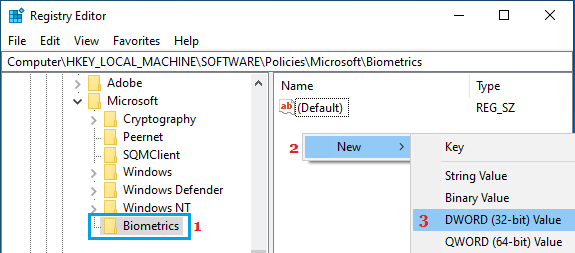
3. On the Registry Editor screen, navigate to HKEY_LOCAL_MACHINE\SOFTWARE\Policies\Microsoft\Biometrics. If Biometrics key is not available, right-click in the left-pane, select New > Key and name the New Key as Biometrics.

4. Select the newly created Biometrics Key > In the right-pane, right-click and select New >DWORD 32-bit value and name the new DEWORD as “Enabled”.
5. Double-click on the newly created Enabled DWORD and make sure its Data Value is 0.
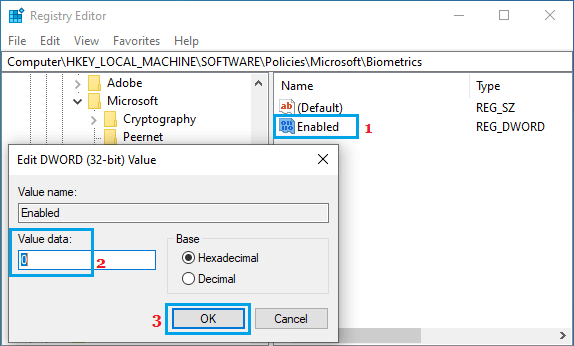
This will disable all kinds of Biometric sensing on your computer including Face Detection, Fingerprint and Iris scan.