Since, Apple devices are closely integrated with iCloud, it is easy to setup automated backups of your Mac to iCloud and also to manually backup your device to iCloud.
As you must be aware, Apple provides all its devices users with 5 GB free iCloud Storage, which should be good enough to Backup Contacts, Notes, Reminders and Calendars to iCloud.
However, you do need to go for a paid iCloud Account, if you are thinking in terms of backing up Photos, Documents and other types of Data to iCloud.
The good news is that Apple’s paid iCloud service is not that expensive and it provides the flexibility to upgrade, downgrade and the option to go back to free plan at any time.
Backup MacBook to iCloud Automatically & Manually
All that is required to backup MacBook to iCloud is to login to your Apple ID Account and select the type of data that you want to backup to iCloud.
If you have a paid iCloud account, you can setup your MacBook to automatically Backup all its data, including the Photos and Documents Folder to iCloud.
1. Automatically Backup MacBook to iCloud
As mentioned above, you can setup your MacBook to automatically backup Photos, Contacts, Calendars, Notes, Reminders and also Desktop and Documents Folders to iCloud Drive.
The advantage of this method is that it allows you to select the type of data that you want to include or exclude from auto-backups to iCloud.
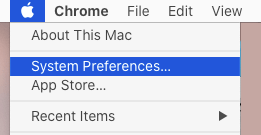
1. Click on Apple Logo in the top-menu bar and select System Settings in the drop-down menu.

2. On the system settings screen, click on Apple ID Icon.
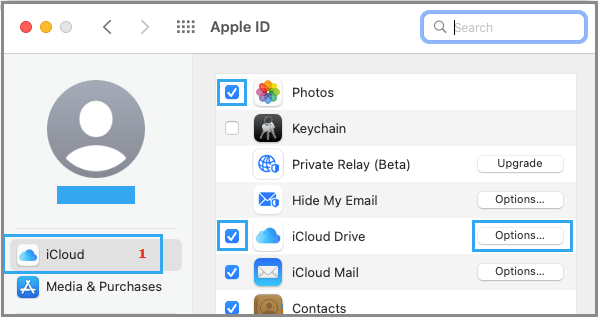
3. On the next screen, select iCloud in the left-pane. In the right-pane, select items that you want to backup to iCloud.

If you also want to Backup Desktop & Documents Folders to iCloud, check the little box next to “iCloud Drive” and click on Options button next to it.
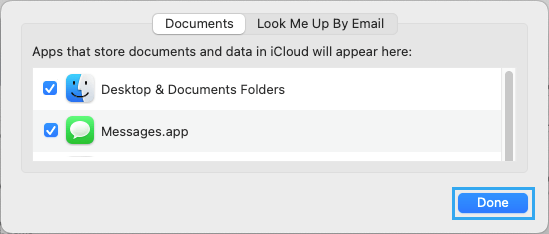
4. On the next screen, select Desktop & Documents Folders and click on Done.

This ensures that all Files located in Desktop and Documents Folders on your Mac are automatically saved to iCloud Drive.
2. Manually Backup MacBook to iCloud Drive
If you do not like the idea of automatically backing up MacBook to iCloud, you can make use of the Finder on your Mac to manually backup selected data to iCloud.
1. Open the Finder on your Mac.
2. On the Finder screen, select iCloud Drive in the left-pane. In the right-pane, select Files and Folders that you want to backup and drag them to iCloud Drive tab in the left-pane.

3. Patiently wait for files to be transferred from the desktop on your MacBook to iCloud Drive.
If your Mac has a low amount of storage space, you can select Optimize Mac Storage option, which results in certain data only being stored on iCloud, if your Mac does not have sufficient storage spaces.
However, if your MacBook has enough storage space, the data will be stored both on Mac and iCloud Drive.
How Much iCloud Storage is Required to Backup Mac?
If you are setting up a Time Machine Backup, Apple recommends having an external storage drive that is twice the size of the storage space available on your MacBook.
However, this should not be the case if you are thinking in terms backing up MacBook to iCloud. The reason for this is that you can precisely select the type of data that you want to backup to iCloud.
As mentioned above, your free iCloud Account with 5 GB storage should be sufficient to backup Contacts, Calendars, Notes and Reminders.
If you have the lowest 50 GB ($0.99/month) plan, you should be able to backup Photos, Desktop and Documents Folders to iCloud Drive.