When the built-in “Cast to Device” feature is not working on a Windows computer, it is known to come up with “contacting device” or “no device found” error message; which indicates that Windows is unable to communicate with the nearby cast-enabled devices.
The reason for Cast to Device feature not working on a Windows computer could be due to network discovery not being enabled, network type being set to public, Miracast-based Wireless Display not being installed on the computer, firewall interference, outdated drivers, stuck media sharing service or due to Miracast not being supported by hardware.
Cast to Device Not Working in Windows 11/10
If your computer is coming up with “Device not found” error message or getting stuck on “Contacting device” message; while you are trying to Cast Media to TV or another Display Device, you should be able to fix the problem using the following steps.
Related: How to Use Chromecast on Computer (Windows & Mac).
1. Enable Network Discovery
In order to use Cast to Device, both the Casting Device (computer) and Receiving device (say Home TV) need to be made visible or discoverable on the same network.
1. Press Windows + I keys.
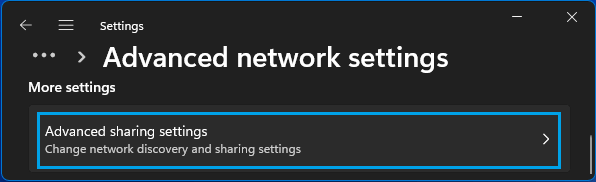
2. From Settings screen, go to Network & Internet > Advanced Network Settings > Advanced Sharing Settings.
3. On the Advanced Sharing Settings screen, expand Private Networks tab and enable Network Discovery by moving the toggle to ON position.
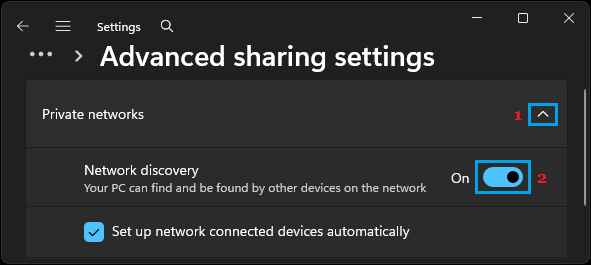
This will ensure that connected devices within your trusted/secure Home or Office network are discoverable by each other.
2. Install Wireless Display Feature
Another common reason for Cast to Device not working is due to the Miracast-based Wireless Display feature not yet been installed on the computer.
1. Open Settings (Win + I).
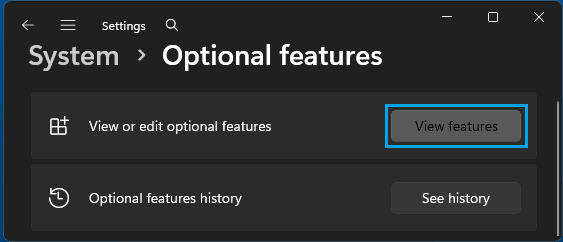
2. Go to System > Optional Features > click on View Features.
3. On “View Features” screen, click on See Available features > type Wireless Display in the Search box.
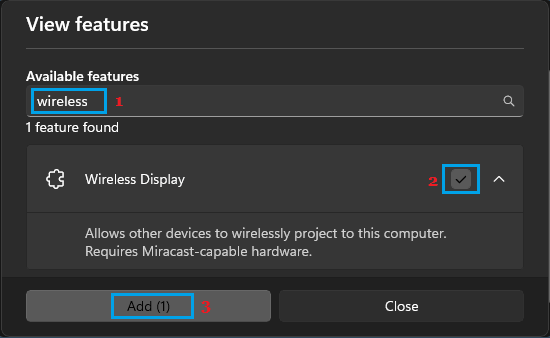
4. If Wireless Display appears > Select Wireless Display and click on the Add button and wait for the optional Wireless Display feature to be installed on your computer.
3. Clear Miracast Pairing Profiles
Clearing previously saved Cast profiles can help; if “Cast to Device” feature was previously working on the computer; but has now stopped working.
1. Open Command Prompt as Admin.
2. Type netsh wlan delete profile name=”DIRECT-*” and press the Enter key.
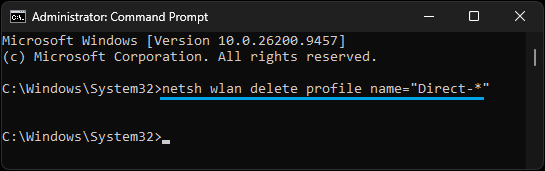
3. After the Command is executed, close the Command Prompt screen and Restart the computer.
This will remove the old Miracast pairing profiles; which might be blocking new connections.
4. Set Network Type to Private
If Cast to Device is not working after clearing old Miracast profiles, the problem could be due to your network (Wi-Fi or Ethernet) being set to Public; which tends to block local network discovery and enables additional Firewall restrictions.
1. Press Windows + I keys to open Settings.
2. On the Settings screen, select Network & Internet in the left-pane and check the indicated Network Type (Public or Private) for Wi-Fi (or Ethernet) under Properties in the right-pane.
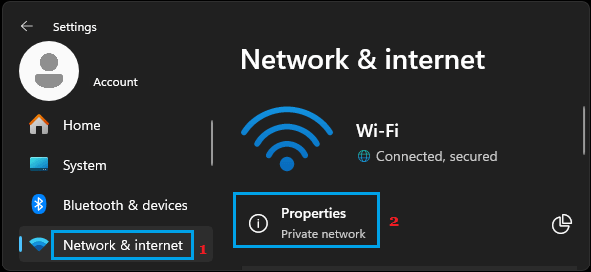
3. If the Network type is indicated as Public, click on the “i“ Icon; located next to Properties.
4. On the next screen, open the Properties tab and select Private Network.
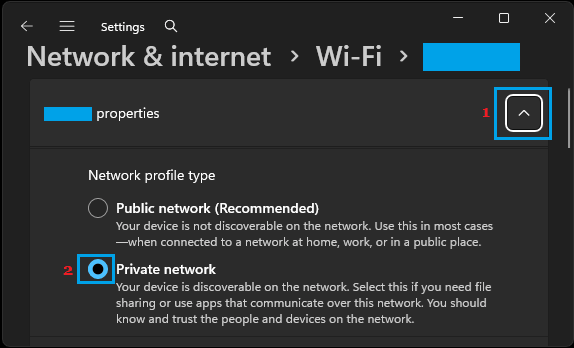
This will remove the restrictions placed by Windows on the Wireless Display feature on your computer.
5. Allow Cast to Device Functionality Through Windows Firewall
Make sure that “Cast to Device” functionality is not being blocked by the Firewall Settings on your computer.
1. Type Windows Defender in the Search bar > click on Windows Defender Firewall in the search results.
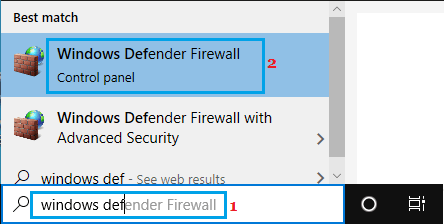
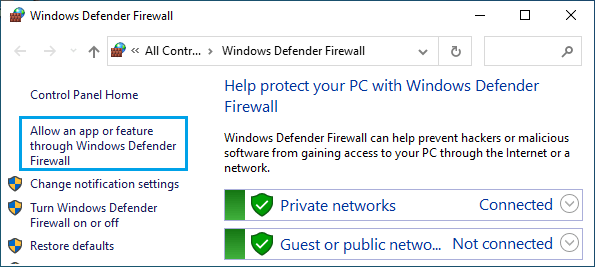
2. On Windows Defender Firewall settings screen, click on Allow an app or feature through Windows Defender Firewall option.
3. On the next screen, click on Change Settings button and make sure Cast to Device functionality enry is selected.
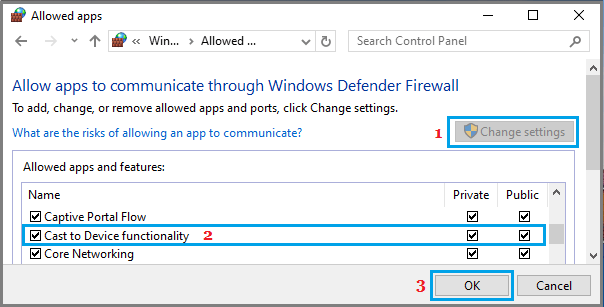
4. Click on OK to save this setting on your computer.
6. Restart Media Sharing Service
As mentioned above, the problem could be due to Media Sharing service being stuck or not working.
1. Right-click on the Start button and click on Run.
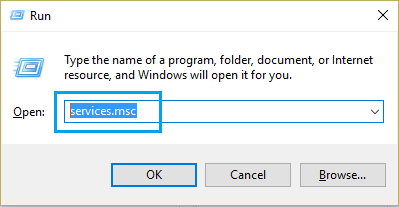
2. Type services.msc and click on OK.
3. On the services screen, right-click on Windows Media Player Network Sharing Service and select the Restart option.
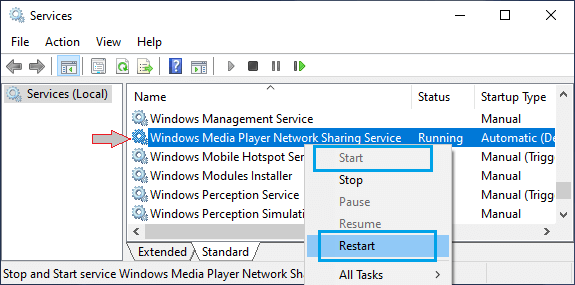
Note: If the Service is not running, click on the Start option.
4. After this, make sure the following related/dependent Services are running and set to either Automatic or Manual Start.
- DNS Client: Automatic
- SSDP Discovery: Manual
- UPnP Device Host: Manual
- Function Discovery Resource Publication: Manual
Note: You can change the Startup type by double-clicking on each of these services and selecting the required Startup type on the next screen.
7. Disable Bonjour Service
If you are using an iPhone or iPad, the problem could be due the iTunes-related Bonjour Service interfering with proper functioning of the “Cast to Device” feature.
1. Open the Services Screen on your computer (See steps 1 & 2 above).
2. On the Services screen, locate Bonjour Service and double-click on it.
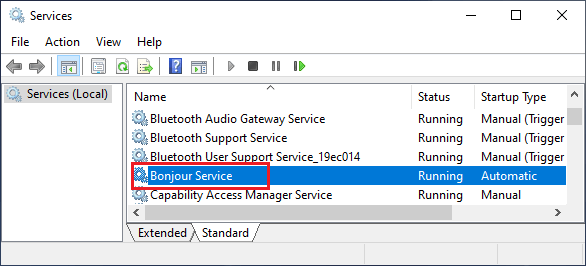
3. On the next screen, disable Bonjour Service by changing the Startup Type to Disabled.
8. Update Graphics Driver
The problem could be due to the Display Driver (Intel UHD or NVIDIA/AMD) becoming outdated or being replaced by generic drivers during a Windows update.
1. Right-click on the Start button and click on Device Manager.
2. On Device Manager screen, expand Display Adapters entry > right-click on Graphics Driver and select Update Driver option.
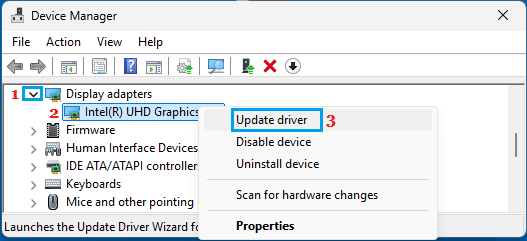
3. On the next screen, select Search Automatically option and follow the instructions to install the updated driver.
Note: If the problem has started after a Windows update, rolling back the Graphics and Wi-Fi Drivers to their previous versions might be an effective strategy.
9. Check Miracast Support
If you are using an assembled PC or an older device, the problem could be hardware-related.
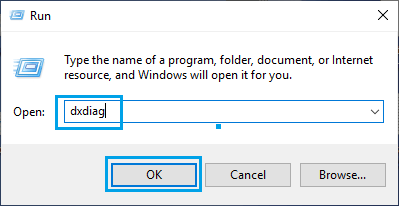
1. Press Win + R keys to open Run Command.
2. On the Run Command screen, type dxdiag and click on OK.
3. On “DirectX Diagnostic Tool” screen or interface, wait for the process to be completed and click on Save All Information.
4. Save the File to Desktop > open the Saved file and Search for Miracast.
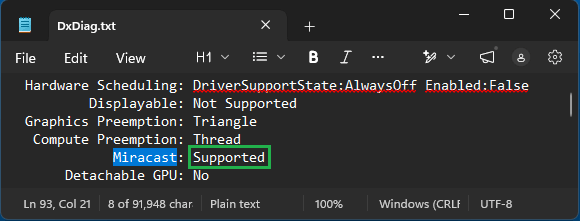
If the entry next to Miracast reads “Not Supported” the issue is hardware related and the solution in this case is to use a Miracast Adapter.