Sometimes, you may find the need to change your Apple ID, because you no longer have access to the Email Address that was used to create Apple ID.
This can happen, if you had used your School, University or Workplace Email Address to create your Apple ID and also if you end up losing access to the Email Address that was linked to your Apple ID.
Change Apple ID Without Email Address
Luckily, it is not necessary to have access to your Email Address in order to change Apple ID. You can change your Apple ID, as long as you can remember your Apple ID Password (different from your Email Account Password).
You can find below the steps to change Apple ID, without the need to access the Email Address linked to your Apple ID.
1. Change Apple ID Without Email Address on Mac or PC
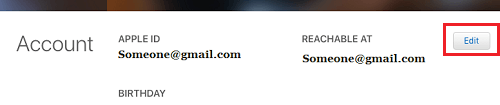
An easy way to change Apple ID is by logging into your Apple ID Account on Apple’s dedicated Apple ID Page.
1. Using a Mac or PC go to appleid.apple.com > Enter your Apple ID and Password to login to your Apple Account.
2. Once you are Signed-in, click on the Edit option located at the top-right corner in the “Account” section.
3. On the next screen, click on Change Apple ID… option.

4. On the pop-up, enter the new Email Address that you want to use as your New Apple ID and click on Continue.
Note: Apple may ask you to verify your identity by answering 2 security questions.
5. Once you click on Continue, a Verification code will be sent to your New Email Address and you will be required to verify by entering the verification code.
2. Change Apple ID Without Email Address on iPhone
You can also change Apple ID, right on your device by logging into your Apple ID.
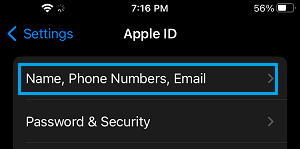
1. Go to Settings > Apple ID > Name, Phone Numbers, Email.
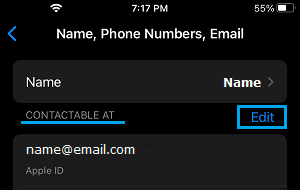
2. When prompted, enter your Apple ID Password > On the next screen, tap on the Edit button.
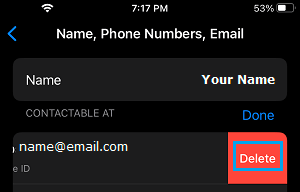
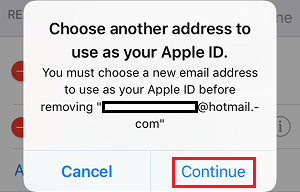
3. Next, tap on the Delete option that becomes available next to your current Apple ID Email Address.
4. On the next screen, tap on Continue.
5. Confirm your identity by answering 2 security questions > enter the Email address that you want to use as your Apple ID and tap on Next.
6. Follow the instructions to complete this process.