The simplest way to change the IP Address of a Windows computer and other connected devices is to power off the Router and restart it back again after 60 seconds.
However, this method does not always work, as the Router may fail to obtain a new IP Address from the service provider and end up not changing the IP address to your computer.
Hence, a more reliable to change the IP Address of a computer is to manually change its IP Address by accessing the network properties screen for the active network (Wi-Fi or Ethernet) on your computer.
Change IP Address of Windows 11/10 Computer
The IP Address of a computer exists in the form of 4 sets of numbers (For example 192. 175. 1 .14).
In this example, the first 3 number sets (192. 175. 1) are derived from IP Address of the Router and only the last number set can be changed or replaced with any number from 1 to 255.
Hence, the first step to change the IP Address of a computer is to find the IP Address of the Router, which is assigned by the internet service provider.
Step 1. Find Router IP Address
You can follow the steps below to find the current IP Address of Router, which gives you the first 3 number sets of the IP Address of your computer.
1. Open Command Prompt As Admin.
2. Type ipconfig/all in the Command prompt window and hit the Enter key.

3. When the Command is executed, it will list the current IP Address of your computer (Subnet Mask) and the current IP Address of Router (DHCP Server Address).

4. Note down these addresss and close the Command Prompt window.
Step 2. Change IP Address Using Settings
After noting down Subnet Mask and DHCP Server Address, you can follow the steps below to change the IP Address of your computer.
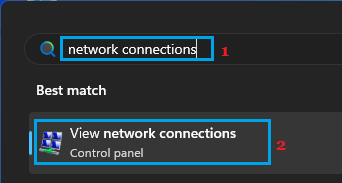
1. Type Network Connections in the search bar and click on View Network Connections Control Panel.

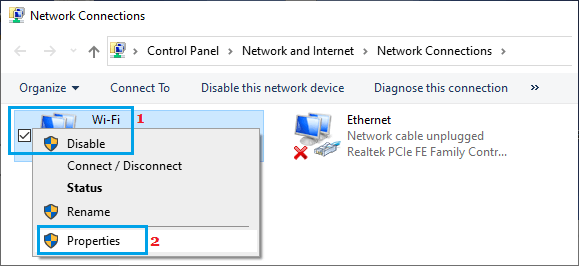
2. On the next screen, right-click on Wi-Fi Network (Active Network) and click on Properties.

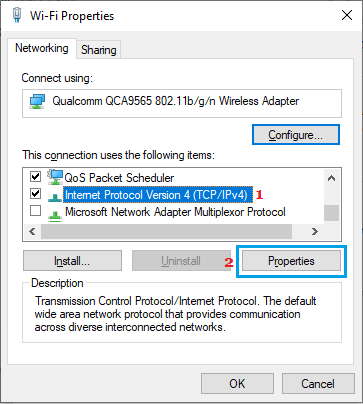
3. On Wi-Fi properties screen, select Internet Protocol Version 4 (TCP/IPv4) entry and click on Properties.

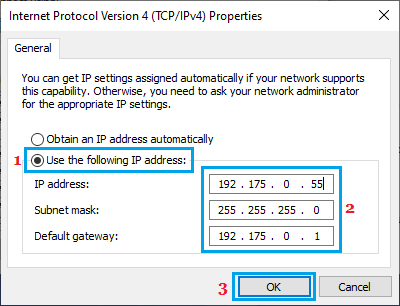
4. On the next screen, check/select Use the following IP Address option > enter Subnet Mask Address in Subnet mask box and enter DHCP Server Address in Default Gateway and IP Address boxes.

After entering DHCP Server Address in IP Address box, change only the last number set and click on OK.
As you can see in above example, the first 3 number sets (192.175.0) in IP Address Field are the same as Default Gateway entry (Router IP Address) and only the last number set has been changed from 1 to 55.
Note: As mentioned above, you can only use any number from 1 to 255 to change the last number set.