Whether you are trying to buy New, Used or Refurbished computer, it is important that you check the hardware specs of the computer that you are trying to buy.
Similarly, in the case of an existing computer, it is a good practice to check the amount of RAM and the type of GPU that the computer is equipped with, before installing AutoCAD, Photoshop and other resource intensive programs.
Another common reason for checking the hardware specifications of a computer is to make a decision about whether to go for a New computer or upgrade RAM & storage on an existing computer.
Check Computer Specs in Windows 11/10
If you are buying a computer from Costco, Best Buy or Staples, you will find most (not all) hardware specs listed on the display piece and you can also ask the advisor for specs that are missing or not clearly defined.
However, you can avoid the sales talk and prevent chances of being misled by a pushy or less experienced sales advisor by manually checking the computer specs.
1. How to Check RAM on Computer
While the minimum amount of RAM (Random Acces Memory) required on a Windows 11 computer is 4GB, it is recommended that you go for a computer with 8GB to 12GB RAM.
If the computer is expected to handle large excel spreadsheets and other heavy workloads, you can go for a computer with 16GB to 24GB RAM.
1. Go to Settings > System > About.
2. On the next screen, you can find the amount of RAM installed on the computer.
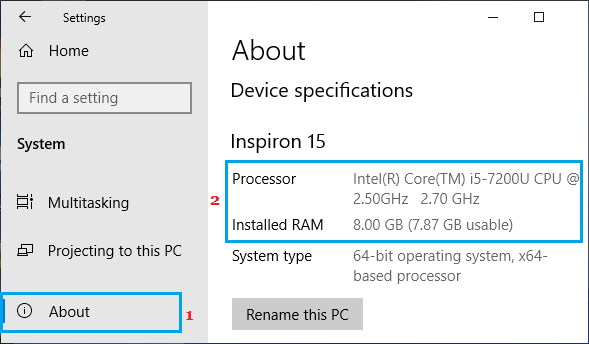
As you can see in above image, the computer has 8 GB installed RAM and 7.87 GB of usable RAM.
2. Check Storage Capacity of Computer
If you like the idea of storing photos and videos on OneDrive, iCloud or Google Cloud, a budget computer with 500 GB storage should be good enough for a home computer.
1. Go to Settings > System > Storage. In the right-pane, you will find the Storage capacity of your computer listed under “Local storage” section.
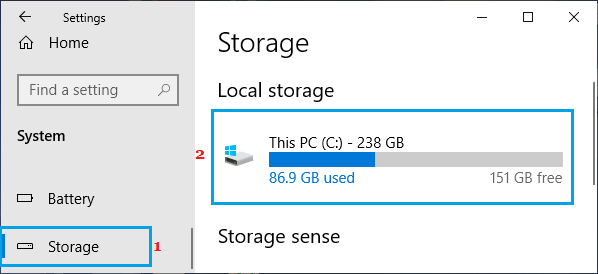
2. Click on This PC to see detailed information about usage of storage on your computer.

As you can see in above image, 48 GB space is reserved for the operating system and other System Files on this computer.
3. Check GPU on Computer
Most budget computers that people buy for daily tasks at home, office use, media consumption and entry level gaming are equipped with an integrated graphics card.
1. Right-click on Start button and click on Device Manager.
2. On Device Manager screen, expand Display Adapters entry to see the type GPU installed on the computer.
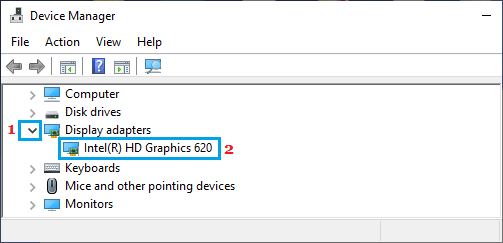
If you find two GPU entries, it means that the computer is equipped with a dedicated graphics card, in addition to the Integrated graphics card in the processor.
Typically, the dedicated Graphics Card will be the second entry under “Display adaptors”.
For example, if you have an Intel processor, the integrated graphics will be named “Intel HD Graphics XXXX” and the second Graphics card will be named something like NVIDIA GeForce GTX 700M.
4. Check Processor Type and Speed
While you can find information about the Processor on “About” screen (Settings > System > About), detailed information about the Processor is available on System Information screen.
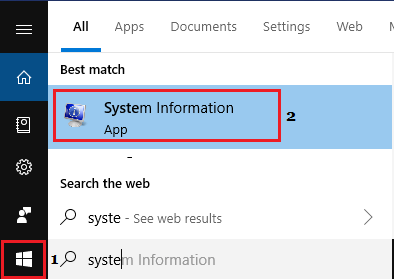
1. Type “System Information” in the search bar > Double-click on System Information App.
2. On the next screen, scroll down to Processor entry (right-pane), where you should find detailed information about the Procesor installed on the computer.
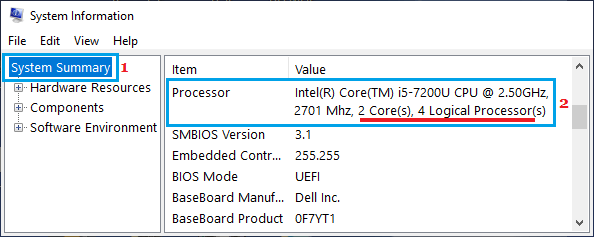
As you can see in above image, the computer is equipped with a 2 Core, Intel Core i5 Processor, with 2.5 GHz base speed.
5. Is the Computer Equipped With SDD Storage?
You can follow the steps below to find the type of storage (HDD or SDD), manufacturer and the model number of the Hard Disk Drive installed on a Windows computer.
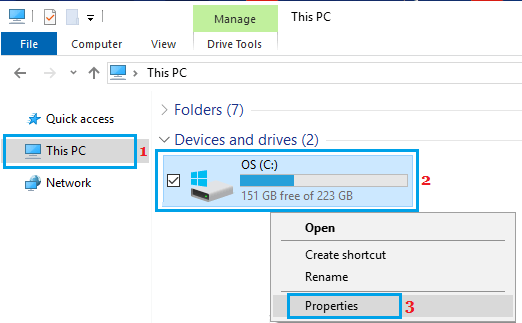
1. Open the File Explorer on your computer.
2. Click on This PC (or My Computer) in the left-pane. In the right-pane, right-click on your Hard Disk and click on Properties.
3. On the pop-up, select the Hardware tab and click on Properties button.
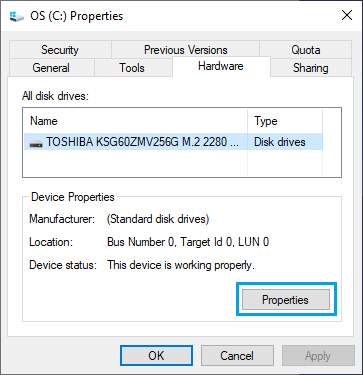
4. On the next pop-up, you will find the Manufacturer, Model Number and type of Hard Disk installed on the computer.

As you can see in above image, the computer has a Toshiba Standard Disk Drive (SDD) of 256 GB size.
6. How to Check Information About Motherboard
You can find the Model Number, Version and Serial Number of the Motherboard installed on the computer by using System Information App.
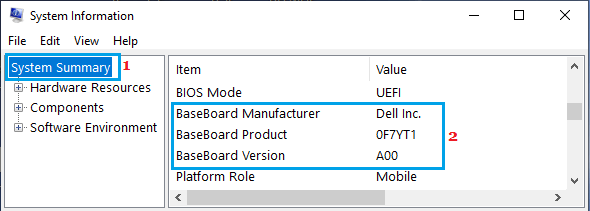
1. Type System Information in the search bar > Double click on System Information App.
2. On System Information screen, scroll down in the right-pane to BaseBoard (or Motherboard) entry and you will find information about the Motherboard of the computer.
Many times information about Motherboard may not be clear. You will have to use command prompt to find Motherboard Model, Version and Serial Number.
3. Open Command Prompt > Type wmic baseboard get product, manufacturer, version, serialnumber and press the Enter Key.
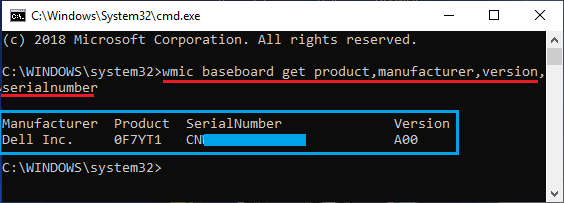
Once the above command is executed, you will find the Manufacturer, Serial Number and Version of the Motherboard installed on the computer.