While it is more common for iPhone to come up with “Could Not Activate Cellular Data Network” error while travelling, the same or similar network connectivity error can happen at other times.
Other variations of this error message as reported by users are “Could Not Activate Mobile Data Network” and “You Are Not Subscribed to a Cellular Data Service”.
In general, users have reported about iPhone coming up with “Could not activate Cellular data Network” message only while trying to use certain Apps and not while making calls or sending text messages.
Could Not Activate Cellular Data Network Error on iPhone
If iPhone is coming up with “Could Not Activate Cellular Data Network” Error, you should be able to fix the problem using the following methods.
1. Enable/Disable Cellular Data
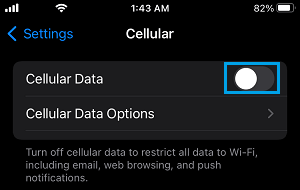
Enabling and Disabling Cellular Data can help in fixing cellular data connectivity issues on iPhone.
1. Open Settings > tap on Cellular .
2. On the next screen, move the toggle next to Cellular Data to OFF position.

3. After 15 seconds > Enable Cellular Data by moving the slider to ON position.
2. Clear VPN Profiles
Try this fix only if you are using a VPN service on your iPhone. If not, you can skip and move to the next method.
1. Go to Settings > General > VPN & Device Management > VPN.
2. On the VPN screen, tap on Profiles and clear everything listed under “Profiles” section.
After this Power OFF iPhone, wait for 10 seconds and Restart your device.
3. Enable/Disable Airplane Mode
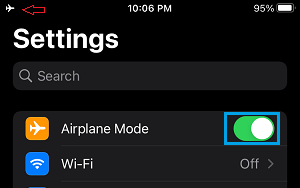
Enabling and Disabling Airplane Mode helps in refreshing cellular data network and resets the wireless antennas on your device.
1. Open Settings > Enable Airplane Mode by moving the slider to ON position.

2. Wait for 30 seconds > Disable Airplane Mode by moving the slider to OFF position.
4. Reset Cellular Data Settings
Depending on the carrier, you should be able to reset cellular data settings for the network of your mobile service provider by following the steps below.
1. Go to Settings > Cellular > Cellular Data Network.
2. On the next screen, tap on Reset Settings.
5. Install Updates
Make sure that your iPhone is up-to-date with the latest software updates.
1. Go to Settings > General > Software Update.
2. Wait for iPhone to search for updates and follow the steps to install updates (if available).
6. Reset Network Settings
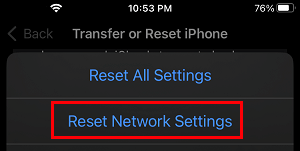
If above methods did not work, it is time to Reset Network Settings on your iPhone and this should help in fixing the problem.
1. Go to Settings > General > Transfer or Reset iPhone > Reset.
2. On the pop-up, select Reset Network Settings option.

3. Enter your Lock Screen Password > tap on Reset and wait for the Reset process to be completed.
After iPhone restarts, you should be able to connect your device to cellular network, without encountering any error message.