In many cases, the problem of late or delayed Notifications on iPhone is usually related to Wi-Fi/Cellular network being spotty and other network related problems.
This problem can also occur when the battery level on iPhone goes below 20%, in which case iPhone automatically switches to Low Power Mode, which in-turn results in delayed notifications.
In other cases, the problem appears to related to Scheduled Notification Summary option being enabled on iPhone, which can sometimes end up delaying notifications from certain Apps.
Late or Delayed Notifications on iPhone
If Notifications are getting delayed on iPhone, you can end up missing important messages, emails and other alerts. You can find below the steps to troubleshoot and fix this problem.
1. Check Network Strength
iPhone won’t be able to provide timely notifications, if your device is not connected to a stable mobile or Wi-Fi network.
If you are not connected to Wi-Fi, take a look at top-left corner of the screen and make sure that the signal strength at your current location is good enough.
![]()
If the reception is poor, it confirms that the problem is due to poor network connectivity.
2. Enable Notifications for Apps
Make sure Notifications have been enabled on your device for Messages, WhatsApp and other Apps from which you want to receive notifications.
1. Go to Settings > Notifications > select the App from which you want to receive notifications.
2. On the next screen, make sure Allow Notifications option is turned ON (green).
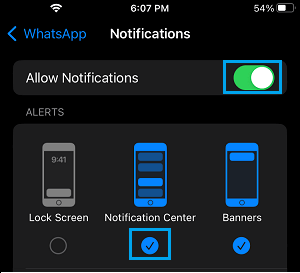
Repeat above steps for other Apps from which you want to receive Notifications.
3. Disable Low Power Mode
Low Power Mode prevents apps from running in background, which can lead to Notifications being delayed on iPhone.
1. Go to Settings > Battery.
2. Disable Low Power Mode by moving the Slider to OFF position.
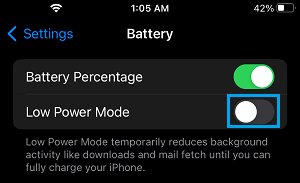
Note: Disabling Low Power Mode can speed up the loss of battery life on your iPhone.
4. Disable Notification Summary
iPhone provides the option to schedule a Notification Summary to appear at specified times. However, this option can end up preventing certain Apps from sending Notifications to your device.
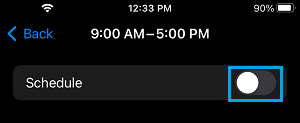
1. Go to Settings > Notifications > Scheduled Summary.
2. On the next screen, disable Scheduled Summary.
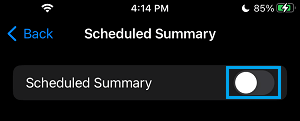
After this, you should find Apps providing timely Notifications on your device.
5. Turn off Low Data Mode
While enabling Low Data Mode helps in reducing data usage on iPhone, it prevents background activities by apps, which can delay notifications by apps on your device.
1. Go to Settings > Cellular > Cellular Data options.
2. Move the toggle next to Low Data Mode to OFF position.
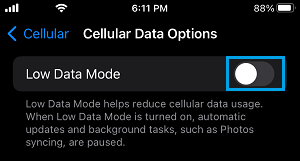
Similarly, go to Settings > Wi-Fi > Cellular Data options > move Low Data Mode to OFF position.
6. Disable Do Not Disturb & Driving Mode
Another common reason for late or delayed Notifications on iPhone is due to your device being in Do Not Disturb or Driving Mode.
1. Go to Settings > Focus > Do Not Disturb > Select your DND Schedule.
2. On the next screen, disable your Do Not Disturb Schedule.
Now, you can expect your iPhone to start providing Notifications.
For the steps to disable Driving Mode you can refer to this guide: How to Turn OFF Driving Mode on iPhone.
7. Install Updates
Notifications can get delayed if there is an update waiting to be installed on your device.
1. Go to Settings > General > Software Update.
2. Allow iPhone to search for updates > tap on Download and Install (If an update is available).
8. Update Apps
If the problem of delayed notifications is related to a specific App, make sure that the latest version of the App is installed on your device.
1. Open the App Store on your iPhone and tap on Account Icon.
![]()
2. On the next screen, tap on Update All or update individual Apps by tapping on the Update option next to the Apps.
Note: Update option will only be available, if an update is available for any of the Apps installed on your device.