Allowing multiple apps to continue running in the background can lead to excessive resource usage on the computer, which in turn can have an adverse impact on the performance of your device.
Hence, Windows operating system provides the option to Disable Background Running Apps and prevent them from unnecessarily using up resources on the computer.
Disable Background Apps in Windows 11/10
While Windows operating system allows Apps like OneDrive, Microsoft Teams and others to remain active in the background, it also provides the option to selectively disable background running apps.
You can find below different methods to disable background running apps and prevent them from using up resources on the computer.
1. Stop Background Apps Using Settings
You can follow the steps below to prevent selected Apps from running in background.
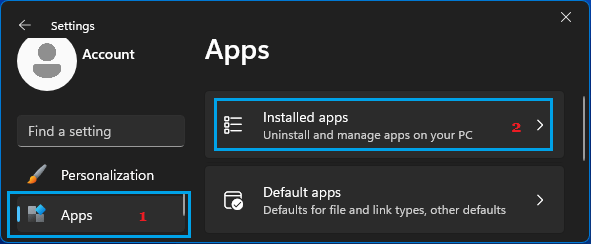
1. Go to Start button > Settings Icon > Apps > click on Installed Apps in the right-pane.
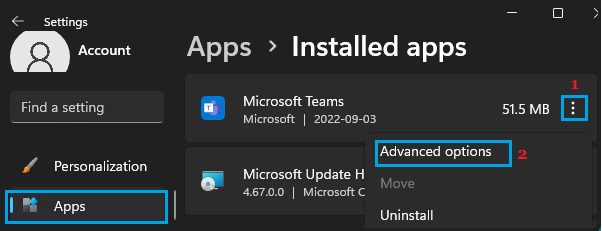
2. On Installed Apps screen, click on 3-dots icon next to the App Name and click on Advanced options.
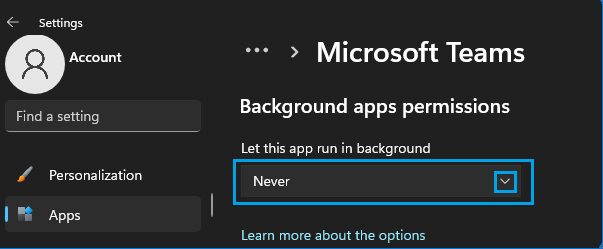
3. On the next screen, scroll down to “Background App Permissions section” and set Let this App Run in Background to Never option.
Similarly, you can prevent other Apps like Skype, OneDrive and other from running in background.
2. Stop Background Apps Using Battery Usage
You can also prevent Apps from running in background by going to the Battery Usage screen on your computer.
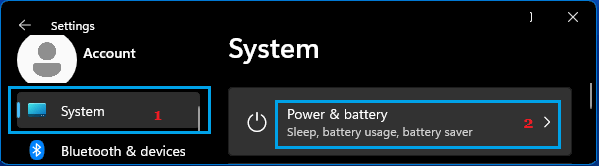
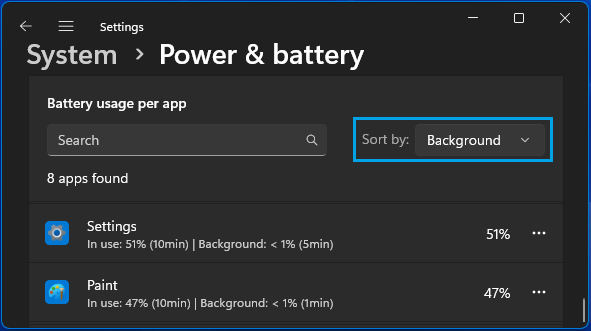
1. Go to Start button > Settings Icon > System > click on Power & Battery card in the right-pane.
2. On Power & Battery screen, Sort by Background to see the list of Apps running in the backgrund on your computer.
3. Next, click on 3-dots icon located next to the App that you want to prevent from running in background and select Manage Background Activity option.
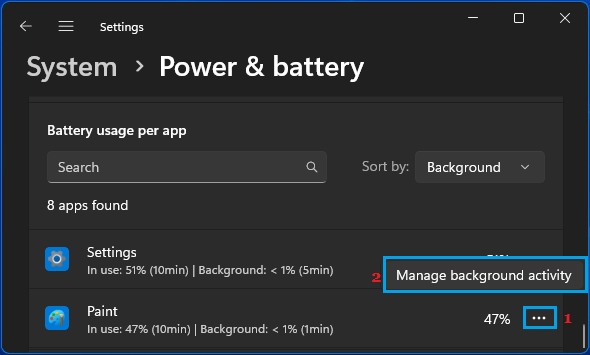
4. On the next screen, you can prevent this particular App from running in background by selecting the Never option for Let this App Run in Background entry.
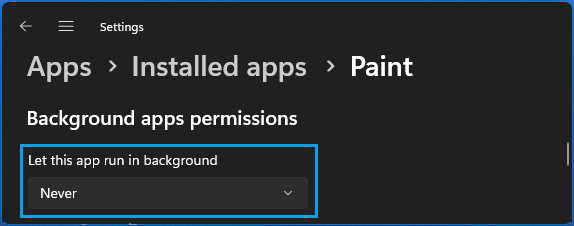
After this, you should no longer find this particular App running in background on your computer.
3. Stop All Background Apps Using Registry Editor
You can prevent all Apps from running in the background on your computer by using Registry editor.
1. Right-click on the Start button and click on Run.
2. In the Run command window, type regedit and click on OK.

3. On Registry Editor screen, navigate to HKEY_CURRENT_USER\Software\Microsoft\Windows\CurrentVersion\BackgroundAccessApplications.
4. Select BackgroundAccessApplications folder in the left-pane. In the right-pane, look for GlobalUserDisabled entry. If it is not there, right-click and select New > DWORD (32-bit) value option.
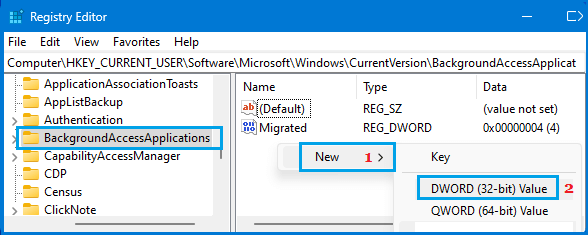
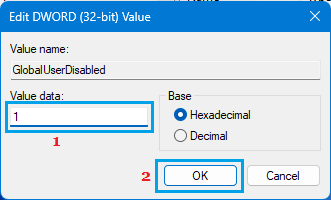
5. Name the New DWORD as GlobalUserDisabled > Double Click on it > Set its Value data to 1 and click on OK to save this change.
6. After this, close the Registry Editor and Sign out to apply this change to your user account.
Note: You can undo this change at any time by changing the GlobalUserDisabled value to 0 or by deleting it from the Registry.
4. Disable All Background Apps for All User Accounts
You can prevent Apps from Running in Background for all User Accounts on the computer by using Registry Editor.
1. Open Run command > Type regedit and click on OK.
2. On the Registry Editor screen, navigate to HKEY_LOCAL_MACHINE\SOFTWARE\Policies\Microsoft\Windows\AppPrivacy.
3. In the right pane, create a New 32 bit DWORD value > Name it as LetAppsRunInBackground and set its Value Data to 2.
4. Close the Registry Editor and Restart the computer to implement this change.
This way you can prevent All Apps from Running in Background for All the User Accounts on your computer.
Note: If AppPrivacy is missing, you will have to manually create this entry.