While it is easy to enable Hibernation on a Windows computer and start experiencing its proven battery saving capabilities, it is important that you understand both the advantages and disadvantages of using Hibernate Mode.
Starting with the positives, the clear advantage of Hibernation over Sleep Mode is that Hibernation consumes “zero” battery life, while Sleep Mode needs battery power to keep the RAM running. This means, you can expect a computer in Hibernation mode to retain all its battery power; while the same computer in sleep mode will keep consuming battery life and eventually run out of battery power.
- Extends Battery Life: Hibernation saves your active browsing session to the hard disk, which allows it to completely switch-off the power and retain the same battery life for days.
- Session Preservation: You can leave all your files and apps open for days and expect them to jump back to life in the same condition that they were left in.
In addition to above, Hibernation provides more security for your data by saving it to encrypted hard drive, unlike sleep mode; which leaves your data in the RAM in an unencrypted format.
Why Switch-off or Disable Hibernation
While Hibernation Mode can significantly extend the battery life of a Windows computer and has its own advantages, it is not switched-on by default on a Windows computer due to the following reasons.
- Fast Startup: Windows computers come with Fast Startup enabled by default; which requires them to use Hybrid Sleep (combination of Sleep & Hibernate); instead of using the full Hibernate Mode.
- Slower Resume Time: It takes more time for a computer to wake-up from Hard Disk; compared to a computer in Sleep Mode waking up from RAM.
- Storage Space: Hibernation writes the content of RAM to hiberfil.sys; located on the hard disk. The storage taken up by hiberfil.sys file (equal to RAM) can be significant on computers with limited SSD storage.
- Dual Boot Issues: On computers using dual operating systems (Windows & Linux), Hibernation can end up locking the shared Windows drive; preventing Linux from creating new files and modifying the existing ones.
- Impact on SSD: Hibernation can slightly reduce the lifespan of SSD Drive; due to repeated writing of Data to the Hard Disk, every time the computer goes into Hibernation.
In addition to above, problems like memory leaks, frozen/stuck apps, system crashes and essential services like Wi-Fi, Bluetooth and Audio services not waking up properly and causing problems are noticed more frequently on computers using Hibernation.
1. Enable Hibernation Using Command Prompt
If Hibernation has been disabled on your device, it can be easily enabled by using Command Prompt.
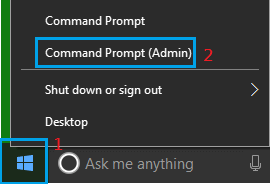
1. Right-click on the Start button and click on Command Prompt (Admin).
2. On the Command prompt screen, type powercfg.exe /hibernate on and press the enter key on the keyboard of your computer.
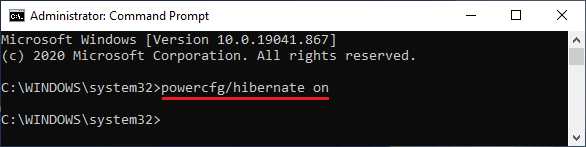
This will enable Hibernation on your computer.
2. Prevent Windows Computer from Hibernating
You can prevent a Windows computer from going in to Hibernation; without disabling the Hibernate feature by going to the Settings App on your device.
1. Press Windows + I keys to launch Settings on your computer.
2. Select System in the left-pane and click on Battery & Power in the right-pane.
3. On the next screen, expand Screen, Sleep & Hibernate Timeouts tab and set Make my Device Hibernate After setting to Never; both under “On Battery” & “Plugged in” sections.
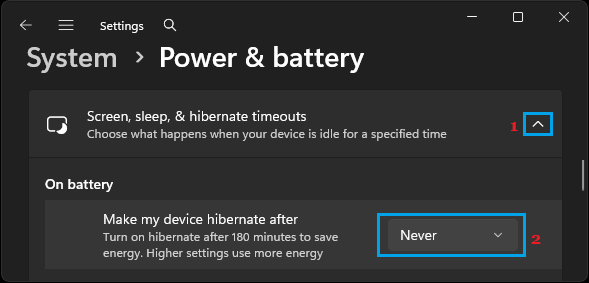
This will effectively prevent your computer from going into Hibernation; without disabling the Hibernate feature on your computer.
3. Disable Hibernation Using Command Prompt
If Hibernation is causing problems on your device, you can Disable Hibernation by using powercfg.exe /hibernate off Command.
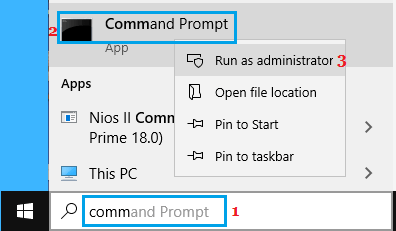
1. Type CMD in the Search bar > right-click on Command Prompt in the search results and select Run as Administrator option.
2. On Command prompt screen, type powercfg.exe /hibernate off and press the Enter key on the keyboard of your computer.
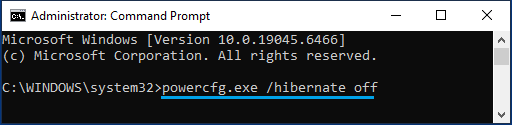
3. Once the Command is executed, Hibernation Mode will be disabled on your computer.
4. Disable Hibernation Using PowerShell
If PowerShell instead of Command prompt is available in the Start menu, you can disable Hibernation by using PowerShell.
1. Right-click on Start button and click on PowerShell (Admin).
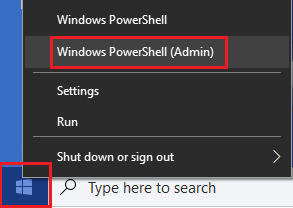
2. On the PowerShell screen, type powercfg -h off and press the Enter key on the keyboard of your computer.
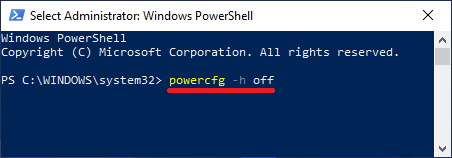
3. Once this Command is executed, Hibernation mode will be disabled on your computer.
5. Disable Hibernation Using Registry Editor
You can also disable the Hibernation feature on a Windows computer by using Registry Editor.
1. Type Registry in the Search bar and click on Registry Editor in the search results.

2. From Registry Editor screen, navigate to HKEY_LOCAL_MACHINE\System\CurrentControlSet\Control\ Power and double-click on HibernateEnabled entry in the right-pane.
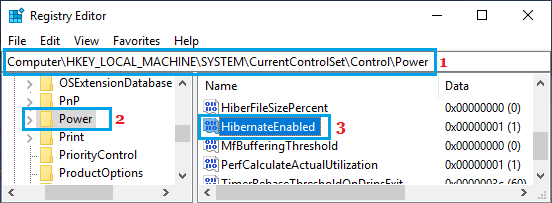
3. On the next screen, you can disable Hibernation by changing Value Data to 0.
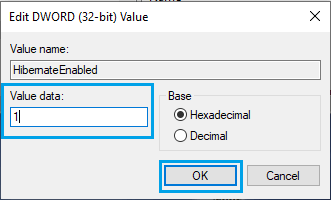
4. Click on OK to close the registry editor and save the changes on your computer.
6. Prevent Computer From Hibernating Using Advanced Power Settings
Another way to prevent a Windows computer from going into Hibernation; without disabling the Hibernate feature is by using Advanced Power Settings.
1. Right-click on the Start button & click on Run.
2. Type Powercfg.cpl and click on OK.
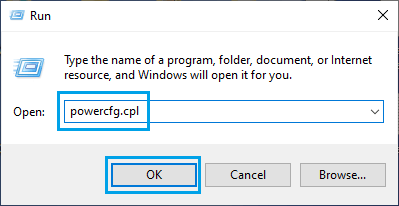
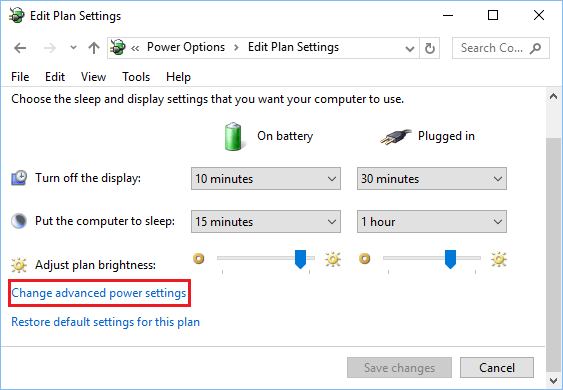
3. From the next screen, go to Change Plan Settings > Change Advanced Power Settings.
4. On the next screen, expand the Sleep entry > expand Hibernate After entry and set both On Battery and Plugged in to Never.
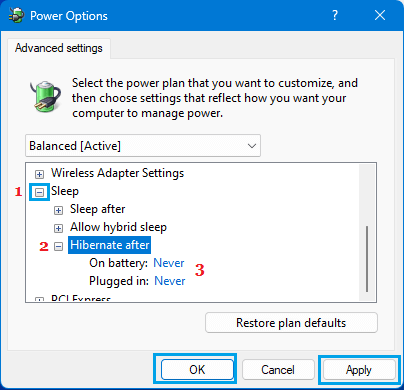
5. Click on Apply & OK to save this change in Power Settings on your computer.
This will ensure that your computer never goes into Hibernation, while using battery and also when it is plugged-in to a direct power source.