If you suddenly find your computer speaking when you type or use the mouse, you have accidentally enabled the Narrator on your computer. You can find below the steps to Enable or Disable Narrator Voice in Windows 10.

Enable or Disable Narrator Voice in Windows 10
The Narrator feature in Windows 10 is basically designed to help visually impaired users.
When you enable the Narrator in Windows 10, your computer will start reading aloud the keys that you press, the words that you type and basically all the text that appears on the screen of your computer.
Narrator can also read notifications and calendar appointments, which can allow anyone to multitask – Keep in touch with incoming emails and notifications, while doing something else.
You can Enable or Disable Narrator Voice in Windows 10 at any time by pressing Windows + Ctrl + Enter keys on the keyboard of your computer.
In most cases, the Narrator Voice gets accidentally enabled and users are looking for a way to disable Narrator Voice in Windows 10.
1. Disable Narrator Voice Using Keyboard Shortcuts
As mentioned above, the quickest way to Enable or Disable Narrator Voice in Windows 10 is to press Windows + Ctrl + Enter Keys.
Another way to quickly turn off Narrator Voice in Windows 10 is to hold the Caps Lock key and press Esc.
2. Disable Narrator Voice Using Settings
The Narrator Voice in Windows 10 can also be disabled using Windows Settings.
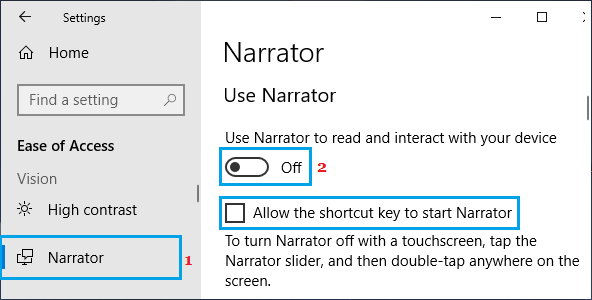
1. Open Settings > click on Ease of Access Icon.
2. On the next screen, click on Narrator in the left pane and toggle OFF Use Narrator option in the right pane.

If you do not want the Narrator to bother you again, toggle OFF Allow the shortcut key to start Narrator option.
This will entirely prevent the possibility of Narrator Voice being accidentally enabled on your computer.
Enable Narrator Voice in Windows 10
If you ever come across the need to use Narrator voice, you can follow the steps below to Enable Narrator in Windows 10 and change Narrator Voice, Pitch and the Speed of Narration.
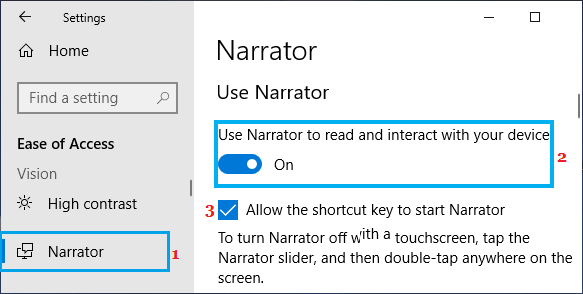
1. Open Settings > Click on Ease Access.
2. On the next screen, click on Narrator in the left pane. In the right-pane, turn ON Use Narrator to read option.

Also, check Allow the Shortcut key to start Narrator option. This will allow you to start Narrator at any time on your computer by using Windows + Ctrl + Enter Keys.
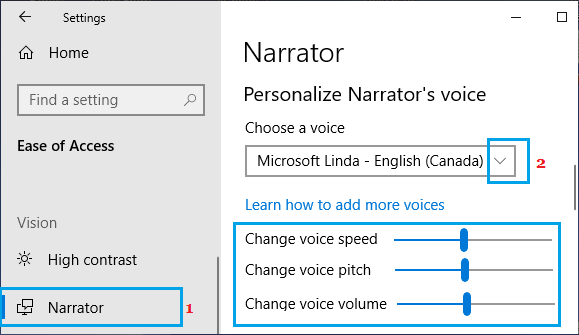
3. To change Narrator Voice, scroll down and click on the down arrow in “Chose a Voice” section and select your desired voice in the drop-down menu.

In the same section, you will see the options to change Narrator speed, pitch and volume.