In order to access your Home or Office computer from a remote location, the Remote Desktop (RDP) feature needs to be enabled on the computer.
However, this feature is only available in the Pro & Enterprise version of Windows and not in the Home Edition of Windows.
While the Home Edition of Windows can be used to access remote computers by using Microsoft Remote Desktop App (available at Microsoft Store), it cannot be used to provide access to Remote computers.
Enable Remote Desktop in Windows 11/10
If your computer is using the Pro & Enterprise version of Windows, you can enable the Remote Desktop feature on your computer by using Settings, Control Panel and Run Command.
Once Remote Desktop (RDP) feature is enabled on the computer, you will be able to access this computer from a remote location by using steps as provided in this guide: How to Access Remote Computer Using RDP.
Note: Enabling Remote Desktop (RDP) can make the computer vulnerable to remote attacks. However, you can limit this risk by enforcing Network Level Authentication (see below) and using strong passwords.
1. Enable Remote Desktop Using Settings
If you are like most users, it is likely that you prefer using the Settings menu to enable Remote Desktop (RDP) feature on your computer.
1. Open the Settings App on your computer.
2. Select System in the left-pane and click on Remote Desktop in the right-pane.
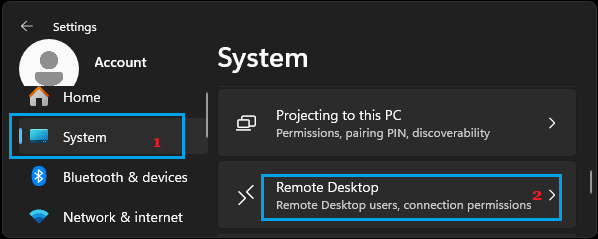
3. On the next screen, enable Remote Desktop by moving the toggle to ON position.
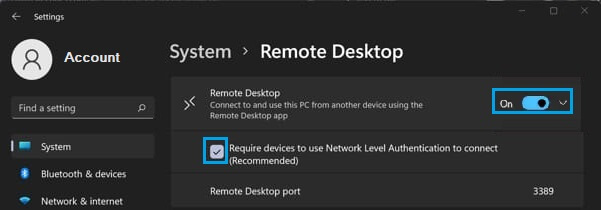
Windows 10: Go to Settings > System > Remote Desktop > move the toggle next to Remote Desktop to ON position.
4. On the confirmation pop-up, select the Yes option to confirm.
Note: Make sure that you select Require devices to use Network Level Authentication to connect option and note down the Name of the computer (it will be on the same screen).
Using Network Level Authentication helps in protecting the computer from unauthorized access by making it mandatory for users to authenticate themselves; before a remote session is established.
2. Enable Remote Desktop Using System Properties
A quick way to enable Remote Desktop on a Windows computer is by going to the System Properties screen.
The advantage of this method is that it automatically checks the power settings on your computer and prompts you to change power settings, if they are not compatible with RDP.
1. Type sysdm.cpl in the Search bar and select sysdm.cpl Control Panel Item.
2. On System Properties screen, go to Remote tab and select Allow Remote connections to this computer option.
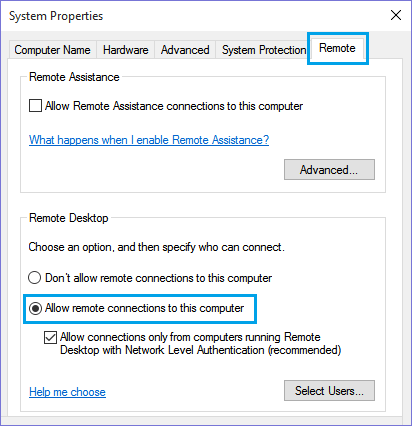
3. Click on Apply and OK to save this setting on your computer.
Note: You may be prompted to change the Sleep Settings on your computer, if they are not compatible.
3. Enable Remote Desktop Using Control Panel
You can also enable the Remote Desktop feature on your computer by using Control Panel.
1. Open Control Panel > click on System and Security.
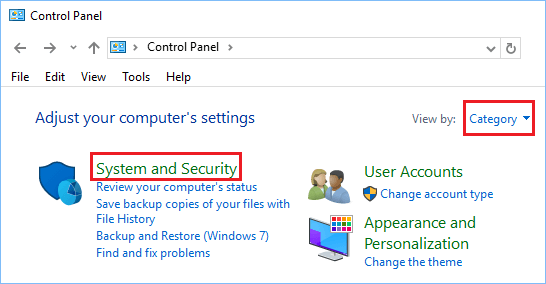
2. On System and Security Screen, click on Allow Remote Access option.
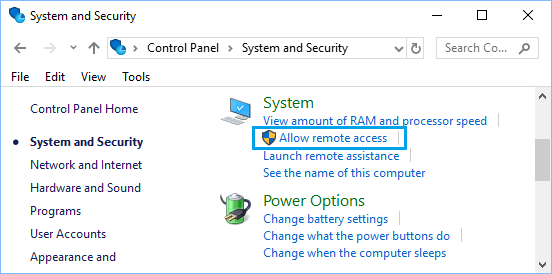
3. On the next screen, switch to Remote Tab and select Allow Remote connections to this computer option.
4. Click on Apply and OK to save this setting on your computer.
4. Enable Remote Desktop Using Run Command
Another way to Enable Remote Desktop connection is by going to System Properties screen using the Run Command.
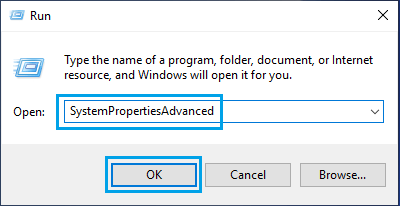
1. Press Win + R keys > type SystemPropertiesAdvanced and click on OK.
2. On System Properties screen, go to Remote tab and select Allow Remote connections to this computer option.
3. Make sure you click on Apply and OK.
As mentioned above, you may be prompted to change the Sleep Settings on your computer, so that it never goes to sleep and always remains available for Remote Connections.