Do you find the text cursor too thin and the mouse pointer difficult to spot on the screen of your computer? The good news is that you can easily enlarge Cursor and Change Mouse Pointer in Windows 10.

Enlarge Cursor & Change Mouse Pointer in Windows 10
Depending on your eyesight, you may find the default blinking cursor in Windows 10 too small or thin and difficult to easily find on the screen of your computer.
As you must have noticed, this problem becomes more pronounced if the LCD monitor is set to high resolution.
However, it is really easy to configure or set the thickness of the blinking cursor to a larger size so as to make it more visible and easy to locate on the screen of your computer.
1. Change Cursor Thickness in Windows 10
Follow the steps below to change Cursor Thickness in Windows 10
1. Open Settings > click on Ease of Access Icon.
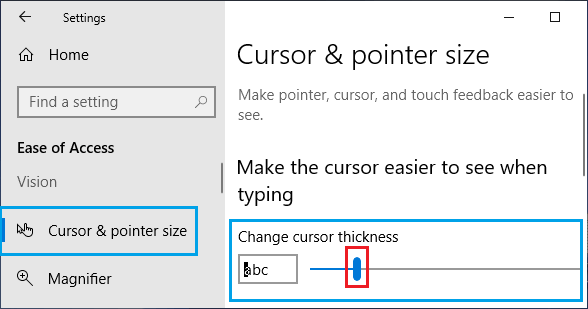
2. On the next screen, click on Cursor & Pointer in the left pane. In the right-pane, you will be able to change Cursor Thickness by moving the slider to right.

When you move the slider to right, you will see the Cursor thickening or enlarging on letters abc located to the left of the slider.
2. Change Mouse Pointer Size and Colour in Windows 10
The default mouse pointer in Windows 10 is white in colour with a black border.
However, if you are having problems seeing the white mouse pointer, you can easily change the size and the colour of the cursor in Windows 10 to make the mouse pointer more prominent and easier to spot on the screen.
1. Open Settings > click on Ease of Access Icon.
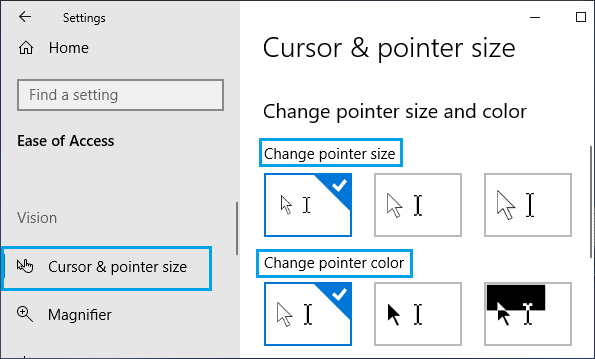
2. On the next screen, click on Cursor & Pointer in the left pane. In the right pane, you will see the options to “Change Pointer Size” and “Change Pointer Colour”.

Change Pointer Size: You can choose from 3 pointer sizes by clicking on the boxes.
Change Pointer Colour: The first option is the default pointer colour (which is white), choosing the middle option makes your mouse pointer solid black in colour.
Clicking on the 3rd option makes the mouse pointer black in colour and it will automatically become white in colour, whenever you move the cursor on black objects.