If your Windows computer is coming up with “Ethernet doesn’t have a valid IP configuration” message, it usually means that your computer is unable to obtain a valid IP address for the Ethernet Connection from Router/Modem.
This can happen due to a variety of reasons, ranging from a glitch in the Modem/Router and damaged or corrupted network drivers to other possible reasons.
Ethernet Doesn’t Have Valid IP Configuration
If you are unable to connect to internet due to “Ethernet Doesn’t Have Valid IP Configuration” error on your Windows computer, you should be able to fix the problem using the following steps.
1. Power Flush Modem/Router
Before going ahead with other steps, it is recommended that you start by power flushing the Modem/Router.
1. Unplug the Modem/Router from its power supply source.
2. After 60 seconds > connect the Router/Modem back to its power supply source.
Patiently wait for the Router/Modem to fully restart (all lights switched ON) and try to connect your computer to internet.
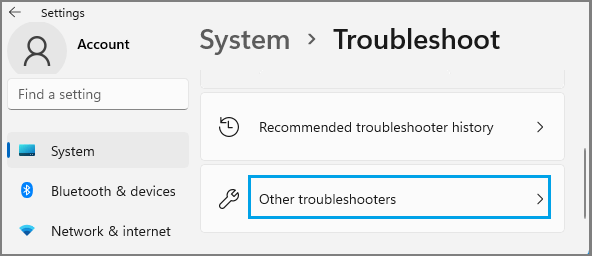
2. Troubleshoot Network Adapter
1. Go to Settings > System > scroll down in the right-pane and click on Troubleshoot. On the next screen, click on Other troubleshooters.
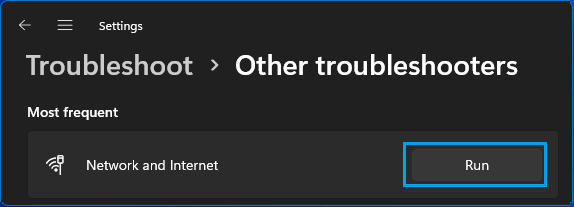
2. On the next screen, click on Run button located in “Network & Internet” tab.
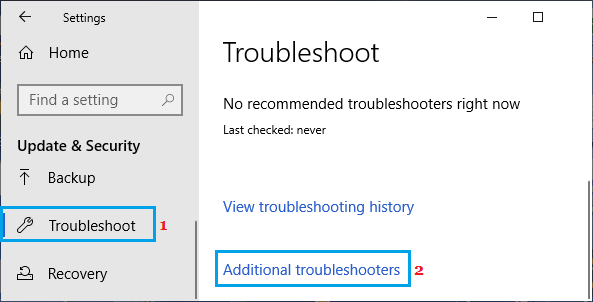
Windows 10: Go to Settings > Update & Security > select Troubleshoot in the left pane. In the right-pane, scroll down and click on Additional Troubleshooters.
On the next screen, select Network Adapter and click on Run the Troubleshooter option.
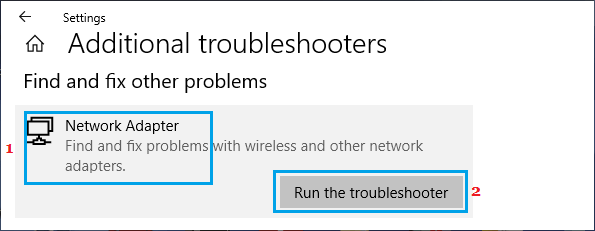
Allow the Troubleshooter to find and fix problems with the Network Adapter on your computer.
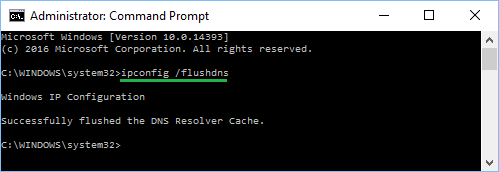
3. Flush DNS & Reset Winsock
Follow the steps below to Flush the DNS cache and Reset Winsock.
1. Type CMD in the Search bar > right-click on Command Prompt and click on Run as administrator option.

2. On the Command Prompt Window, type ipconfig /flushdns and press the Enter key on the keyboard of your computer.
3. Next, type netsh winsock reset and press the Enter key.

4. Once above Commands are executed, close Command Prompt window and Restart your computer.
4. Reset IP Address
Follow the steps below to Reset and Renew the IP Address for your computer.
1. Open Command Prompt as Admin > type ipconfig /flushdns and press the enter key on the keyboard of your computer.
2. Next, type the following commands one-by-one and press the Enter Key after each command.
- netsh int ip reset
- ipconfig /release
- ipconfig /renew
3. After running above commands, close the Command Prompt window and Restart your computer.
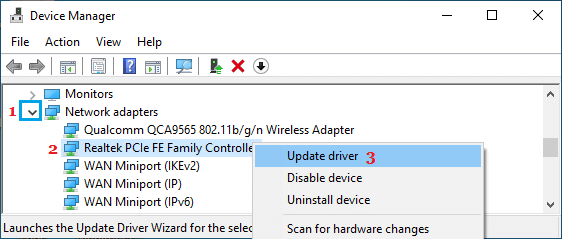
5. Update Ethernet Adapter
Make sure that the Ethernet Adapter is up-to-date with the latest software updates.
1. Right-click on the Start button and click on Device Manager.
2. On Device Manger Screen, expand Network Adapters entry > right-click on Ethernet Adapter and click on Update Driver Software option.
After this, see if you can connect to internet, without encountering an error message.
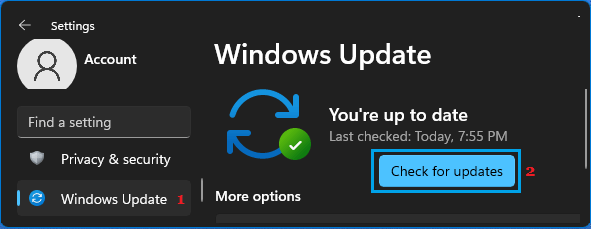
6. Install Updates
The problem could be due to your computer not being up-to-date with the latest Windows Update.
1. Open Settings > scroll down and click on Windows Update in the left-pane. In the right-pane, click on the Check for Updates button.
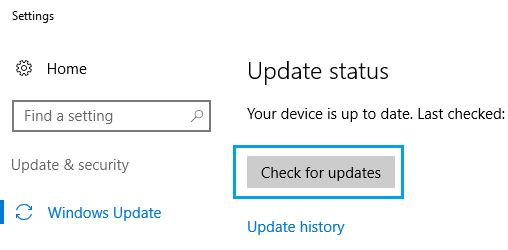
Windows 10: Go to Settings > Updates & Security > select Windows Update in the left-pane and click on Check for Updates button in the right-pane.
2. Allow Windows to check for available updates and download them on your computer.
7. Change DNS Server
The problem could be due to DNS Servers of your Internet Service Provider being busy or going through problems.
In such cases, switching to Google’s Public DNS service or to other Free DNS Service Providers like OpenDNS or Cloudflare and help in fixing the problem.
You can find the exact steps to change DNS Servers on your computer in this guide: How to Change DNS Servers in Windows 10.
8. Make Sure the Computer Can Automatically Obtain IP Address
Make sure that your computer is set to automatically obtain IP Address and DNS Address.
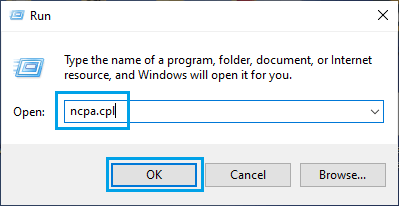
1. Right-click on the Start button and click on Run.
2. In the Run Command window, type ncpa.cpl and click on OK.
3. On Network Connections screen, right-click on your active Network (Ethernet in this case) and click on Properties.
4. On the next screen, select Internet Protocol Version 4 (TCP/IPv4) and click on Properties.
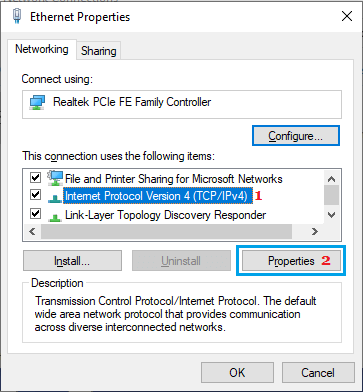
5. On the next screen, select Obtain an IP address automatically and Obtain DNS server address automatically options.
9. Disable Fast Startup
Sometimes, the problem is due to the Fast Startup feature on your computer failing to load the required services for Ethernet connection.
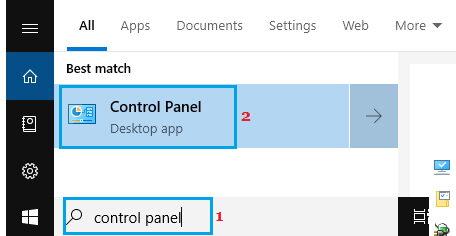
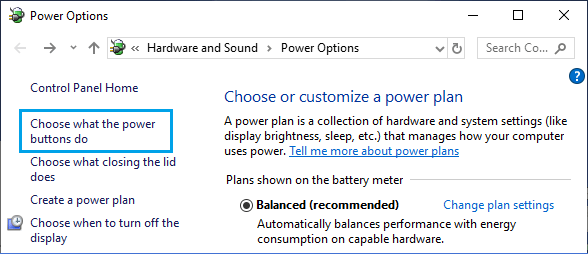
1. Type Control Panel in the Search bar and click on Control Panel Desktop App in the Search results.
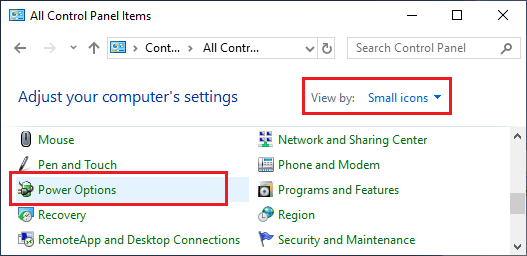
2. On Control Panel screen, switch to Large or Small Icons view and click Power Options.
3. On Power Options screen, click on Choose What the Power Buttons Do.
4. On the next screen, scroll down to “Shutdown Settings” and uncheck Turn on fast startup option.
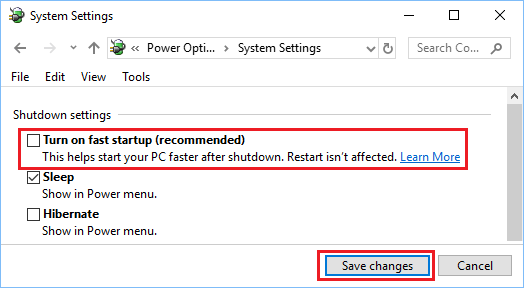
4. Click on Save Changes to save and implement this change on your computer.
Note: With Fast Startup disabled you may find your computer booting up a bit slower, but you may not even notice the difference.
10. Disable Microsoft kernel Debug Network Adapter
1. Right-click on the Start button and click on Device Manager.
2. On Device Manager screen, click on the View tab and select Show Hidden Devices option.
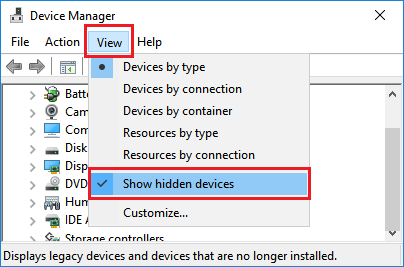
Once hidden devices become available, locate and right-click on Microsoft kernel Debug Network Adapter and select the Disable option.
11. Uninstall and Reinstall your Network Adapter
1. Right-click on the Start button and click on Device Manager.
2. On Device Manager screen, expand Network Adapters entry, right-click on your Ethernet and click on Uninstall.
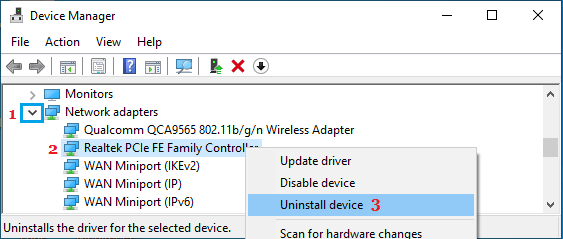
3. Next, click on the Action tab and select Scan for hardware changes option.
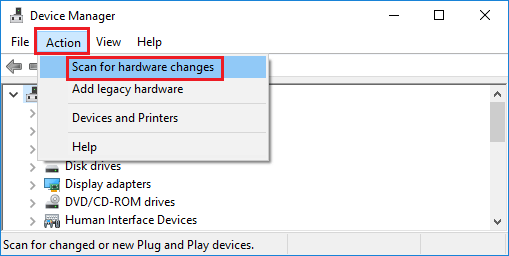
Restart the computer and see if you can now connect to the Internet.
12. Disable Antivirus Program
Temporarily disable the Antivirus software program installed on your computer and see of this helps.
In most cases, you should be able to right-click on the Antivirus Program icon in the taskbar and select the Disable option.
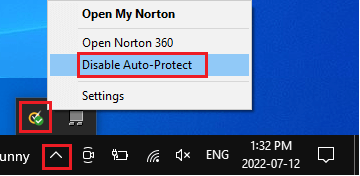
If you cannot find the program icon in the Taskbar, it should be available in the System Tray. If you are using Windows Defender, you can disable Windows Defender for a temporary period.
13. Scan Hard Disk for Errors
1. Open Command Prompt as Admin.
2. On Command Prompt window, type chkdsk /r c: and press the Enter key.
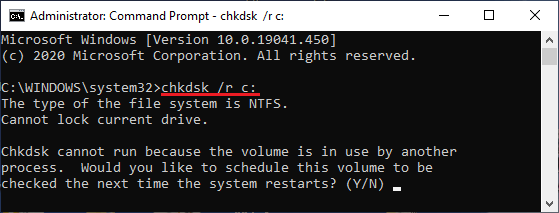
3. Chkdsk may ask you to run next time the system restarts. If this happens, type Y and restart your computer.
Patiently wait for the Chkdsk Command to find and fix Hard Disk Errors on your computer. Once, the Chkdsk command is complete, restart your computer and see if the problem is fixed.
14. Enable AutoConfig Service
Sometimes, the problem could be due to third-party apps disabling AutoConfig Service on the computer.
1. Open Command Prompt as Admin.
2. On the Command Prompt screen, type sc config dot3svc start= demand and press the Enter key.
Once the Command is successfully executed, close Command Prompt screen and Restart the computer.
15. Reset Network Configurations
If the problem is not yet fixed, resetting network configurations and reinstalling network drivers using command prompt might help in fixing the problem.
1. Open Command Prompt as Admin.
2. On Command Prompt screen, type netcfg -d and press the Enter key.
Once the Command is executed successfully, close Command Prompt screen and Restart the computer.