When you open the File Explorer on a Windows computer, it provides access to desktop, downloads, photos and other commonly used locations in the Left Sidebar Navigation Pane
Hence, the problem of missing left-pane in the File Explorer window can make it really difficult to navigate to location of files and folders located on your computer.
File Explorer Sidebar Navigation Pane Missing in Windows
If the File Explorer Navigation Pane is missing on your Windows 11/10 computer, you should be able to enable the File explorer navigation pane in the left-sidebar using the following steps.
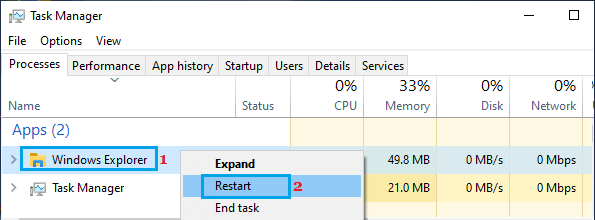
1. Restart File Explorer Process Using Task Manager
Restarting the File Explorer process in the Task Manager can help in fixing this problem.
1. Right-click on the Start button and click on Task Manager.
2. On the Task Manager screen, right-click on Windows Explorer entry and click on Restart.
After this, open file explorer and see if it is now showing the left pane.
2. Enable Navigation Panel
It is possible that you may have accidentally disabled the File Explorer Navigation Pane on your computer.
1. Open the File Explorer on your computer.
2. On the File Explorer screen, click on the View tab in top-menu bar > hover mouse over Show and click on Navigation pane.
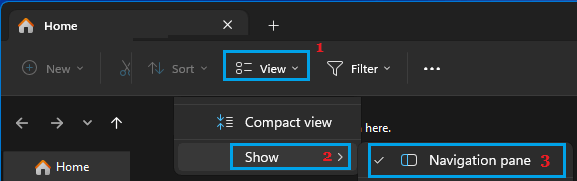
Note: Make sure the Navigation pane is checked (has a check mark).
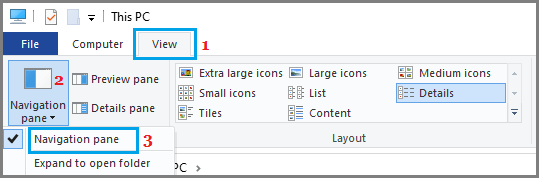
If you are using Windows 10, open File Explorer > switch to View tab, click on Navigation pane and select Navigation pane in the menu that appears.
After this, you should find the left navigation pane showing in the File explorer app on your computer.
3. Perform a Complete System Shutdown
1. Type CMD in the Search bar > right-click on Command Prompt in search results and select Run as administrator option.

2. On Command Prompt screen, type shutdown /s /f /t 0 and press the Enter key.

3. Allow the computer to shut down > After 30 seconds, restart the computer by pressing the Power button.
4. Clear File Explorer History
The problem could be due to presence of corrupted or outdated files in File Explorer history.
1. Open File Explorer > Click on 3-dots icon and select Options in the drop-down menu.
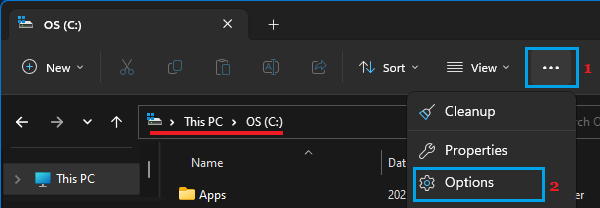
2. On File Explorer Options screen, scroll down to Privacy section and click on the Clear button next to Clear File Explorer History option.
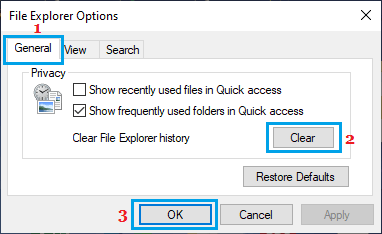
3. Click on OK to close the Folder Options window.
5. Re-register shdocvw.dll file
Re-registering shdocvw.dll file can help in fixing file explorer related problems.
1. Open Command Prompt As Admin.
2. On the Command Prompt screen, type regsvr32 /i shdocvw and press the Enter key.

3. Close the Command Prompt window and see if the Left Pane is now showing in File Explorer.
6. Repair System Files
In certain cases, the problem of Left Navigation Pane missing in the File Explorer window could be due to the system files on the computer being damaged or corrupted.
If above steps did help, you can check the System Files on your computer for damage by using steps as provided in this guide: How to Repair Corrupted System Files In Windows 11/10.