The default setting in Windows is to keep certain types of files and folders hidden on the computer, which prevents these files from being viewed and also prevents them from appearing in the Start Menu search results.
While this default setting does help in reducing the clutter of files on the computer, its main objective is to prevent the possibility of key system files, configuration files, system restore/recovery files, AppData Folder and other important types of files from being modified or accidentally deleted by the users.
Related: How to Hide Files and Folders in Windows 11/10.
View Hidden Files & Folders in Windows 11/10
If becomes necessary for troubleshooting and other purposes, Windows operating system provides the option to show both Hidden System Files and also other types of hidden files on the computer by making use of the “View” and “Options” Menu; as available in File Explorer.
When the option to Show Hidden Files is enabled on a Windows computer, it results in hidden files being shown with partially transparent icons on the File Explorer screen, which makes it easy to distinguish them from regular files and folders on the computer.
1. Show Non-System Hidden Files & Folders
The easiest way to show the regular or “non-system” hidden files and folders on a Window computer is by using the “View” tab in File Explorer.
1. Open the File Explorer on your computer.

2. On the File Explorer screen, open the View tab > go to Show and click on Hidden Items.
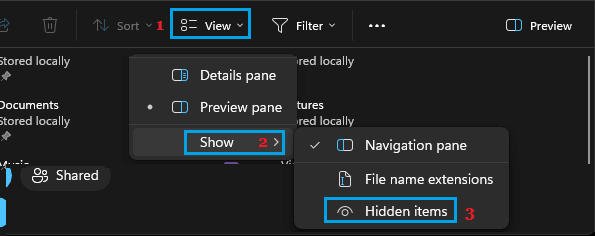
After this, you will be able to see all the non-system files/folders that were previously hidden on the computer.
Note: Even if you show Hidden Files using this method, protected system files (.sys) will continue to remain hidden on the computer.
2. Show Hidden System Files & Folders
If required for troubleshooting purposes, you can show Hidden System Files on the computer by using the following steps.
1. Open the File Explorer on your computer.
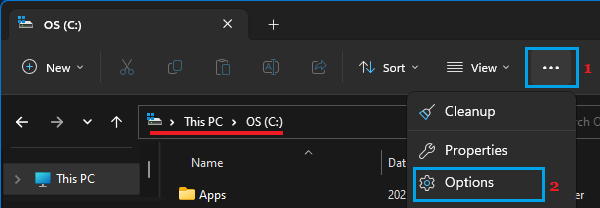
2. On the File Explorer screen, click on 3-dots icon located in the top-menu bar and select Options in the drop-down menu.
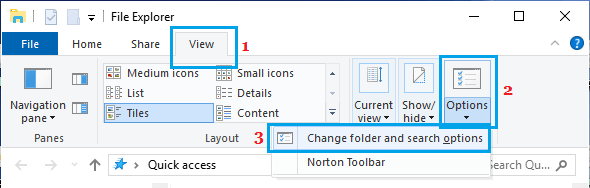
Windows 10: Click on View > Options and select Change Folders and Search options in the menu that appears.
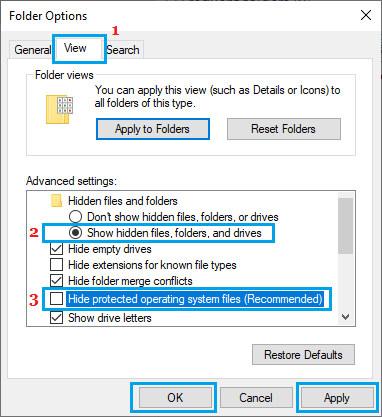
3. On Folder Options screen, switch to View tab, select Show hidden files, folders, drives option, scroll down a bit further and uncheck Hide protected operating system files (Recommended) option.
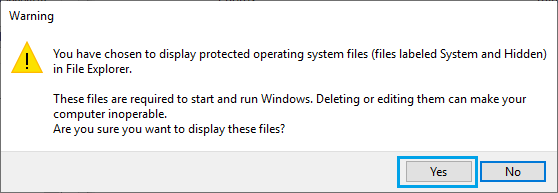
4. On the warning or confirmation pop-up, click on the Yes button.
5. Click on Apply and OK to save the changes
As you can see in the warning pop-up, deleting or editing system files can have an adverse impact on the performance the computer and it can even result in the system becoming inoperable.
Hence, it is recommended that you go back to the default setting of keeping system files hidden, as soon as you are done with the purpose of showing the System Files on your computer.