While the problem of iMessage not syncing between iPhone and Mac is usually reported after a macOS update, it can also occur at any other time.
In such cases, the reason for iMessages not syncing between iPhone and Mac could be due to incorrect iMessage settings, poor network connectivity and other reasons.
iMessage Not Syncing on Mac
If iMessages are not syncing between iPhone and Mac, you should be able to fix the problem using the following troubleshooting steps.
1. Check Apple ID on Mac
In order to allow syncing of iMessages between iPhone and Mac, you need to be logged-in to iMessage using the same Apple ID on both devices.
1. Open the Messages App on your iPhone.
2. Click on Messages tab in top-menu bar and select Preferences in the drop-down menu.

3. On the next screen, switch to iMessage tab and make sure that you are you are signed-in to iMessage with the right Apple ID.
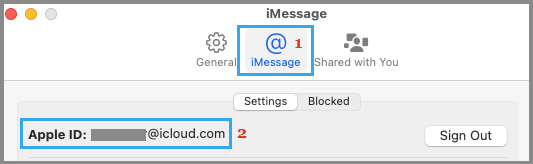
If not, Sign Out of iMessage and Sign-in back in to iMessage using the right Apple ID.
2. Check iMessage Settings on iPhone and Mac
The next step is to make sure that the same Phone Number and Apple ID Email Address are linked to iMessage on both iPhone and Mac.
On iPhone: Go to Settings > Messages > Send & Receive > make sure both your Apple ID and Phone Number are listed with check marks.
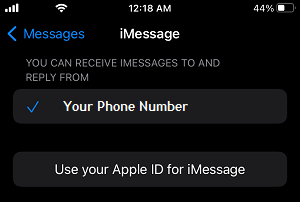
If there is no check mark, tap on your Phone Number to activate iMessage for your Phone Number. If Apple ID is not listed, tap on Use your Apple ID for iMessage and sign-in to your Apple ID.
On Mac: Open Messages App > click on Messages tab in top-menu bar and select Preferences in the drop-down menu.
On the next screen, switch to iMessage tab and make sure that both your Apple ID Email address and Phone Number are listed under “You can be reached for Messages At:” section are selected.
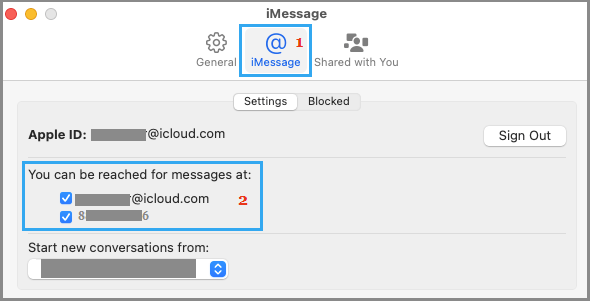
In general, you need to make sure that you are using the same Apple ID on both devices and the same Email Address under “You can be Reached For Messages At” section.
3. Send An iMessage from Mac
Even if the the same Apple ID Email Address and Phone Number are listed for iMessage on iPhone and Mac, you may still find iMessages working on iPhone but not syncing to Mac.
This usually happens due to the Message App giving priority to iPhone over Mac, sending Messages to iPhone first and delaying or not at all pushing those Messages to Mac.
A simple solution to this issue is to open the Messages App on your Mac and send an iMessage to any Apple Device user.
Once the Message is sent, you should find iMessages appearing on Mac, as if the Messaging App was looking for a confirmation of the User being active and present on Mac.
4. Sign-out and Sign-in to Messages on Mac
Since the problem is appearing on Mac, Sign out of iMessage on Mac and sign-in back again. This can help resolve any technical glitches that iMessage on your Mac might be going thorough.
1. Open Messages App > click on Message tab in top-menu bar and select Preferences in the drop-down menu.
3. On the next screen, switch to iMessage tab and click on the Sign out button.
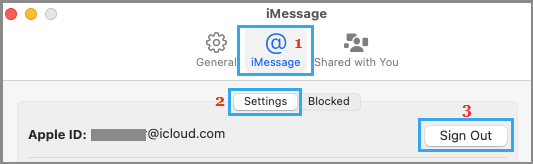
4. After 30 seconds, open Messaging App and Sign-in to iMessage using your Apple ID Email Address and Password.
5. Enable/Disable iMessage On iPhone
If Signing out of iMessage and signing back-in on Mac did not help, try disabling and enabling iMessages on iPhone.
1. Go to Settings > Messages > disable iMessage by moving the slider to OFF position.
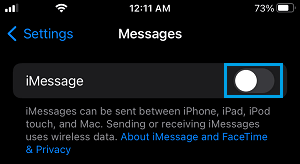
2. After 30 seconds, enable iMessage back on your device by moving the toggle next to iMessage to ON position.
Deleted Messages Appearing on iPhone and Mac
The way iMessage works, you will have iMessages appearing on iPhone, even if you had deleted these iMessages on Mac. The same thing happens when you painfully go through the process of deleting iMessages on iPhone, only to see them appearing on Mac.
This happens because iMessage generates different security keys for your iPhone and Mac and makes use of these security keys to push Messages separately to your Mac and iPhone.
In short, iMessage syncing only makes iMessages appear on both devices, it does not work like traditional syncing.