If you are looking for a way to forward Gmail to another Email Account, it is likely that you have switched to another Gmail Account or to an Email account from Outlook and other Email service providers.
In both cases, you can make use of the Mail Forwarding feature in Gmail to automtically forward all emails landing in your Gmail Account to another Email Address.
Auto Forward Gmail to Another Email Account
You can find below the steps to Auto Forward Gmail to another Email Account and also the steps to disable Auto-forwarding in Gmail.
As mentioned above, the Email Account that you are forwarding messages to does not necessarily need to be another Gmail Account, it can also be an Outlook Mail or an Email Account from other Email Service providers.
1. Forward Gmail to Another Email Account
The Mail Forwarding feature in Gmail works only on Desktop. Hence, you need to login to your Gmail Account on Mac or PC to complete the following steps.
1. Login to your Gmail Account on a Windows computer or Mac.
2. Once you are logged-in, click on the Gear icon located at top-right corner and select Settings in the drop-down menu.
![]()
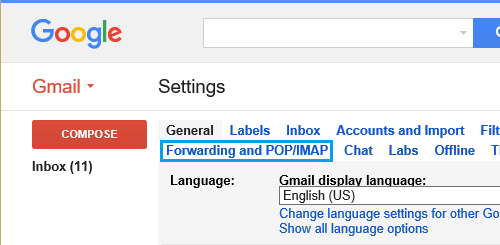
3. On the Settings screen, click on Forwarding and POP/IMAP tab.
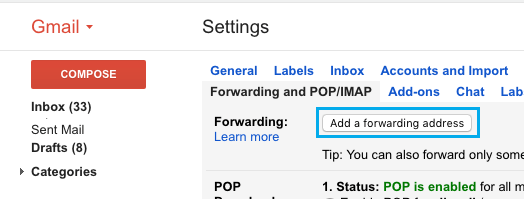
4. Next, click on Add a Forwarding Address button located in “Forwarding” section.
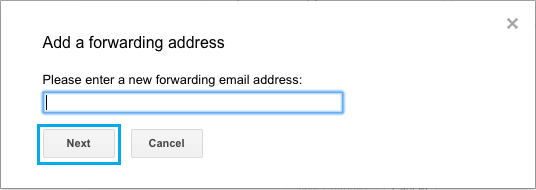
5. On the pop-up, enter the Email Address to which you want to forward Gmail Messages to and click on Next.
6. On the next pop-up, click on Proceed.

7. Google will now send a Verification Message to your other Email Address that you just provided. Do not logout of your Gmail Account or close the screen.
8. Login to your other Email Account, open the Verification Message from Google and click on the Verification Link.

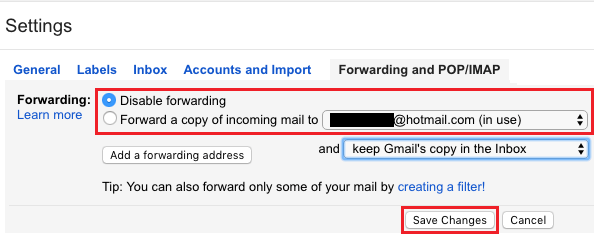
9. Now, go back to your Gmail Account Settings page and make sure that Forwarding a copy of incoming mail option is selected and your other email address appears in this section (see image below).
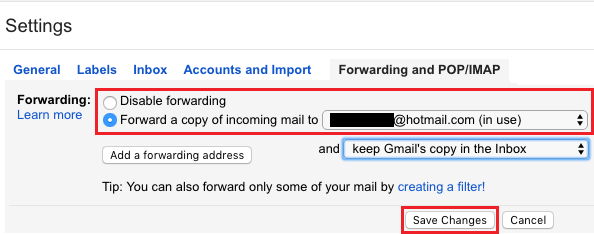
Also, select whether or not you want to keep a copy of forwarded messages in your current Gmail Account and click on Save Changes.
2. Disable Mail Forwarding in Gmail
At any time, you can disable email forwarding to other email accounts by following the steps below.
1. Login to your Gmail Account > click on the Gear icon > Settings.
2. On the Settings screen, click on Forwarding and POP/IMAP tab.
3. Next, choose Disable forwarding option and click on Save Changes button located at the bottom of the page.
Auto Forward Specific Gmail Messages to Another Email Account
As mentioned above, you can setup filters in case you wanted to auto-forward specific types of Emails from your Gmail Account to another Email Account.
Once filters are setup, Emails will be automatically forwarded from Gmail to other Email Account based on the Filter Criteria.