There comes a time in the life of every computer when it becomes necessary to free up storage space, in order to improve its performance and prevent it from running out of storage space.
Hence, Windows operating system comes with built-in tools like Storage Sense and Disk Clean up wizard that you can be used to free up hard disk storage space on your computer.
After running these tools, you can free up more storage space by getting rid of unnecessary apps and bloatware programs that come preloaded from the manufacturer on most Windows computers.
Free Up Storage Space on Computer
You can find below the steps to Free up the Hard Disk Storage Space on a Windows 10/11 computer.
1. Empty Recycle Bin
When you delete files and photos on your computer, the deleted items are only moved to the recycle bin, where they continue to occupy storage space on your computer.
Hence, the easiest way to gain some immediate storage space on a computer is to manually empty the Recycle bin.
Right-click on the Storage Bin and click on Empty Recycle Bin option in the contextual menu. On the confirmation pop-up, click on Yes to get rid of all the accumulated items in the Recycle Bin.
2. Run Storage Sense
The Storage Sense feature in Windows is designed to automatically remove unwanted files from the computer. However, you can also run the Storage Sense utility manually, at any time on your computer.
1. Open Settings > click on the System Icon.
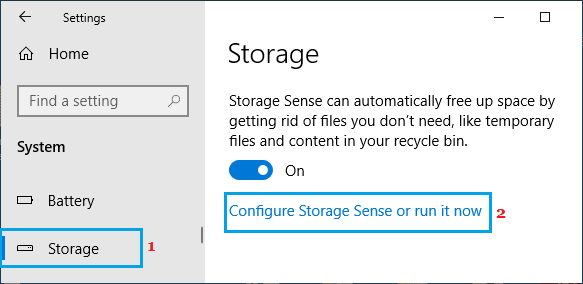
2. Select Storage in the left-pane. In the right-pane, click on Configure Storage Sense or run it now option.
3. On the next screen, select the File types that you want to remove and click on Clean now button.
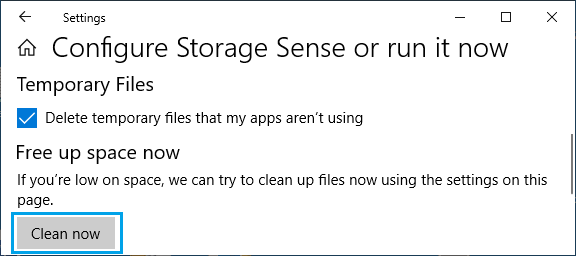
This will free up the Storage space on your computer by removing temporary and other unwanted files that you selected for removal.
3. Use Disk Cleanup App
The Disk Cleanup Wizard is a classic Windows Storage Management tool that is still available in Windows.
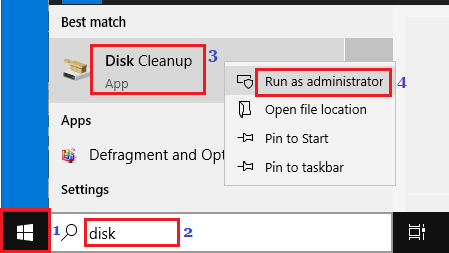
1. Type Disk Cleanup in the Search bar > right-click on Disk Cleanup App and click on Run as Administrator.
2. When prompted, enter your Admin Password and wait for Windows to calculate the amount of storage space that can be saved on your computer.
3. On the next screen, click on OK to remove all the suggested files.
4. Uninstall Unused Programs and Apps
Follow the steps below to uninstall programs and apps that you no longer use.
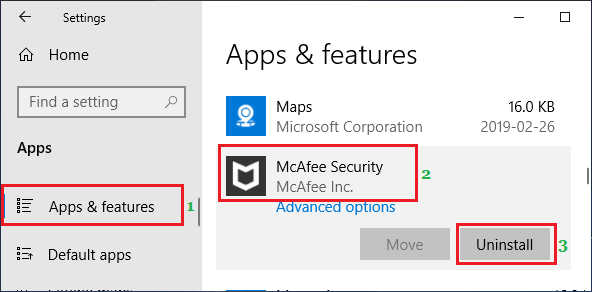
1. Go to Settings > Apps > select Apps & Features in the left pane. In the right-pane, click on the App or program that you want to uninstall and click on the Uninstall button.
3. On the confirmation pop-up, click on Uninstall to confirm.
5. Uninstall Built-in Windows App
If you are really struggling with lack of storage space, you can consider uninstalling built-in Windows programs like Maps, Groove Music and others that you do not use.
For Uninstalling built-in Windows Apps and programs, you can refer to this article: How to Uninstall Microsoft Apps in Windows 10
6. Remove Bloatware
In addition to the Operating System and Microsoft programs, manufacturers tend to preload Windows computers with their own software programs, utility tools and trail version of software programs.
All such programs can be classified as bloatware as they rarely get used and yet continue to exist on the computers, taking up valuable storage space.
You can get rid of all the Bloatware on your computer by using steps as provided in this guide: How to Remove Bloatware From Windows 10 PC.
7. Delete System Restore Points
While creating Periodic System Restore points is a good precaution against the possibility of data loss, these System Restore Points can keep accumulating on your computer.
The easiest way to remove all the system restore points on your computer, except the latest one is to make use of the Disk Cleanup App.
1. Type Disk Cleanup in the Search bar > right-click on Disk Cleanup App and click on Run as Administrator.

2. On the next screen, select the More options tab and click Clean up button under “System Restore & Shadow copies” section.
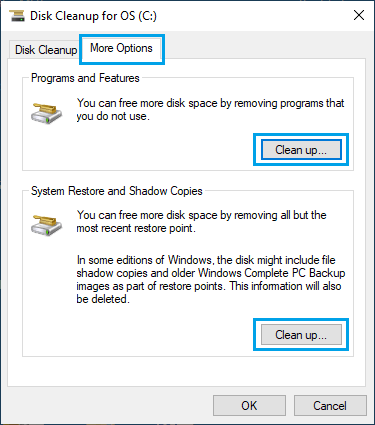
3. On the conformation pop-up, click on the Delete button to confirm.
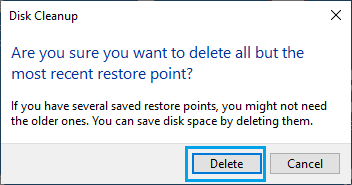
Windows will now delete all the System Restore points from your device and keep only the most recent System Restore point on your computer.