If you are looking for a way to Hide or Block Wi-Fi Networks on your computer, it is likely that you want to prevent the possibility of connecting to unknown and untrusted Wi-Fi Networks.
Luckily, the default setting in Windows is to automatically connect to your own Wi-Fi Network, which prevents it from connecting to unknown networks.
However, there is always the possibility of someone in your home connecting to an unprotected and open Wi-Fi Network.
Hide/Block Wi-Fi Networks in Windows
A simple solution to prevent the possibility of anyone in your house being able to automatically connect to unknown Wi-Fi Networks is to Hide/Block other Wi-Fi Networks.
Hence, we are providing below the steps to block all unknown Wi-Fi Networs on your computer and also the steps to block a particular or a single Wi-Fi Network on your computer.
1. Block Single Wi-Fi Network On Windows Computer
You can follow the steps below to block a particular Wi-Fi Network on your computer.
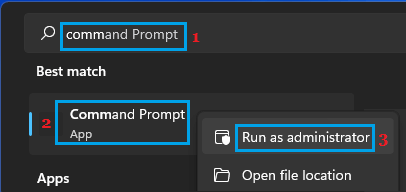
1. Type Command Prompt in the search bar > right-click on Command Prompt App in the serac results and click on Run as Administrator option.
2. On Command Prompt screen, type netsh wlan add filter permission=block ssid=”Name of Wi-Fi Network that you want to block” networktype=infrastructure and press the Enter key on the keyboard of your computer.
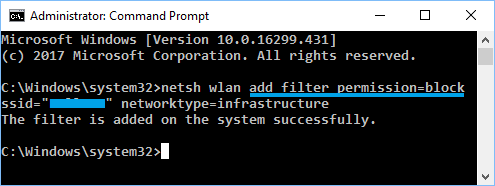
In the above command, make sure that you type the actual Wi-Fi Network Name (in SSID field) that you want to block from appearing on your computer.
Once the command is executed, you will see “Filter is added on the system successfully” and the Wi-Fi Network will be blocked from appearing on your computer.
You can repeat the above command, in case there are a few more Wi-Fi Networks that you want to prevent from appearing on your computer.
Note: The above command blocks Wi-Fi Networks based on “Network Name”. If your neighbor happens to rename his/her Wi-Fi network, you will see the new name appearing on your computer.
2. Block All Unknown Wi-Fi Networks
Instead of going through the process of hiding individual Wi-Fi networks, you can simply add your Wi-Fi Network to the allow list and block all other unknown Wi-Fi Networks.
This means that only your Wi-Fi Network or approved Wi-Fi Networks will be able to show on the computer and all other Wi-Fi Networks will be blocked.
First whitelist your own Wi-Fi Network by running netsh wlan add filter permission=allow ssid=”Name of WI-FI Network that you want to whitelist” networktype=infrastructure
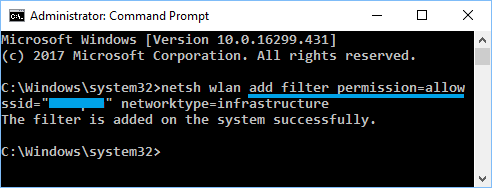
In the above Command, make sure you type the actual Wi-Fi Network Name (in SSID Field) that you want to whitelist.
You can repeat the above command; in case you have other Wi-Fi Networks that you want to add to the Allow list or whitelist.
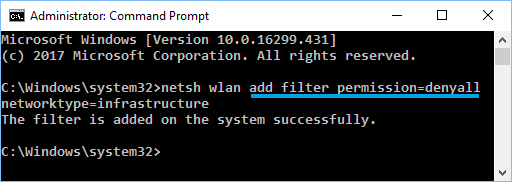
After Adding your own Wi-Fi Network to the Safe List, the next step is to block all other Wi-Fi Networks on your computer.
To block all Wi-Fi Networks, type netsh wlan add filter permission=denyall networktype=infrastructure and press the enter key.
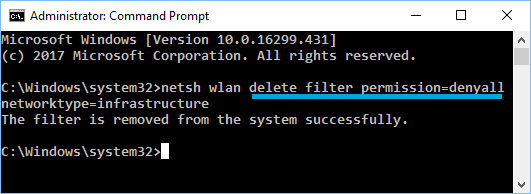
At any time you can undo this change and allow other Wi-Fi Networks, by running netsh wlan delete filter permission=denyall networktype=infrastructure
Since, this method blocks all unknown Wi-Fi Networks, you won’t be able to connect to Wi-Fi hotspots in case you carry your Laptop elsewhere.
3. Unblock Wi-Fi Network On Windows Computer
At any time, you can unblock Wi-Fi Networks on your computer by running netsh wlan delete filter permission=block ssid=”Name of Wi-Fi Network that you want to unblock” networktype=infrastructure
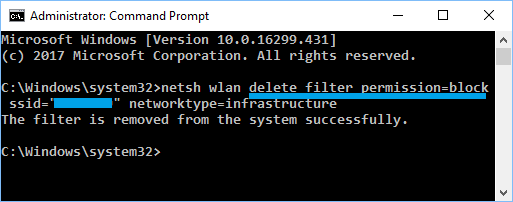
In above command, make sure that you type the actual Wi-Fi Network Name (in SSID Field) that you want to unblock.
4. View Unblocked and Blocked Wi-Fi Networks
In case you forget Wi-Fi Network names, you can view all the Wi-Fi Networks by running “netsh wlan show filters” command
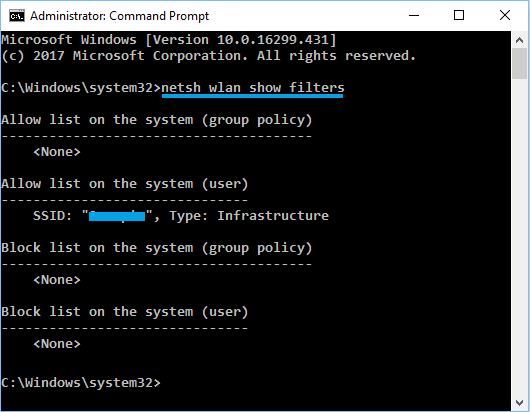
Once the command is executed, you will be able to see all the Allowed and Blocked Wi-Fi Networks on your computer.