The default tendency on a Windows computer is to automatically scan for nearby Wi-Fi networks and show them on the network screen; which makes it really easy for users to connect to their Home or Office Wi-Fi network.
Hence, you will have a hard time connecting to the internet, if your computer is not showing Wi-Fi Networks and this issue needs to immediately fixed.
Wi-Fi Networks Not Showing in Windows 11/10
In general, the reason for Wi-Fi Networks not showing up on a Windows computer is usually due to change in Network Settings, the network drivers becoming outdated or corrupted and other reasons.
In most cases, the problem of a Windows computer not showing Wi-Fi networks can be fixed by updating network drivers, restarting network adapter, running the built-in network troubleshooter and others methods as provided below in this guide.
1. Disable Airplane Mode
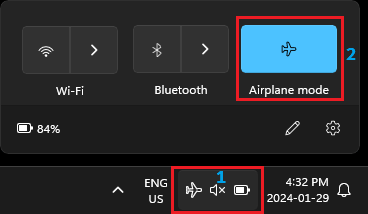
If you have been travelling, make sure that Airplane mode is not enabled on your device. If your device is in Airplane mode, you will see an Airplane Icon in the taskbar (bottom-right corner).
1. Click on the Airplane icon in the taskbar > click on Airplane Mode tab to disable Airplane mode on your computer.
2. Next, go to Settings > Network and Internet and make sure the toggle next to Airplane mode is set to OFF position.
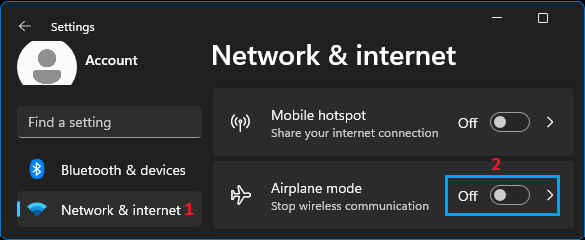
You should now find your computer displaying all the available Wi-Fi networks and you may also find it automatically connecting to your Wi-Fi network.
2. Restart Network Adapter
Restarting Network Adapter might help in fixing this issue.
1. Right Click on the Start button and click on Device Manager.
2. On Device Manger Screen, expand Network Adapters entry > right-click on your Wireless Adapter and select Disable Device option.
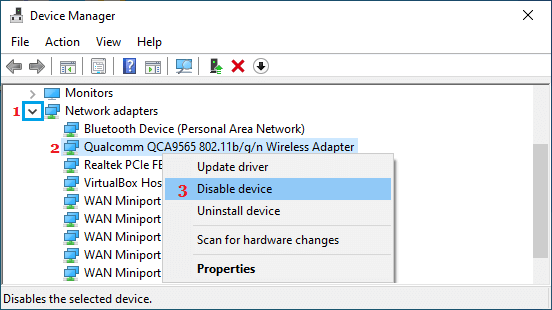
3. After 30 seconds, right-click on Wireless Adapter again and this time select the Enable Device option.
Restart the computer and check to see if your computer is now displaying Wi-Fi networks.
3. Update Network Adapter Driver
As mentioned above, the problem could be due to the driver software for network adapter not being up to date with the latest available version.
1. Right click on Start button and click on Device Manager.
2. On the Device Manager Screen, open Network Adapters entry > right-click on the right Wi-Fi Adapter for your computer and click on Update Driver Software option.
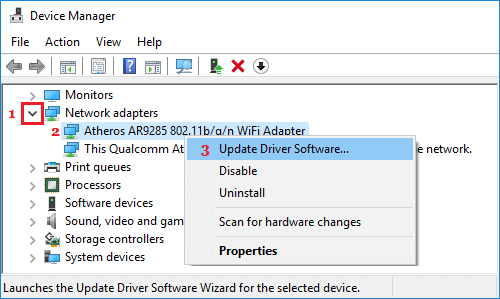
Note: If there are multiple entries, click on the entry that has the terms “Network, 802.11b or Wi-Fi” in it.
3. On the next screen, select Search automatically for updated driver software option.
4. Follow the instructions to install the updated driver on your computer (if available).
4. Run Network Troubleshooter
Windows comes with a built-in Network & Internet Troubleshooter, which can be very effective & helpful in fixing network connectivity issues.
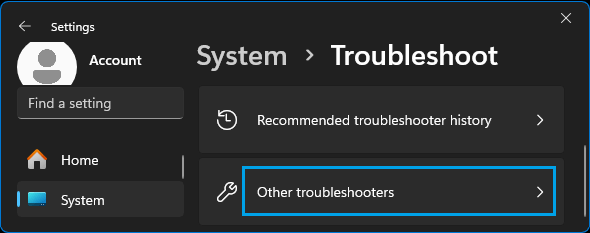
1. Go to Settings > System > scroll down in the right-pane and click on Troubleshoot.
2. On the next screen, scroll down and click on Other troubleshooters.
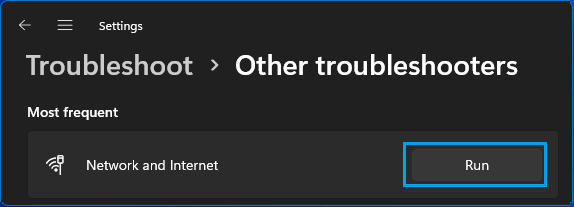
3. On the next screen, click on the Run button located in “Network & Internet” tab.
4. Follow the onscreen instructions as the troubleshooter tries to find and fix network connectivity problems on your computer.
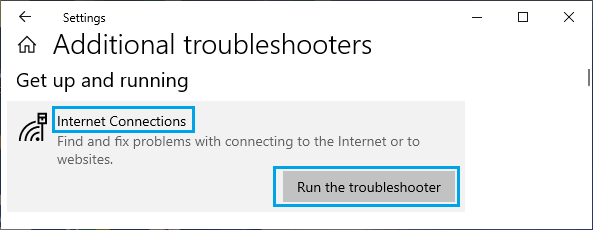
Windows 10: Go to Settings > Update & Security > Troubleshoot > Additional Troubleshooter > select Internet Connections and click on Run the troubleshooter button.
Follow onscreen instructions as the troubleshooter tries to find and fix Wi-Fi connectivity problems on your computer.
5. Reset Network Settings
As mentioned above, the problem could be due to change or corruption of the Network Settings on your computer.
This issue can be fixed by resetting the Network Settings on your computer to its original or Factory Default Settings by using steps as provided in this guide: How to Reset Network Settings in Windows 11/10.
After the Reset process is completed, click on the Wi-Fi icon in the taskbar and see if your computer is now displaying Wi-Fi networks.