As you must have seen on online forms, a checkbox, selection box or tick box (British English); is a little square box that provides an interactive way to make choices or select applicable items.
Clicking inside the checkbox inserts a check mark icon into the checkbox, indicating that an option has been selected. In most cases, checkboxes provide the option to deselect a choice/entry by clicking once again inside the checkbox; if the user makes a mistake or wants to change the choice that was made.
Insert Checkbox in Microsoft Excel
While inserting a checkbox in Microsoft Excel is easy, many users have a hard time trying to find the right tab where the option to insert checkbox is located.
The reason for this is due to the option to Insert Checkbox, Radio Box and other interactive tools being available in the Developer tab, which is not enabled by default in Microsoft Excel.
Hence, the first step that is required to insert a checkbox in Microsoft Excel is to add the Developer tab to the ribbon menu in Excel.
Step 1: Add Developer Tab to Ribbon Menu in Excel
The quickest way to add the Developer Tab to Ribbon menu in Excel is to right-click in an empty space in the ribbon menu and click on Customize the Ribbon… option.
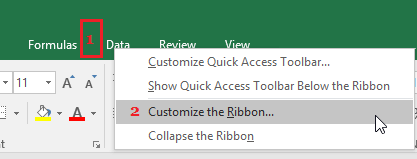
On the next screen, select the little box next to Developer and click on OK.
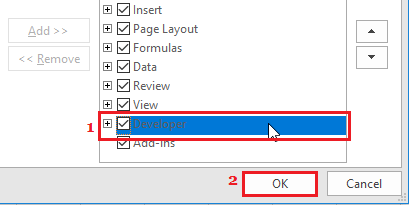
If this does not work, you can try any of the following methods as applicable for the version of Microsoft Excel that you are using on your computer.
- Excel 2010 and Later: Click on File > Options > Customize Ribbon > select the Developer option and click on OK.
- Excel 2007 and earlier: Click on the Microsoft Office Button > Excel Options > Popular > select Show Developer Tab in the Ribbon.
- Excel on Mac: Click on Customize tool bar Down Arrow and select More Commands. On the “More Commands” screen, click on the Ribbon tab and select the Developer option.
Step 2: Add Checkbox to Cells in Excel
Once the Developer tab is enabled in the ribbon menu, you are all setup and ready to insert checkboxes into any of the Cells in your Excel workbook.
1. Click on the Developer tab and select the Check Box option.
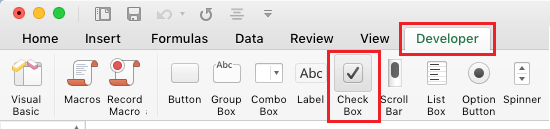
2. Next, click in the Cell in which you want to insert the checkbox. If required, you can drag the checkbox to its desired position using the four-pointed arrows.
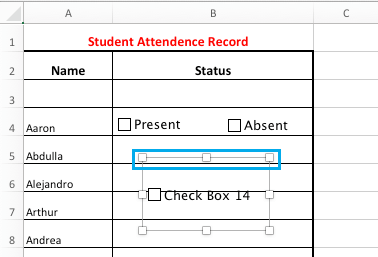
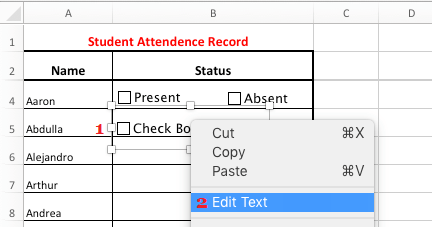
3. Once the checkbox is properly placed in its cell, right-click on the Checkbox > click on Edit Text and type the Title for the checkbox.
3. Copy Checkbox to Other Cells
After inserting checkbox in the first cell, you can copy and paste the same checkbox to other cells.
1. Right-click on the Checkbox > select Copy in the contextual menu.
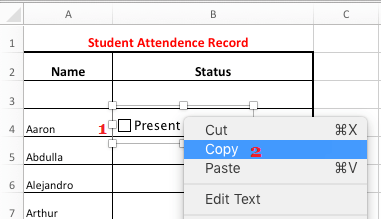
2. Select the Cells into which you want to insert the checkbox, right-click on the selected Cells and choose the Paste option in the contextual menu that appears.
This way the same checkbox along with its title will be pasted into the selected cells and you do not have to go through the steps to insert the checkbox.
Step 3: Link Checkbox to Cell in Excel
Although the checkboxes have been inserted and you are able to select and unselect them, you won’t be able to count the responses or use the checkbox responses in an Excel formula.
In order to be able to Count or use checkbox responses in an Excel formula, the checkboxes need to be linked to their own individual cells.
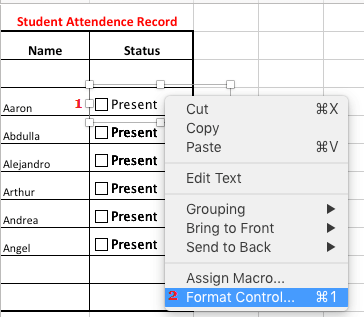
1. Right-click on the first Checkbox and click on Format Control.
2. In the Format Control screen, click on Control tab > Cell Link box > and then click on the Cell that you want to link to the checkbox and click on OK.
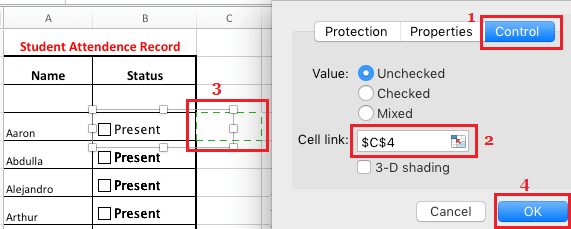
3. Repeat the above steps for all the remaining checkboxes. Unfortunately, you will have to do this One-by-One.
4. Once you have linked all the checkboxes, click in the linked Checkboxes and you will see “True” appearing for checked boxes and “False” for cleared checkboxes.
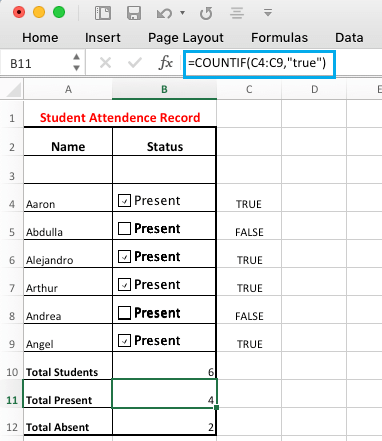
5. Once the checkboxes are linked to cells, you will be able to Count the responses and use them in any Excel Formula.
As you can see in the image above, we have counted the number of Present and Absent students by using their responses in the checkboxes.