Sometimes, a Windows 11/10 computer can suddenly come up with “.dll file is missing” error message, which cannot be ignored and needs to be fixed.
DLL Files (Dynamic Link Libraries) contain bits of common utility codes and data that can be used by various programs and processes operating on a Windows computer.
The idea behind using DLL Files in Windows operating system is to achieve modularization and reuse of common code files, which results in efficient use of resources and reduces system complexities.
Missing DLL File Error in Windows 11/10
The reason for “.dll file is missing” error on a Windows computer could be due to accidental deletion of DLL File, DLL Files getting corrupted or DLL Files being overwritten with an older or non-compatible version.
Before going ahead with the troubleshooting steps, simply restart your computer to rule out the possibility of the DLL Files not being loaded on the computer due to a stuck program or procecess.
1. Restore DLL Files
If you had accidentally deleted a DLL File, it should still be available in the Recycle Bin.
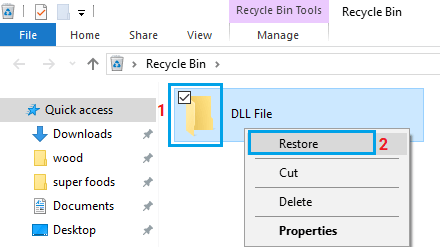
1. Open the Recycle Bin on your computer and look for files with .dll extension.
2. Right-click on the DLL File and select the Restore option.

2. Run Malware scan
Missing DLL File error can also be generated by viruses and other harmful programs trying to sneak into your computer by disguising themselves as DLL Files.
Hence, it makes sense to Scan your Computer for Viruses using Windows Defender or the Third Party Antivirus program installed on your Computer.
3. Uninstall and Reinstall Applications
If you are noticing Missing DLL File error after installing a particular program or App, it is possible that the program was not properly installed on your computer.
To confirm, Uninstall the program and see if the error goes away. After checking, you can Reinstall the Program back on your computer.
4. Update Device Drivers
Missing DLL File Error can also be caused by incompatible, corrupted or outdated Device Driver Files.
1. Right Click on the Start button and click on Device Manager.
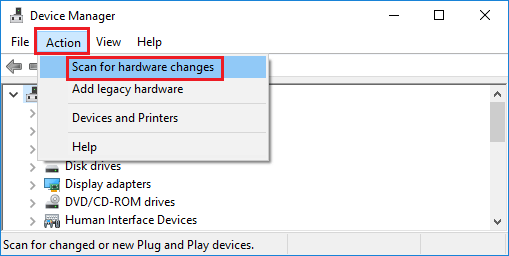
2. On Device Manger Screen, select the Action tab and click on Scan for hardware changes option.

Windows will check the computer for Hardware changes and install the required drivers.
5. Run System File Checker
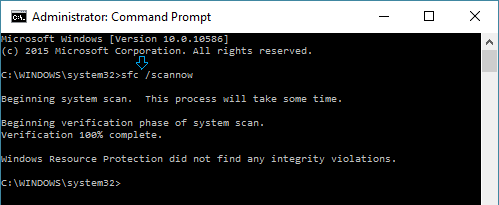
If above methods did not help, run SFC command to allow the built-in System File Checker on your computer to find and replace missing or corrupted system files.
1. Right-click on the Start button and click on Command Prompt (Admin).
2. On the Command prompt screen, type sfc /scannow and press the Enter key on the keyboard of your computer.

3. Restart the computer to see if the problem is fixed.
6. Repair System Image Using DISM
1. Open Command Prompt (Admin).
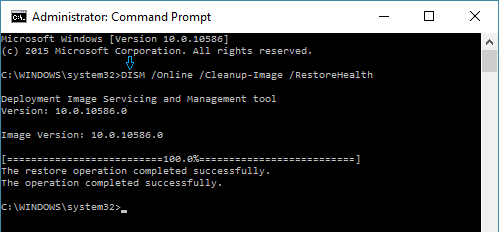
2. On the Command prompt screen, type Dism /Online /Cleanup-Image /RestoreHealth and hit the Enter key on the keyboard of your computer.

The DISM command checks for Windows component store corruption and restores good health.
3. Wait for the DISM command to be completed (15 minutes or more).
After the DISM process is completed, close the Command Prompt window and Restart the computer for the changes to apply.