As indicated by its name, the “Devices and Printers” section in Windows is designed to provide easy access to Printers and Devices connected to the computer, so that you can manage them.
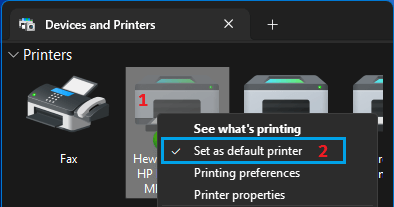
In addition to showing devices that are connected to the computer, the “Devices & Printers” section also provides the option to Add Printers, Set Default Printer and change Printer Preferences/Settings on your computer.
Open Devices and Printers in Windows 11/10
Depending on your preference, you can open or access the “Devices and Printers” section on your computer using Settings, Control Panel or by using Device Manager.
Once you land on “Devices and Printers” section, you will be able to see devices that are directly plugged-in to the computer and also devices that are wirelessly connected to the computer using Wi-Fi/Bluetooth network.
1. Open Devices & Printers From System Tray
If there is a USB Drive or an External Hard Drive attached to the computer, you should be able to open “Devices & Printers” by clicking on the System Tray Icon.
1. Click on System Tray Icon > right-click on the USB Drive and click on Open Devices and Printers.
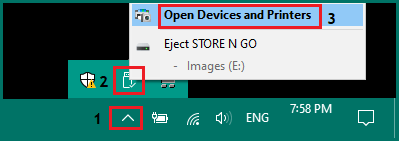
2. On the next screen, you will be on the “Devices and Printers” screen, which allows to Set Default Printer, Manage Print Jobs and Printer Preferences on your computer.
Note: This option becomes available only if a USB Drive is attached to the computer.
2. Open Devices and Printers Using Device Manager
Another easy way to open “Devices and Printers” on a Windows computer is by using the Device Manager utility as available in Windows 11/10.
1. Right-click on the Start button and click on Device Manager.
2. On the Device Manager screen, click inside the box or click on any item > select the Action tab and click on Devices and Printers.
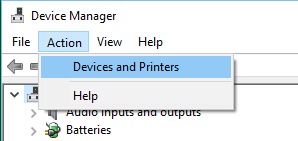
3. On the next screen, you will find all the Printers and Devices attached to the computer.
3. Open Devices & Printers Using Settings
If you are like most users, it is likely that you prefer using the Settings menu to open “Devices and Printers” on your computer.
1. Go to Settings > Bluetooth & Devices > click on View More Devices option in the right-pane.
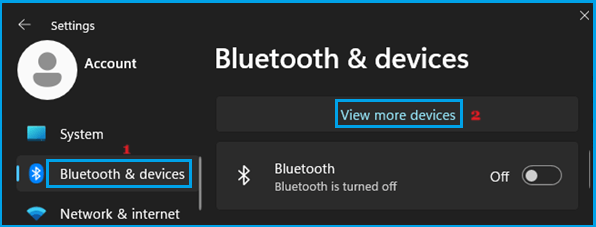
2. On the next screen, scroll down to “Related Settings” section and click on More devices and printer settings tab.

3. On the next screen, you will find yourself on the familiar “Devices & Printers” screen.
Windows 10: Go to Settings > Devices > Bluetooth & Other devices (left-pane) > click on Devices & Printers link located under “Related Settings” section.
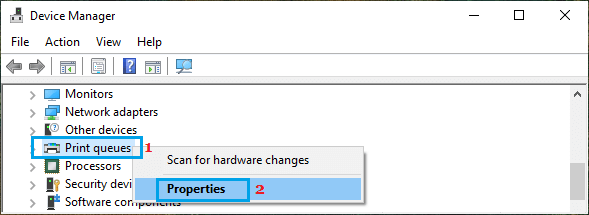
4. Open Devices and Printers Using Print Queue
Going to Print Queue properties from the Device Manager screen is another way to open Devices and Printers screen on a Windows 11/10 computer.
1. Open Device Manager > right-click on Print queues and click on Properties.
2. On the next screen, switch to Settings tab and click on Devices & Printers Folder button.
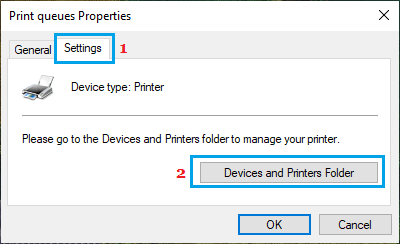
3. On the next screen, you will be landing on the Devices & Printers screen.
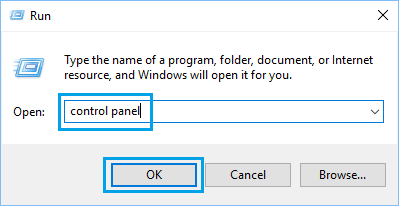
5. Open Devices & Printers Using Control Panel
You can also open “Devices & Printers” screen by going to the Control Panel.
1. Press Windows + R keys > Type Control Panel and click on OK.
2. On Control Panel screen, switch to Category view and click on View Devices and Printers link.
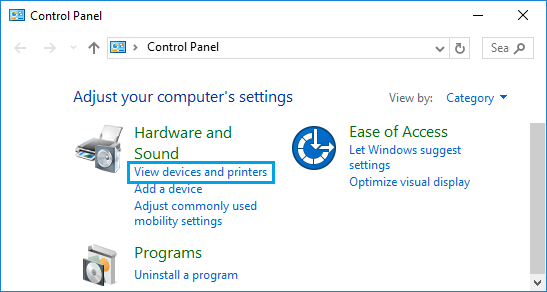
3. On the next screen, you should be on the “Devices & Printers” screen.
Note: If “View Devices and Printers” link does not open Devices & Printers, click on Hardware and Sound and then click on Devices & Printers on the next screen.