If you are looking for a way to remove credit card from Apple ID or iPhone, it is likely that you have changed or cancelled your credit card and you no longer want that particular card to be linked to your Apple ID or remain available on iPhone.
If you are like most users, it is likely that your credit card got linked to Apple ID; when you used it to verify your Country or Region during the account creation process and the credit card information got stored on iCloud as “Card on file” to pay for App store purchases and subscription services like Apple Music & iCloud storage.
Later on, your credit card got linked to iPhone, when you added it to Apple Pay; so that you could make use of your actual device (iPhone) to pay for in-store purchases via NFC and use it for online payments using Face ID/Touch ID.
Another way that your credit card can get linked to iPhone is when you decide to store your credit card information in Safari browser, so that you can make online purchases, without the need to manually fill your information and credit card details.
Remove Credit Card from Apple ID & iPhone
As you must have understood by now, you won’t be able to make purchases on the App Store and continue with Apple Music and iCloud+ subscriptions; if you remove your Credit Card from Apple ID.
In-fact, you won’t be able to remove the credit card from Apple ID; if you have any balance owing or have an ongoing or active subscription on file.
However, you can remove your credit from iPhone (Apple Pay & Safari browser) at any-time and this will have no impact on your ability to make purchases on the App Store and maintain the continuity of Apple Music, iCloud Plus and other subscription services.
1. Remove Credit Card from Apple ID on iPhone
You can remove credit card from Apple ID, right on your iPhone and also by going to App Store on a Mac or Windows computer (See the last method).
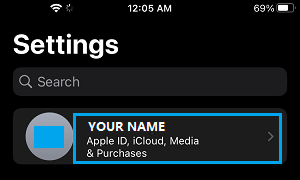
1. Open Settings and tap on your Apple ID Name.
2. From Apple ID screen, go to Payment & Shipping > Enter your Apple ID Password > Select the Credit Card that you want to remove.
3. On the next screen, tap on the Edit option (top-right) > scroll down and tap on the Delete option.
4. Make sure that you tap on Done to save the changes made to your payment method.
Note: As mentioned above, you won’t be able to change or remove your Payment Information, if you have an unpaid balance or an upcoming due payment.
2. Remove Credit Card from Apple Pay
You can follow the steps below to remove your credit card information from Apple Pay.
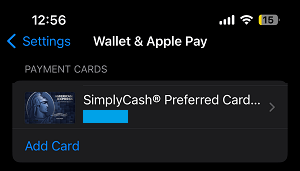
1. Go to Settings > Wallet & Apple Pay > select the Credit Card that you want to remove.
2. On the next screen, scroll down and tap on Remove Card option.
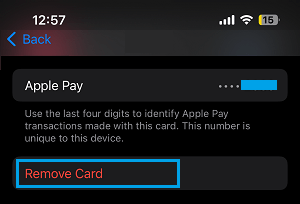
3. On the confirmation pop-up, tap on Remove to confirm.
With these steps, you have successfully removed your credit card information from Apple Pay.
3. Remove Credit Card from Safari Browser
If you are here to remove credit card from iPhone, make sure that your credit card information is removed from the Safari browser on your iPhone.
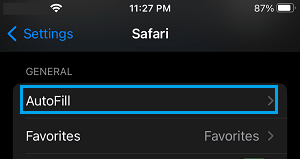
1. Go to Settings > Apps > Safari.
2. On the Safari screen, scroll down to “General” section and tap on AutoFill.
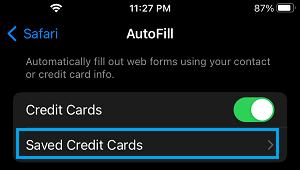
3. On the AutoFill screen, tap on Saved Credit Cards and enter your Lock Screen Passcode.
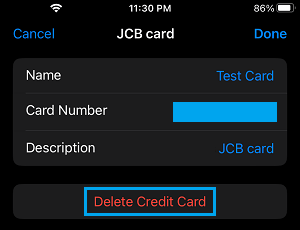
4. On the Credit Cards screen, select your Credit Card.
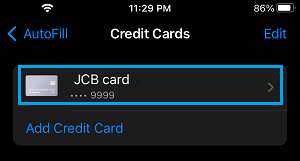
5. On the next screen, tap on the Edit option (top-right) and select the Delete Credit Card option.
6. On the confirmation pop-up, tap on the Delete option to confirm.
After following these steps, you have successfully removed your Credit Card information from all possible locations on iPhone.
4. Remove Credit Card from Apple ID on Computer
You can also remove the credit card linked to your Apple ID by logging into your App Store Account on a MacBook or Windows computer.
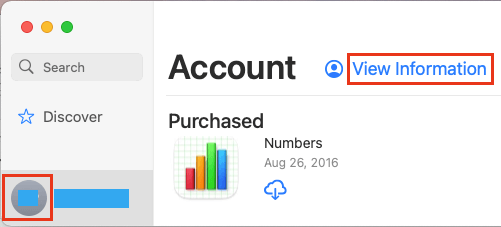
1. Open the App Store on your Mac > Click on your Name or the Sign-in button located at bottom left corner.

2. When prompted, sign-in to App Store by using your Apple ID and Passcode. Once you are Signed-in, click on your Profile Icon (bottom-left) and select View Information option.
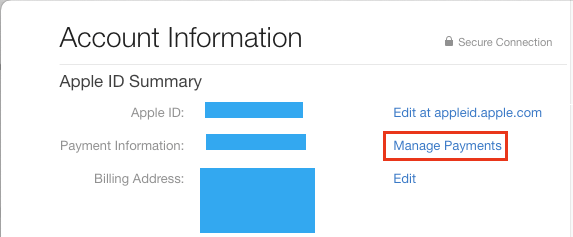
3. On Account Information screen, click on Manage Payments option listed in “Apple ID Summary” section.
4. On the next screen, select the Edit option located next to your Payment Method and then click on Remove.
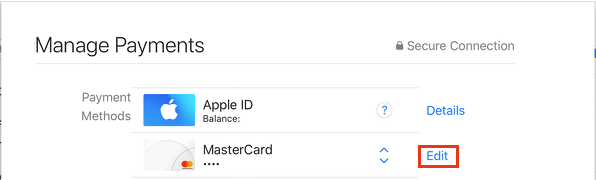
This should remove your Credit Card Information from your Apple ID.