You may find the need to reset the Firewall Settings on your Windows computer, if you are unable to download apps, access certain websites or unable to use or setup Remote Desktop.
Other reasons to reset the Windows Firewall Settings on a Windows 11/10 computer would be to undo changes made to Firewall Settings and close backdoors and open ports left on the computer by malware.
Reset Firewall Settings to Default in Windows 11/10
If you are facing problems on your computer due to corrupted firewall settings, you can find below multiple ways to Reset Firewall Settings on a Windows 11/10 computer.
Before going ahead with the steps to Reset Windows Firewall, you can take a backup of the current Firewall Settings on your computer by using the following steps.
1. Type Command Prompt > right-click on Command Prompt and select Run As Administrator option.

2. On the Command prompt screen, type netsh advfirewall export “C:\Archive\firewall-config.wfw” and press the Enter key.
After the Command is executed, you will find the Backup File at C:\Archive folder. You can copy the file from this location and store on Desktop or any other location.
1. Reset Windows Firewall Settings By Using Windows Security
Perhaps the quickest way to Reset Windows Firewall on a Windows computer is by using Windows Security App.
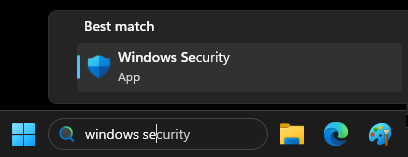
1. Type Windows Security in the Seach bar and click on Windows Security App in the search results.
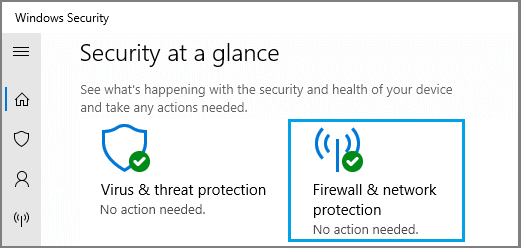
2. On Windows Security screen, click on Firewall & Network Protection.
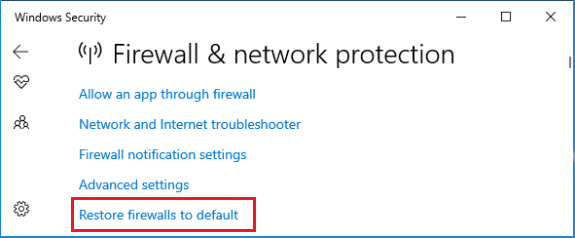
3. On the next screen, scroll down and click on Restore firewall to default option.
4. On the confirmation pop-up, click on Yes to confirm.
2. Reset Windows Firewall Using Control Panel
The Control Panel in Windows can still be used to reset the Firewall settings on a Windows computer.
1. Right-click on the Start button and click on Run.
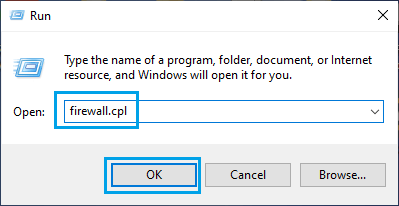
2. In the Run Command window, type firewall.cpl and click on OK.
3. On Windows Defender Firewall screen, click on Restore Defaults option.
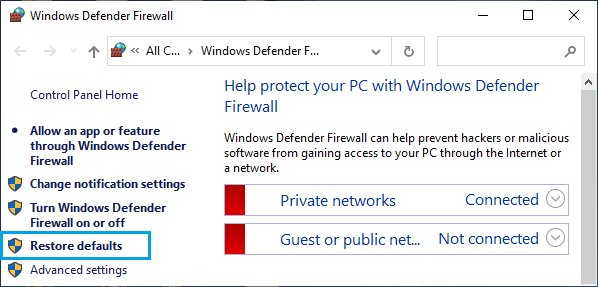
4. On the next screen, click on Restore Defaults button. On the confirmation pop-up, click on Yes to confirm.
3. Reset Windows Firewall Using the Settings App
You can also go to the Settings menu to reset the Firewall Settings on your computer.
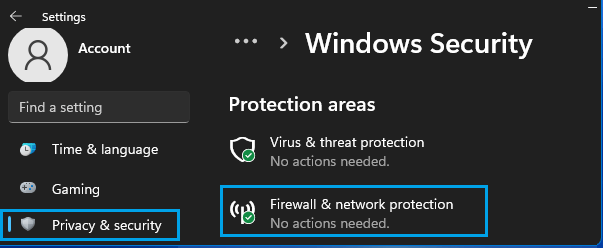
1. Open Settings > click on Privacy & Security (left-pane) and click on Windows Security in the right-pane.

2. Scroll down in the right-pane and click on Firewall & Network Protection tab.
3. On the next sccreen, scroll down and click on Restore Firewalls to default option.
4. This will take you to Control Panel’s Restore default settings page from where you can reset the firewall.
Now click on Restore defaults and then click Yes on the dialog box to reset Windows Firewall.
4. Reset Windows Firewall Using Command Prompt
If you like using Command Prompt, you can Reset Firewall by using a single command.
1. Type Command Prompt > right-click on Command Prompt and select Run As Administrator option.
2. On the Command Prompt screen, type netsh advfirewall reset.
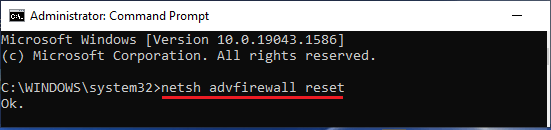
This single command is enough to Reset Windows Firewall to default settings.
5. Reset Windows Firewall Using PowerShell
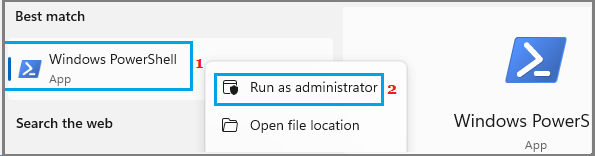
1. Type Powershell in the search bar > right-click on Windows PowerShell App and click on Run As Administrator option.
2. On the PowerShell screen, type (New-Object -ComObject HNetCfg.FwPolicy2).RestoreLocalFirewallDefaults() and press the Enter key.
Once the Command is executed, Windows Firewall on your computer will be Reset to Default Settings.