While the default option on a Windows computer is to connect to internet using a dynamic IP address, it also provides the option to assign or set static IP address.
Since, the IP address assigned by the Router is Dynamic in nature, it changes whenever the DHCP lease expires and it can also change when the Modem/Router is restarted.
While most users do not find the need to change this setup, there are cases, where you may find the need to set a static IP address on your Windows computer.
For example, services like file/printer sharing and port forwarding are best setup on a static IP address, otherwise they will stop working as soon as the computer acquires a new Dynamic IP address.
Assign Static IP Address in Windows 11/10
In order to set Static IP Address on your computer, the first step is to find the IP Address of the Router, which has the capacity to assign IP Addresses for your computer.
Once the Router IP Address is found, it can be used to assign a static IP Address for your computer in the next step.
Step #1. Find Router IP Address
The first step is find the IP Address of the Router which is responsible for assigning IP Address to all devices that are connected to your Home or Office Network.
1. Type Command Prompt in the search bar > right-click on Command Prompt and select Run as Admin option.

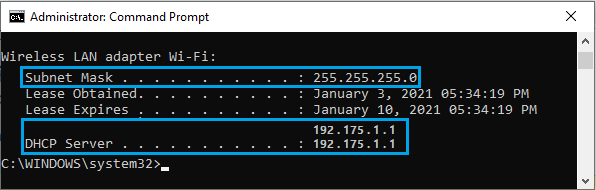
2. On the Command prompt screen, type ipconfig/all and press the Enter key.

3. Once the command is executed, scroll down the list of entries to “WiFi” or “Ethernet” section as required and note down Subnet Mask Address and the DHCP Server Address (Router IP Address).
4. Close Command Prompt window.
Step #2. Set Static IP Address
After noting down Subnet Mask and DHCP Server Address, follow the steps below to Assign or Set Static IP Address for your computer.
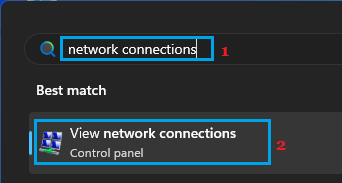
1. Type Network Connections in the search bar and click on View Network Connections Control Panel.
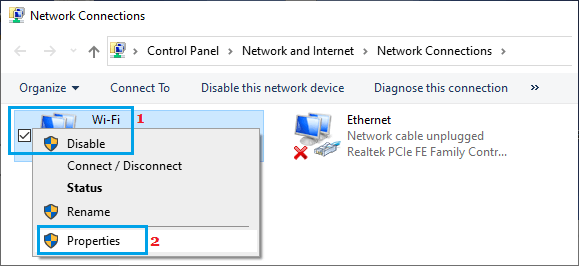
2. On the next screen, right-click on your active Network (Wi-Fi or Ethernet) and click on Properties.
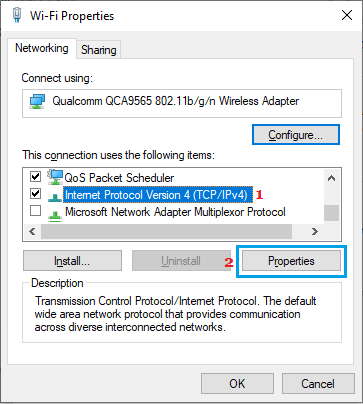
3. On the properties screen, select Internet Protocol Version 4 (TCP/IPv4) and click on Properties.
4. On IPv4 properties screen, select Use the following IP Address option > Enter Default Gateway (Router IP Address), Subnet Mask Address (As obtained in step 1), type Static IP Address and click on OK.
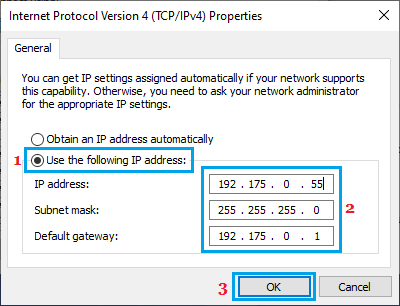
As you can see in above image, the first 3 number sets (192.175.0 in this case) in IP address field need to be the same as the default gateway address and you can only change the last number set with any number from 1 to 255.