A common reason for high CPU & RAM usage on Windows computers is due to the default tendency of many apps to start up with the computer and keep running in background, even when they are not actively being used.
In addition to this, high CPU & RAM usage can also be caused due to real-time scanning feature of Microsoft Defender, outdated drivers, corrupted system files, presence of virus/malware and other reasons.
Fix High CPU & RAM Usage in Windows 11/10
In most cases, the problem of high CPU & RAM usage on a Windows computer can be fixed by addressing the following common reasons for occurrence of this issue.
- Startup & Background Apps: Resource intensive apps starting up automatically when the computer boots up and remaining active in background.
- Outdated/Corrupted Drivers: Outdated or corrupted drivers can cause high resource usage by becoming incompatible and creating conflicts.
- Malware/Adware: Viruses, crypto-miners and other types of malware can hijack system resources for their own activities.
- System Settings: Windows computers come with default settings like “Delivery optimization”; which can cause spikes in CPU usage during background activities.
1. Terminate Resource Consuming Tasks
You should be able to achieve an immediate reduction in CPU/RAM usage on your computer by going to the Task Manager and terminating high resource consuming apps and services.
1. Right-click on Start button and click on Task Manager.
2. On the Task Manager screen, click on the CPU Column and this will bring up high CPU using processes to top of the column.
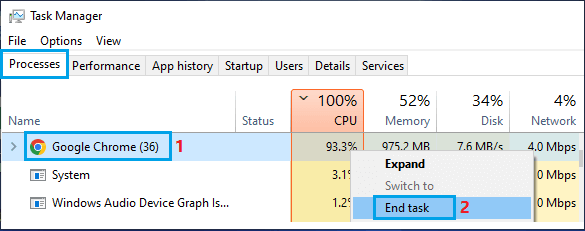 After this, right-click on the high CPU using Process and click on the End Task option.
3. Similarly, you can terminate other non-essential processes which are using high amount of CPU on the computer.
2. Disable Startup Programs
As mentioned above, the most common reason for high resource usage on a Windows computer is due to default tendency of apps to automatically starting up with the computer and keep running in background.
You can easily prevent such apps/programs from starting up with the computer by using steps as provided below in this guide: How to Prevent Apps from Opening At Startup In Windows.
3. Prevent Apps from Running in Background
Many apps have a default tendency to continue running in background; even when they are not actively being used.
You can identify and prevent such apps & desktop programs from running in background by using steps as provided in this guide: How to Disable Background Apps in Windows 11/10.
4. Disable SysMain (Superfetch) Service
While the “SysMain Service” which was previously known as Superfetch can help in improving the performance of applications, it has also been associated with high RAM & CPU usage.
You can safely disable the SysMain service on your computer by using two different methods as provided in this guide: How to Disable SysMain (SuperFetch) in Windows 11/10.
5. Update Device Drivers
In certain cases, the problem of High CPU usage on a Windows computer ends up being due to outdated device drivers.
1. Right-click on Start button and click on Device Manager.
2. On the Device Manager Screen, click on Action > Scan for hardware changes.
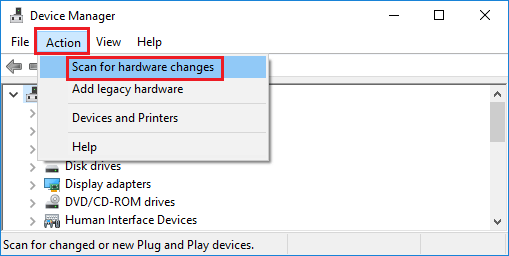
3. Wait for Windows to scan the computer for Hardware changes and update device drivers.
6. Scan the Computer for Malware
As mentioned above, presence of malware/viruses can lead to high CPU usage and other problems on the computer.
You can rule out this possibility by using Microsoft Defender Offline Scan and also by using the scan function as available on most third-party antivirus programs.
If the offline scan detects a virus, it will automatically clear the virus/malware from the computer or prompt you for further actions.
7. Disable Tips & Tricks
While receiving tips from Microsoft can be useful, this feature can sometimes end up using a high amount of resources.
1. Go to Settings > System > click on Notifications in the right-pane.
2. Scroll down in the right-pane and uncheck Offer suggestions on how I can setup my device and Get tips and suggestions when I use Windows options.

3. Restart the computer and you should now find it running better than before.
8. Disable Updates from other PCs
Preventing Windows from downloading updates from other PCs can help in reducing CPU usage.
1. Go to Settings > Windows Update > click on Advanced Options in the right-pane.
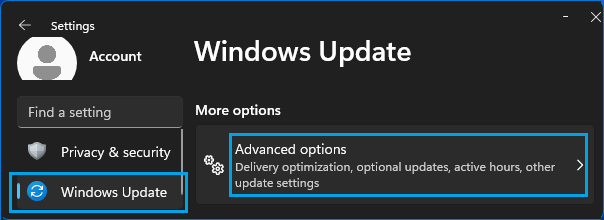
2. From “Advanced Options” screen, go to Delivery Optimization and disable Allow Downloads from other PCs option.

9. Repair System Files
Windows computers come with built-in tools like SFC (System File Checker) & DISM (Deployment Image Servicing & Management), which can be used to check System Files for errors and repair them.
You can make use of these tools (SFC & DISM) to check system files for errors and repair them by using steps as provided in this guide: How to Repair Corrupted System Files In Windows 11/10.
10. Setup Visual Effects for Best Performance
Visual effects like animations and transparencies consume processing power, which can have an adverse impact on the performance of the computer; especially on low end and budget computers.
You can limit the impact of visual effects on CPU usage by setting visual effects for best performance on your computer (instead of best appearance).
1. Open the Run Command on your computer.
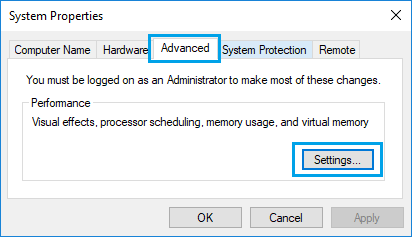
2. Type SystemPropertiesAdvanced and click on OK.
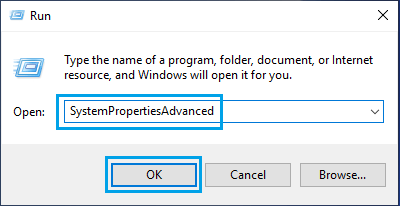
3. On “System Properties” screen, go to Advanced tab and click on Settings button, located under “Performance” section.
4. On the next screen, go to Visual Effects tab and select Adjust for best performance option.
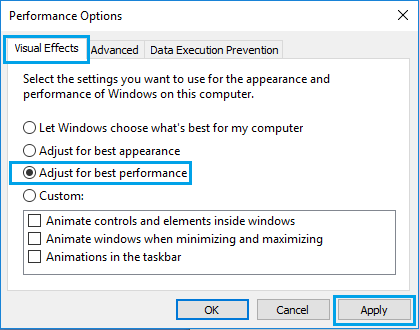
5. Click on Apply > OK to save these settings on the computer.