In general, users find the need to Sideload apps to iPhone or iPad in order to use open source apps, games and emulators that are not available on the App Store.
In case you are not aware, the term “Sideload Apps” is used to describe the process of downloading third-party and open source apps to the computer and transferring them to iPhone or iPad.
Since, iPhone allows downloads only from the App Store, Sideloading Apps is the only way to download and use Apps from other reputable sources on iPhone, without Jailbreaking the device (which voids the warranty).
Sideload Apps to iPhone/iPad
In order to Sideload apps on iPhone, the first step is to download and install the latest version Xcode from App Store on your Macbook. Xcode is an IDE (Integrated Development environment), which provides the tools to develop, test and distribute apps.
After downloading Xcode, the next step is to prepare the third-party app, game or emulator for Sideloading to iPhone/iPad by transferring its source into Xcode.
Note: In general, source code for most apps, games and emulators should be easily available online.
Key Steps to Sideload Apps to iPhone or iPad
The key steps that are required to Sideload apps to an iPhone or iPad, without the need to jailbreak the device can be listed as the following.
- Download & Install Xcode on Mac.
- Input source code of the App that you want to Sideload into Xcode.
- Connect iPhone/iPad to Mac.
- Create a Code Signing Signature.
1. Download & Install Xcode on Mac
Follow the steps below to download and install Xcode on your Mac and add your Apple ID.
1. Download the latest version of Xcode from the App Store on your Macbook.
2. Open the Finder on your Mac > go to Applications Folder and open Xcode by double-clicking on the Xcode icon.
3. Once you are on Xcode, click on the Xcode tab in the top-menu bar and select Preferences in the drop-down menu.
4. On the Preferences screen, select Accounts tab and click on the + button to add your Apple ID to Xcode.
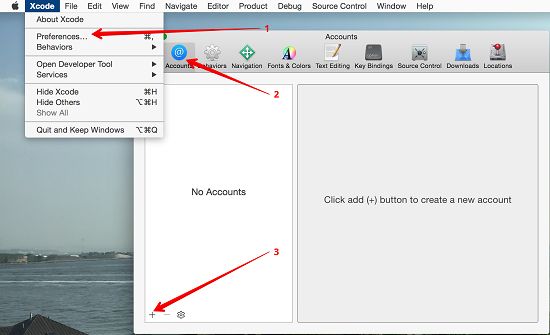
Image credit: bouk.co
5. On the pop-up, enter your Apple ID and Password.
Note: You may get an error message during this step and this happens if your Apple ID is linked to an expired membership of Apple Developer program.
If you get an error message due to this reason, you can create a new Apple ID and log in to Xcode using the New Apple ID.
2. Input the Source Code of App into Xcode
In order to build or prepare the app for Sideloading, the source code of the third-party app that want to use on iPhone needs to be transferred into Xcode.
In this example, we are transferring the source code of GBA4iOS into Xcode. GBA4iOS is a popular emulator that can trick an iPhone into becoming a Game Boy console.
1. Go to website of the App (GBA4iOS Emulator in this case) and download the Source Code to your Mac.
2. Next, open the Terminal on your MAC and type the Command that is required to download the source code of the App and press the Enter key on the keyboard of your Mac.
For example, type sudo gem install cocoapods; git clone https://bitbucket.org/rileytestut/gba4ios.git; cd gba4ios; pod install to transfer the source code of GBA4iOS to Xcode.

Note: The above Command needs to be replaced with the Command that is required input the source code of the app, game or emulator that you want to Sideload to iPhone.
3. After this, open Xcode > click on the File Tab and select the Open option.
4. Locate your project file and click on it to open the project in Xcode.
3. Connect iPhone to Mac
The third step is to connect your iPhone/iPad to Mac using a lightning to USB cable.
1. Plug iPhone to Mac and click on the Finder Icon.
2. After iPhone appears on the Finder, click on the Product tab and select Destination.
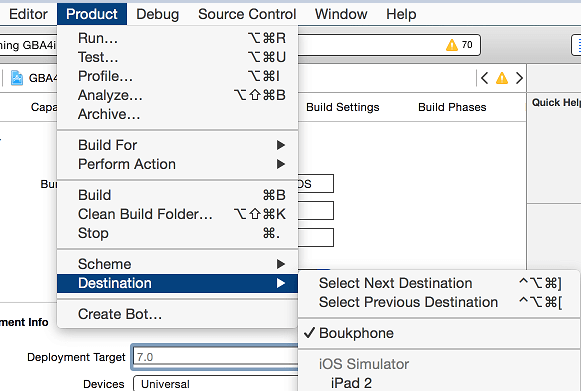
Image credit: bouk.co
3. Select your iPhone (or iPad) as the destination.
4. Create Code Signing Signature
The last step is to generate a unique code signing signature for the app in order to build and install it.
1. Click on the Name of your App or Emulator in the left-side pane.
2. In the right-pane, type your unique Bundle Identifier name.
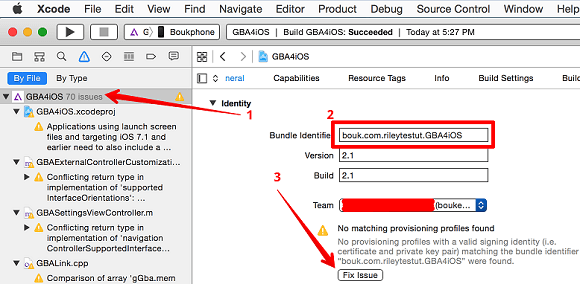
Image credit: bouk.co
3. Take a look at the Team entry and make sure that your name is entered in the team field.
4. Now click on the Play button which is located in the top left of the Xcode window.
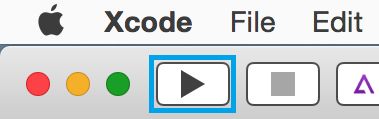
As soon as you click the play button, your app will be built, installed and launched on your iPhone/iPad connected to the Mac via the USB port.
The third-party app should now be available on your iPhone/iPad. If you get an error message, it is most likely due to use of an incorrect/faulty source code.