When Skype Audio is not working, you may experience low quality audio or lack of incoming sound during Skype calls, Headphones not working, Sound breaking up during calls and Audio functions not at all working during Skype calls.
The reason for Skype Audio not working on your computer could be occurring due to a variety issues, ranging from the right speaker and microphone not being selected to corrupted device drivers and other reasons.
Skype Audio Not Working in Windows 10/11
If you are unable to hear the other person’s voice or the Audio is not all working while making Skype Audio calls from your computer, you should be fix the problem using the following troubleshooting steps.
1. Check Audio Settings
The Skype App should automatically select the right Speaker and Microphone on your computer. However, sometimes this does not happen, resulting in Skype Audio not working on a Windows computer.
1. Open Skype on your computer > click on 3-dots menu icon and select Settings in the drop-down menu.

2. On the Settings screen, make sure the right Speaker and Microphone are selected.
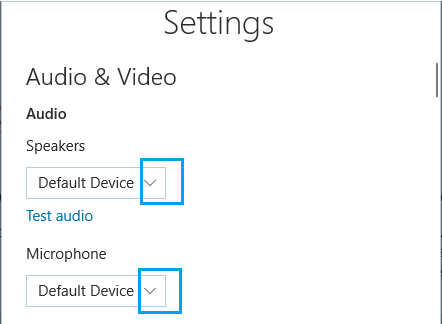
3. After selecting Microphone and Speaker, you can click on the Test Audio link to test and make sure that the right Speaker and Microphone have been selected.
2. Restart Windows Audio Service
Starting Windows Audio Service (if it has stopped) and restarting it (if it has not stopped) can fix the problem of Skype Audio not working on a Windows computer.
1. Right click on the Start button and click on Run.
2. In the Run Command box, type services.msc and click on OK.

3. On the Services screen, right-click on Windows Audio and click on Start (If the service is not running). If the service is running, click on Restart or Resume option.
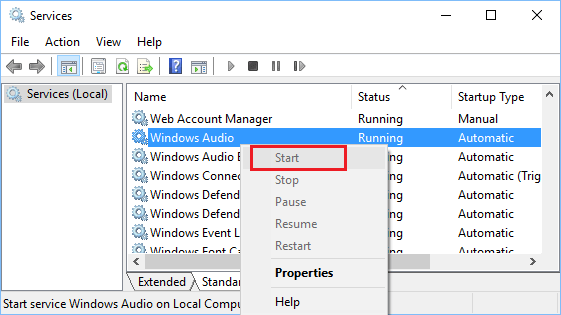
4. Once the Process is completed, restart your computer and see if Skype Audio is working on your computer.
3. Allow Applications to Control Sound
The Skype App should be allowed to control Audio devices, while it is being used.
1. Right-click on the Speaker icon in the taskbar and click on Sounds in the menu that appears.
![]()
2. On the Sound screen, switch to Recording tab and double-click on your Microphone.
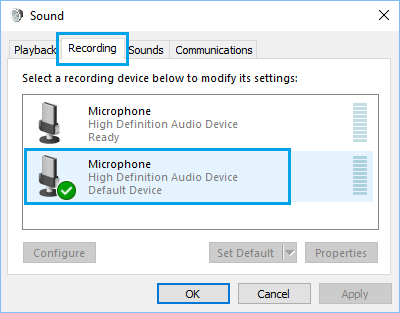
3. On the next screen, switch to Advanced tab and make sure Allow Applications to take exclusive control of this device option is selected.
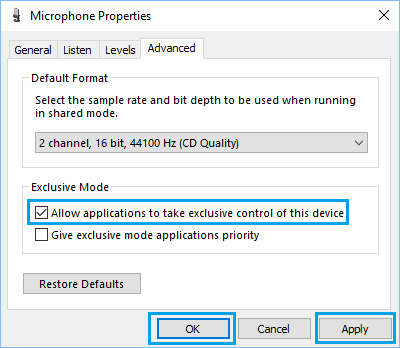
4. Click on Apply and OK to save this setting.
Restart the computer and see if the problem of Skype Audio not working on your computer is fixed.
4. Reinstall Audio Drivers
The problem of Skype Audio not working on your computer might be related to the device driver for the sound controller getting outdated or corrupted.
1. Right-click on the Start button and select Device Manager.
2. On Device Manager screen, expand “Sound, Video and Game controllers” entry, right-click on High Definition Audio device and select Uninstall device option in the menu that appears.
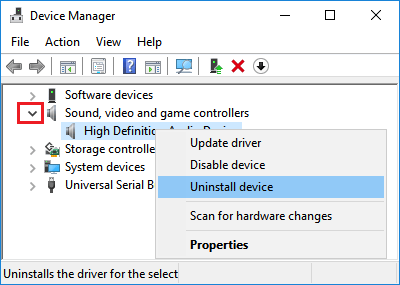
3. After this, Restart the computer and it will automatically install the right device driver.
5. Set Correct Default Audio Device
Make sure the correct Audio Device has been selected on your computer.
1. Right-click on the Speaker icon located in the taskbar (bottom-right corner) and click on Sounds in the menu that appears.
![]()
2. On the next screen, switch to Speaker tab, select the right speaker and Set it as Default.
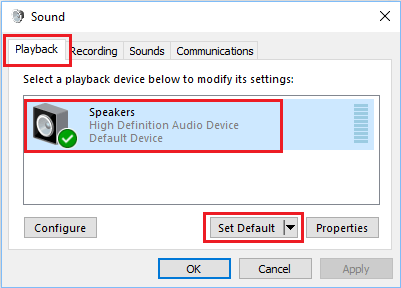
3. Click on Apply and OK to save this change on your computer.
After setting default Audio Device, check to see if the problem of Skype Audio not working is fixed on your computer.
6. Switch to Wired Connection
Whenever Skype detects an interference or problem with network connection, it automatically tries to change the quality of the sound, in order to keep the Skype Call going.
Hence, consider switching from Wi-Fi to Wired connection, in order to improve the quality of sound during Skype Calls.
7. Close Open Tabs and Applications
Similarly, open tabs and applications can interfere with the functioning of Skype and lead to sound problems.
Closing open tabs and programs allows Skype to make use of the full bandwidth and prevents the possibility of any open tab or program conflicting or interfering with functioning of the Skype App.