Similar to any other Web browser, the default Safari Browser on your MacBook can slow down and start degrading in performance over a period of time.
When this happens, you may notice a considerable delay in loading of the web pages, find it difficult to scroll down the web pages and may even find certain busy or popular websites failing to load.
Hence, we are providing below a number of steps to fix the slow Safari browser on Mac and get it back almost to its initial or original brisk browsing speed.
Reason for Slow Safari Browser on Mac
The most common reason for the Safari browser gradually becoming slower on a MacBook is due to the browser cache not being cleared for a long period of time.
Apart from this, the below par performance of Safari browser on your MacBook could be due to multiple browsing tabs being left open, use of browser extensions, unused programs being left open and other reasons.
Hence, start by getting into the habit of closing down unused or idle apps, programs and browser tabs and follow other steps as provided below to speed up the slow Safari browser on your MacBook.
1. Clear Safari Browser Cache
If you are like most users, it is likely that you have been only clearing the Safari Browsing History and never or not been clearing the browser cache.
The main reason for this is due to the Develop Menu not being enabled by default on the top-menu bar on your MacBook.
Once the Develop Menu is enabled, all that is required to clear the Safari browser cache on a MacBook is to select the select the Develop tab and click on Empty Caches option in the drop-down menu.

Emptying the browser cache from time-to-time, helps in ensuring that the browser cache does not become filled up with expired or broken files, which can lead to browser related problems.
2. Disable Safari Browser Extensions
If you are using browser extenstions, disable them and see if it makes a difference to the browsing speed on your MacBook.
1. Open the Safari Browser on your Mac.
2. Select the Develop tab in the top-menu bar and click on Disable Extensions option in the drop-down menu.
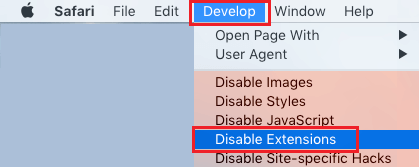
This will Disable all the Safari Browser Extensions on your computer.
3. Update Software
If your MacBook is set to automatically download updates, the Safari browser on your MacBook should be up-to-date with the latest available update.
However, it is still a good idea to make sure that your MacBook is not lagging behind in updates.
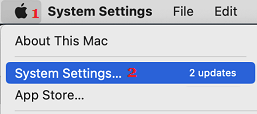
1. Click on Apple Icon in the top-menu bar and select About This Mac option in the drop-down menu.

2. On the next screen, click on Update Software button
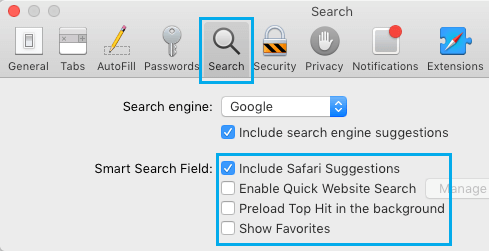
4. Change Safari Search Settings
While “Smart Search Settings” in Safari browser can enhance the browsing experience, they are also known to slow down the browser.
1. Open Safari Browser > select Safari tab in top menu bar and click on Preferences in the drop-down menu.
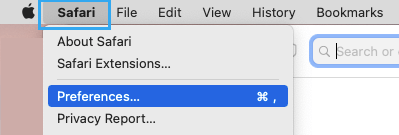
2. On the next screen, click on the Search Tab and disable Enable quick website search, Preload top hit in the background and Show Favorites options.
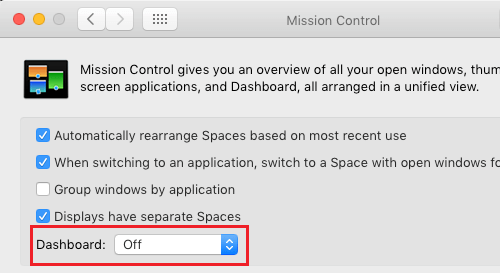
5. Turn OFF Dashboard
While the Dashboard feature on Mac is useful, it takes up resources, which can lead to slowing down of the Safari browser, especially on older MacBooks (2010 or earlier).
Hence, try disabling the Dashboard on your Mac and see if it makes any difference to the speed of Safari browser on your Mac.
1. Click on Apple Logo > select System Settings… in the drop-down menu.
2. From System Settings screen, go to Mission Control > Turn OFF the Dashboard feature on your Mac.
If you do not notice much difference, you can always go back to Mission Control and enable the Dashboard on your Mac.
6. Disable Unused Network
If you are mostly using Ethernet or Wi-Fi, disabling the unused Network can help in speeding up Safari browser.
1. Click on Apple Logo > select System Settings… in the drop-down menu.
2. From System Settings screen, go to Network > select the unused Network (Wi-Fi in this case) and click on the Turn OFF button.
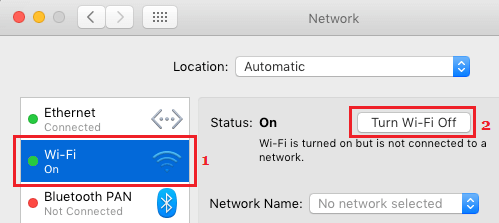
This ensures that your MacBook remains focused on the active network (Ethernet in this case) and does not try to switch to Wi-Fi.
Note: If you always use Wi-Fi, you will be disabling the Ethernet using above steps.
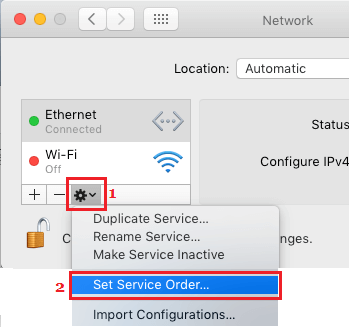
7. Establish Network Priority
In you use both Wi-Fi and Ethernet, setup Network priority based on which Network you are mostly connected to.
1. Click on Apple Logo > select System Settings… in the drop-down menu.
2. From System Settings screen, go to Network > click on the Gear icon and select Set Service Order… in the drop-down menu.
3. On the next screen, drag Wi-Fi below Ethernet Network (if you mostly use Ethernet) or drag Ethernet below Wi-Fi (If you mostly use Wi-Fi Network).
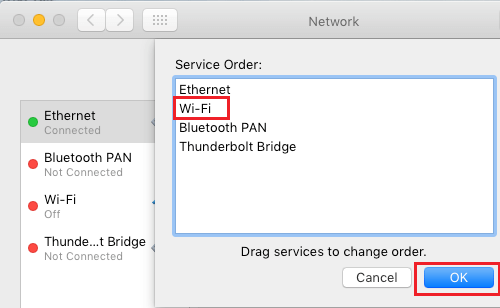
5. Click on OK to save this setting on your Mac.
8. Change IPV6 Settings
Users have reported improvement in page loading speed after disabling IPV6 Settings.
1. Click on Apple Logo > select System Settings… in the drop-down menu.
2. From Preferences screen, go to Network > Advanced > TCP/IP tab and set “Configure IPV6 entry” to Link-local Only option.

3. Click on OK to close the screen and then click on Apply to save this setting on your Mac.
9. Disable DND Prefetching
The DNS prefetching mechanism in Safari browser can sometimes lead to slow loading pages by sending out more requests than those allowed by your internet service provider.
1. Open the Terminal on your Mac.
2. On the terminal screen, type the following command and hit the enter key.
defaults write com.apple.safari WebKitDNSPrefetchingEnabled -boolean false
Once the command is executed, DNS Prefetching will be disabled on the Safari browser on your MacBook.
Note: You can re-enable DNS prefetching by running defaults delete com.apple.safari WebKitDNSPrefetchingEnabled command.
10. Change DNS Server
If you notice that the Safari browser on your Mac usually gets slower during certain periods of the day, the problem might be due to the DNS servers of your service provider being congested.
You can switch to Google’s free Public DNS Service or OpenDNS and see of this helps in improving the browsing speed on your Mac.
The steps the change the DNS servers on you Mac can be found in this guide: How to Change DNS Server on Mac.