iPhone should come up with “Trust this computer” pop-up, whenever it is connected to Mac, Windows computer or Chromebook for the first time.
This allows you to authorize the computer by tapping on the Trust option, which provides it with access to Photos, Contacts, Messages and other data on your iPhone.
As you must have figured out, the purpose of “Trust This Computer” pop-up is to protect your privacy and data by making sure that it is only being connected to known and trusted computers.
Trust This Computer Not Showing Up on iPhone
If “Trust This Computer” pop-up is not showing up on your iPhone, it is likely that you may have unknowingly tapped on the “Don’t Trust” option.
Apart from this, the problem could be due to USB Port being faulty, the version of iTunes installed on your computer being outdated and other issues.
With this understanding, let us go ahead and take a look at the steps to fix the problem of “Trust This Computer” pop-up not appearing on iPhone.
1. Unlock iPhone
iPhone won’t be able to show “Trust This Computer” pop-up, if the screen is locked. Hence, unlock your device and it should come up with Trust This Computer pop-up.
2. Re-plug iPhone into Computer
Unplug iPhone from the Computer > Wait for 30 seconds > Plug iPhone back into the Computer and see if it now comes up with “Trust This Computer?” pop-up.
3. Try Another USB Port
As mentioned above, the problem could be due to the USB Port on the computer being disabled or not working properly.
To confirm, plug iPhone into another USB Port and see if this helps in fixing the issue.
4. Restart iPhone
Sometimes, the problem is due to a minor glitch or stuck process preventing iPhone from coming up with its usual “Trust This Computer?” pop-up.
1. Go to Settings > General > Shut Down > use the Slider to power off iPhone.
2. Wait for 30 seconds > Restart your device by pressing the power button.
5. Update iTunes
If you are connecting iPhone to a Windows computer, make sure that the latest version of iTunes is installed on your computer.
1. Open iTunes on your Windows computer.
2. Once you are in iTunes, click on the Help tab in top-menu bar and click on Check for Updates option.
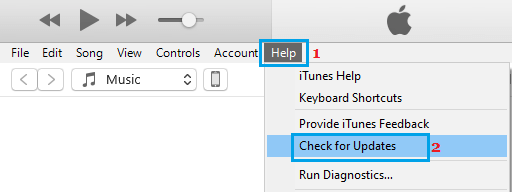
3. Wait for the computer to check and install the update on your computer (if available).
6. Reset Location and Privacy
If you had previously untrusted or trusted the computer, this information needs to be removed from the computer.
1. Go to Settings > General > Transfer or Reset iPhone > Reset.
2. On the pop-up, select Reset Location & Privacy option.
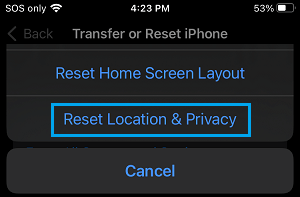
3. Enter your Lock Screen Passcode > On the confirmation pop-up, select Reset Settings to confirm.