Laptop computers come equipped with a built-in internal Microphone that allows you to make voice and video calls using Apps like Skype and Google Voice. However, there are users who may want to disable the Microphone on their computer for security and other reasons.
In general, the most common reason for disabling the Microphone on a Windows computer is to prevent the possibility of children being exposed to online threats by getting into conversations with strangers on the internet.
Disable Microphone in Windows 11/10
You can find below the steps to disable or switch off the Microphone on your Windows 11/10 computer and also the steps to switch on or enable the Microphone on your computer.
1. Disable Microphone on Windows Computer
You can follow the steps below to Turn Off the Microphone on your windows 11/10 Computer
1. Right-click on Start button and click on Device Manager.
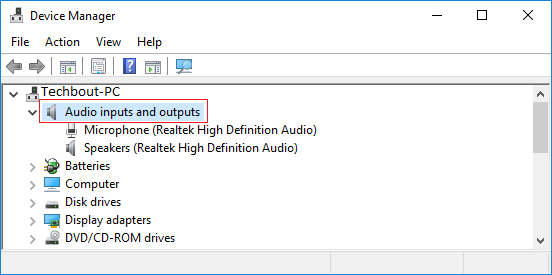
2. On Device Manager screen, expand Audio inputs and outputs entry. You should be able to see your Microphone listed in the expanded list.
3. Next, right-click on Microphone and click on Disable in the contextual menu that appears.
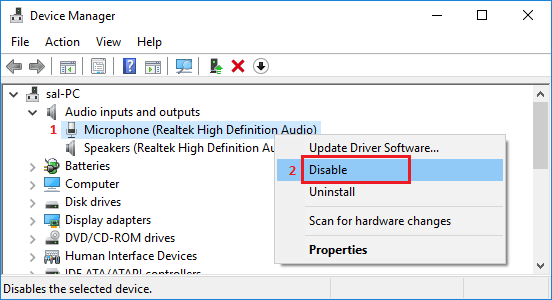
4. On the confirmation pop-up, click on Yes to confirm.
This will disable the Microphone access on your computer.
2. Enable Microphone on Windows Computer
At any time, you can enable the Microphone back on your computer by following the steps below.
1. Right-click on the Start Button and click on Device Manager.
2. On Device Manager screen, click on the down arrow next to Audio inputs and outputs to expand Audio inputs entry.
3. Next, right-click on Microphone and click on the Enable option in contextual menu.
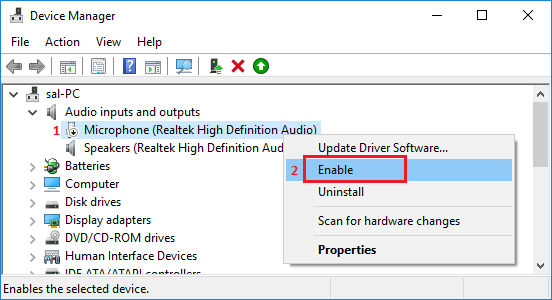
This will enable the Microphone back on your computer and you will be able to use it for Skype and Google Voice calls to your friends and relatives.