The default setting in Windows is to automatically download and install the most essential driver updates (network adapters, basic audio and display) through Windows updates and leave it to the users to install optional driver updates.
While in most cases, allowing Windows to handle essential driver updates (via Windows updates) & downloading optional update (if required) is good enough to ensure the proper functioning of a Windows computer, it sometimes becomes necessary to manually update, roll-back & reinstall drivers.
Update, Remove & Reinstall Drivers in Windows 11/10
Manually updating & reinstalling device drivers is a standard part of troubleshooting problems on a Windows computer and helps if the problem is being caused due to outdated or corrupted driver software.
Hence, if certain devices are not functioning properly or causing problem on your computer, the first step would be to take a look at optional driver updates; as available within Windows update and then manually update drivers (if required) by going to Device Manager.
1. Download & Install Optional Driver Updates
While Windows automatically downloads the recommended driver updates, it classifies some newer and manufacturer-specific drivers as optional and makes them available under “Optional updates” section.
As mentioned above, the “Optional Driver” updates are only notified to users and not automatically installed by Windows. Hence, if the computer is going through problems or certain devices are not working as expected, installing optional driver updates might help in fixing the issue.
1. Press Win + I keys to open Settings.
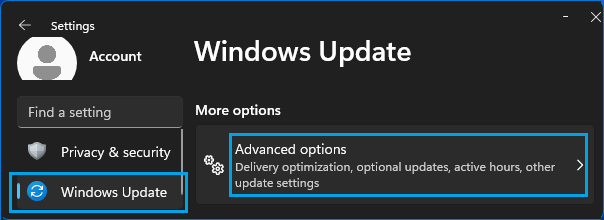
2. On the Settings screen, select Windows Update (left-pane) and click on Advanced options in the right-pane.
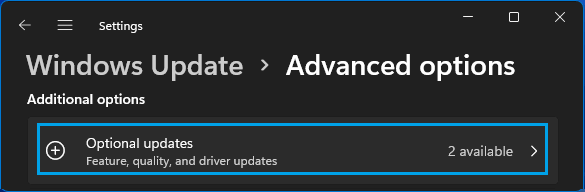
3. On the next screen, scroll down to “Additional Options” section and click on Optional Updates.
4. On “Optional updates” screen, click on Driver updates, select the Driver update that you want to install and click on Download & Install button.
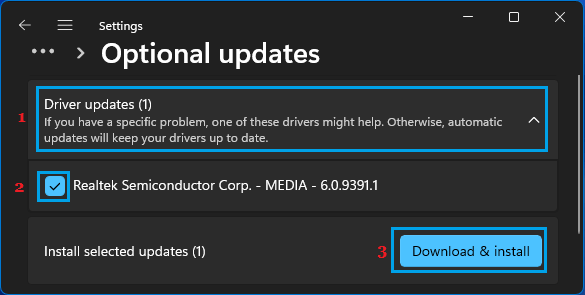
5. Wait for the Optional driver updates to be downloaded and installed on your computer.
Windows 10: Go to Settings > Update & Security > Windows Update > View optional update > select Driver Updates that you want to install and click on Download and Install button.
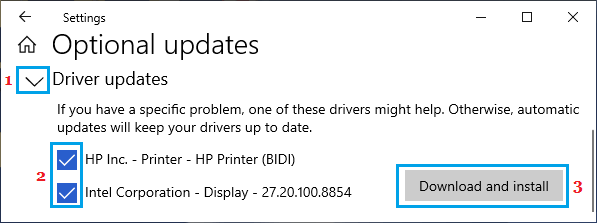
Wait for the optional driver updates to be downloaded and installed on your computer.
2. Scan For Hardware Changes Using Device Manager
If your computer or a particular built-in/attached device is going through problems, you can start by using “Scan for hardware changes” option in Device Manager. This forces Windows to re-check the hardware, load missing devices/drivers and update/refresh the status of devices.
In many cases, this simple step can help in fixing the issue of plugged-in devices like USB drives, headphones, microphone or external monitor not being recognized by Windows and also fix the issue of devices malfunctioning or not functioning properly due to drivers not being loaded on the computer.
1. Right-click on the Start button and click on Device Manager.
2. On the Device Manager screen, click on Action > Scan for Hardware Changes.
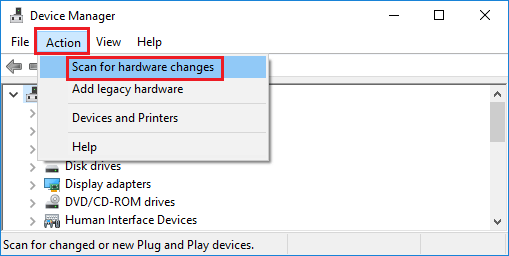
3. Allow Windows to scan the computer for Hardware changes and update the drivers (if required).
3. Automatically Update Drivers Using Device Manager
If the problem is related to a specific device (Sound Card, Graphics Card and others), you can request the Device Manager to automatically search for updated driver software and install it on the computer.
1. Right-click on the Start button and click on Device Manager.
2. On the Device Manager screen, right-click on the Device that you want to update and click on Update Driver option.
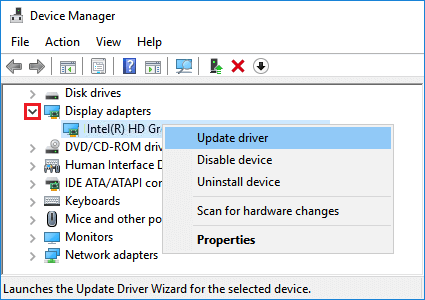
Note: In most cases, you will be required to expand the relevant Device Entry to locate the Device to be updated.
3. On the next screen, select Search automatically for updated driver software option.
4. Wait for Windows to look for an updated version of the driver software. If an updated version is available, it will automatically download and install the latest version of the driver.
If Windows is unable to find an updated driver, it should notify you with “No updates were found” message.
4. Manually Download & Update Drivers Using Device Manager
If Windows is unable to find updated drivers, you can check if a driver update is available on the website of the device manufacturer.
On the manufacturers dedicated download page, make sure that an updated driver is available and it clearly matches the device & version/architecture of Windows installed on your computer.
1. Download the updated/desired driver software on your computer.
2. If the downloaded file is in a compressed format, double click on the downloaded File and note to down the Location, where the New Driver is being stored on your computer.
3. After this, open Device Manager (right-click on Start and click on Device Manager).
4. On the Device Manager screen, open the Device category in which the device is located > right-click on the Device and select Update Driver option.
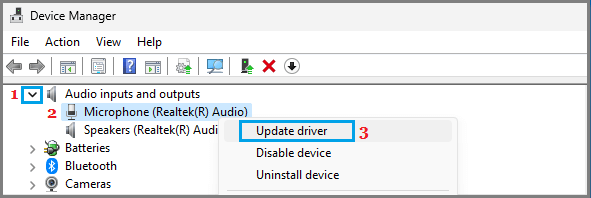
Example: Device Category is “Audio inputs/outputs” and the Device (Microphone) is being updated.
5. On the next screen, select Browse my computer for driver software option.
6. On Update Driver screen, click on the Browse button and navigate to the location where the downloaded driver is located on your computer.
7. Make sure the location path of the downloaded driver is correct and click on the Next button.
Windows will proceed to install the selected driver, if it finds that it is an updated one. If not, it will come up with “Best drivers for the device are already installed” message.
8. Click on the Close button to exit the Update Driver screen.
If the downloaded driver was installed by Windows, you may be prompted to restart the computer. If not, it is better to restart your device to apply the changes.
5. Remove & Reinstall Drivers Using Device Manager
The “Device Manager” utility in Windows also provides the option to remove outdated or corrupted version of any driver from the computer and install the latest available or stable version of the driver.
Note: If the driver is corrupted, the device may be listed as “Unknown Device” on the Device Manager screen.
1. Right-click on the Start button and click on Device Manager.
2. On the Device Manager screen, right-click on Unknown Device and click on Uninstall Device option.
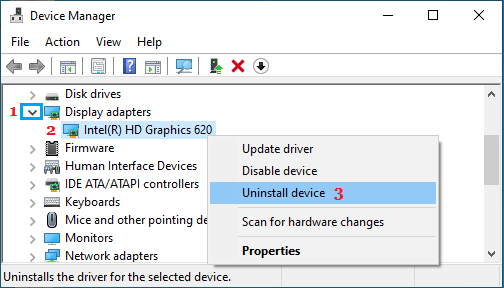
3. After the Device is uninstalled, make sure that you Restart the computer.
As the computer restarts, Windows should automatically find and reinstall the correct driver required for the proper functioning of this device on your computer.
If the problem is still not fixed or you have reasons to believe that Windows has not installed the latest driver, you can manually install the driver using the 4th method as provided above in this guide.