The problem of USB ports not working on a Windows computer could be due to various reasons, ranging from outdated or corrupted drivers to power supply to the USB ports being cut-off to save battery life and other reasons.
Before going ahead with the troubleshooting steps, it is a good idea to make sure that the problem is being caused by the USB port and not by the USB device that you are trying to connect to the computer.
You can check and confirm if the USB port is faulty by plugging another device into the USB Port that is not working on your computer. If you find that the new device is also not working, it confirms that the problem lies with the USB Port.
USB Ports Not Working in Windows 11/10
Now that you have checked and confirmed that the problem lies with the USB Ports, you can go ahead and try the following troubleshooting steps to fix the problem of a USB Port or Ports not working on your Windows computer.
1. Restart the Computer
The problem could be due to a minor glitch preventing the USB Port from functioning properly. In most cases, this can be fixed by restarting the computer.
Switch OFF the computer > Wait for 60 seconds > Restart the computer and you may be surprised to see the USB Port working properly.
2. Reinstall Faulty Device Drivers
A common reason for USB Ports not working on a Windows computer is due to the drivers software becoming outdated, corrupted or not loading during the startup process.
1. Right-click on the Start button and click on Device Manager.
2. On Device Manager screen, right-click on the USB Controllers with an exclamation mark and select the Uninstall option.
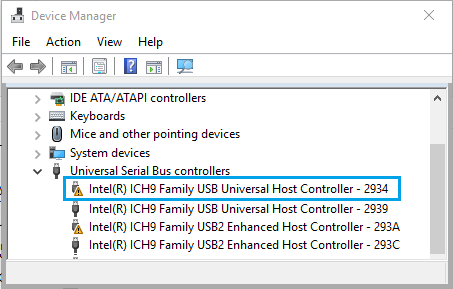
Note: You need to expand the Universal Serial Bus Controllers entry to see all the USB Controllers.
3. Repeat the above steps for other USB Controllers with exclamation marks and Restart the computer.
Once the computer restarts, Windows should automatically load the right drivers as required for the USB Ports on your computer.
3. Disable Fast Startup
The Fast Startup feature in Windows can sometimes lead to USB device drivers not being properly loaded or skipped during the startup process.
1. Right-click on the Start button and click on Run.
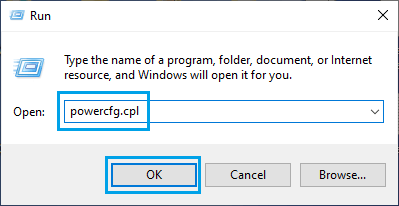
2. In the Run Command window, type powercfg.cpl and click on OK.
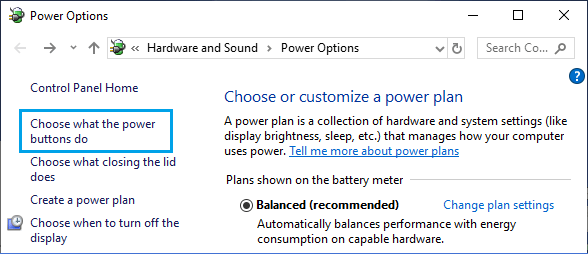
3. On Power Options screen, click on Choose What the Power Buttons Do in the right-pane.
4. On the next screen, scroll down to “Shutdown Settings” and uncheck Turn on fast startup option.
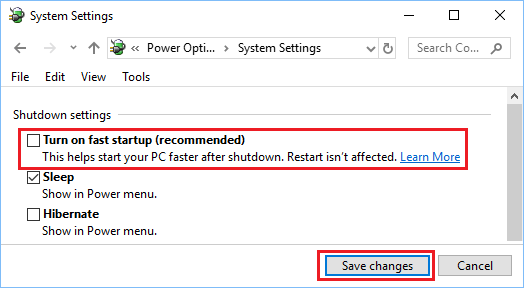
5. Click on Save Changes button to save this Power Setting on your computer.
4. Change Power Management Setting for USB Root Hub
Windows computers have a default tendency to turn-off power supply to unused USB ports and this can lead to the problem of USB Ports not working.
1. Open the Device Manager on your computer.
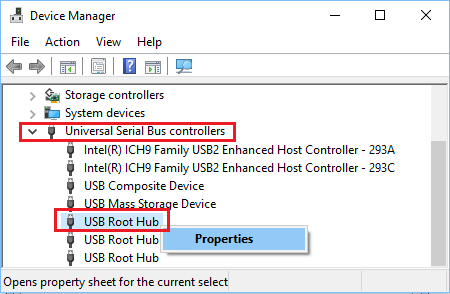
2. On the Device Manager Screen, expand Universal Serial Bus Controllers entry > right-click on USB Root Hub and click on Properties.
3. On USB Root HUB Properties screen, switch to Power Management tab and uncheck Allow the computer to turn off this device to save power option and click on OK.
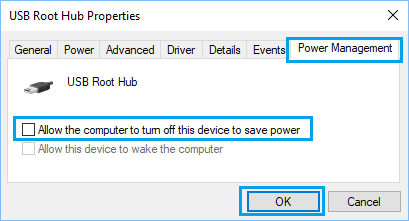
If there are multiple USB Root Hubs, you need to repeat the above steps for them as well.
5. Disable USB Selective Suspend Setting
If all the USB Ports are not working on your computer, disabling Selective Suspend Power Setting for all the USB Ports can help.
1. Right-click on the Start button and click on Run.
2. In Run Command window, type powercfg.cpl and click on OK.

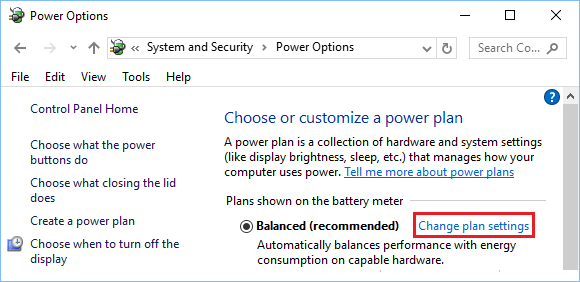
3. On Power Options screen, click on Change Plan Settings link located next to the current Power Plan.
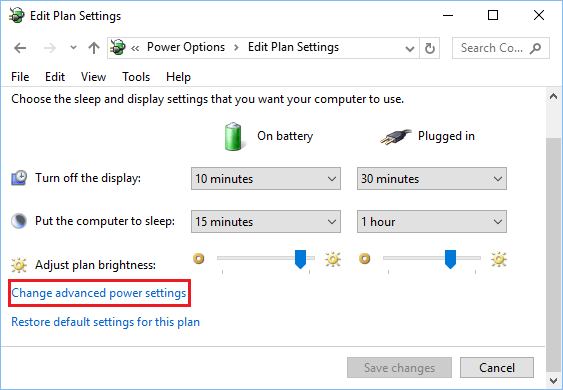
4. On the next screen, select Change Advanced Power Settings link.
5. On Power Options screen, click on USB Settings > USB selective suspend setting and select the disabled option for “Plugged In” and also for “On Battery” (If you are using a Laptop).
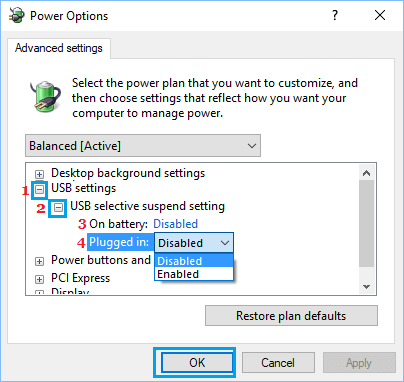
6. Click on OK to save these Advanced Power Setting on your computer.
6. Check for Updates
See if an update is available for the computer. If an update is available, Windows will also install the latest available drivers for USB Ports on your computer.
1. Go to Settings > Windows Update (left-pane) > Click on Check for Updates button in the right-pane.
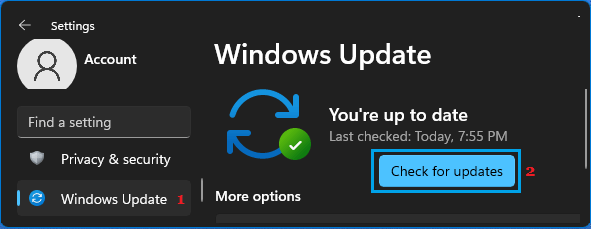
2. Wait for Windows to check for updates > Follow the instructions to download and Install Updates (If available).
Windows 10: Go to Settings > Updates & Security > Windows Update > click on Check for Updates button.
If updates are available, the latest available device drivers may also be installed on your computer.