The Snipping Tool was first introduced by Microsoft in Windows 7, since then it has been available for use in every version of Windows operating system, including Windows 11.
As indicated by its name, the “Snipping Tool” utility can be used to take snips or screenshots of the screen and even record short video clips of screen activity.
In addition to taking screenshots, snipping tool also provides the option to edit, annotate and mark up the screenshots by using colored pens, highlighters, shapes and emoji’s, before saving them.
Use Snipping Tool in Windows 11
While Snipping tool should be available on every version of Windows computer, it is not uncommon to find the Snipping Tool utility missing or being disabled, especially on a Windows 11 computer.
Hence, make sure that “Snipping Tool” App is available on your computer. If it is missing, you can download Snipping Tool from Microsoft Store.
1. Snipping Tool Interface
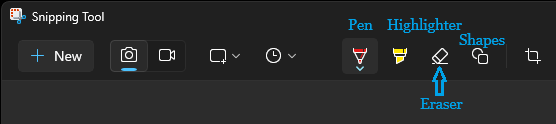
Before going ahead with the steps to open and use Snipping Tool, let us take a look at the User Interface of the Snipping Tool on a Windows 11 computer.
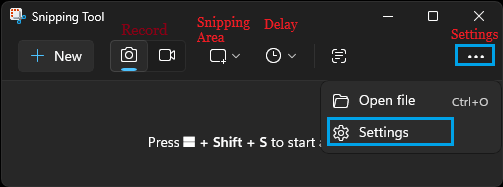
As you can see from above image, the User Interface in Snipping Tool basically consists of 4 buttons and a Settings menu, designed to perform the following functions.
- New: Starts a New Snip.
- Record: The next two buttons can be used to record a snip.
- Snipping Area: Allows you to select Rectangular Snip, Window Snip, Full Screen Snip & Freeform.
- Delay: Can be used to delay screenshot capture by 3, 5 and 10 seconds.
- Settings: Allows you to open files & select whether or not you want to automatically copy the screenshots to clipboard.
2. Multiple Ways to Open Snipping Tool
Now that you understand the Snipping Tool User Interface, let us take a look at some of the ways to start or open the Snipping Tool on a Windows computer.
1. Open Snipping Tool Using Shortcuts
Depending on the purpose, you can open the Snipping Tool utility on your computer using the following Shortcuts
- Use Windows Logo + Shift + S shortcut to capture image snapshot.
- Use Windows Logo + Shift + R shortcut to capture a video clip of the screen.
- Press PrtSC (Print Screen) key to capture snapshot of the entire screen to the clipboard
2. Open Snipping Tool Using Search Bar
If you are not good at remembering keyboard shortcuts, you can open or launch the Snipping Tool on your computer by using Windows Search bar
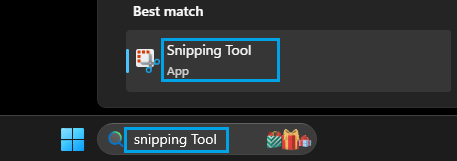
Simply type, Snipping Tool in the Search Bar and click on Snipping Tool Desktop App in the search results.
3. Open Snipping Tool Using Run Command
Similarly, you can also make use of the Run Command to open Snipping Tool on your computer.
1. Right-click on Start button and click on Run.
2. In the Run Command window, type snippingtool and click on OK.
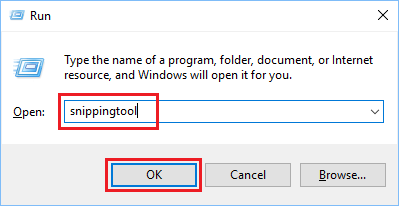
This should immediately launch the Snipping tool utility on your computer.
3. Take Screenshots Using Snipping Tool
Finally, lets us take a look at the steps to Take Screenshots using the Snipping Tool on a Windows 11/10 computer.
1. Press Windows + Shift + S to open the Snipping Tool on your computer.
2. On the Snipping Tool screen, click on the Mode Icon and select Rectangular Snip.
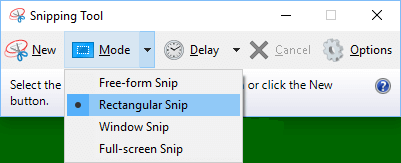
3. You should now find the cursor switching to + icon. Press and hold the Right Mouse key and drag the Cursor around the part of the screen that you want to capture in a screenshot.
4. Once your desired area is selected, release the Mouse Key and the screenshot will be copied to the Clipboard and also saved to the Screenshots Folder on your computer.
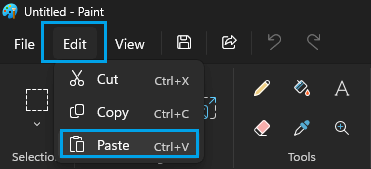
From the Clipboard, the screenshot can be pasted to Paint by opening the Paint App > clicking on Edit and selecting the Paste option in the drop-down menu.
The second copy of the screenshot that is available in the Screenshots Folder can be opened for editing in Paint, Photos and Snipping Tool App by right-clicking on it.
4. Annotate/Edit Screenshots Using Snipping Tool
As mentioned above, Snipping Tool provides some basic tools like Pen, Highlighter and Eraser that you can make use of to highlight, color and markup screenshots.
For other methods of taking screenshots on a Windows computer, you can refer to this guide: How to Take Screenshot in Windows 10/11.
5. Customize Snipping Tool
You can customize the behavior of the Snipping Tool utility on your computer by clicking on 3-dots Icon and selecting Settings in the drop-down menu.
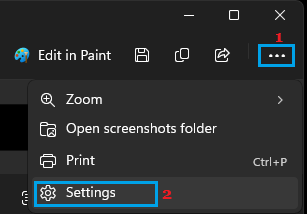
On the settings screen, you can customize the behavior of Snipping Tool on your computer by enabling or disabling the following options.
- Automatically copy changes: Edits to screenshots are automatically copied to clipboard.
- Automatically save original screenshots: Automatically saves screenshots to Screenshots Folder.
- Ask to save edited screenshots: Prompts you to save screenshots.
- Multiple Windows: Opens new screenshots in different windows.
- Add border to each screenshot: Automatically adds a border to screenshots on your computer.
- HDR screenshot color corrector: Adjusts colors for screenshots taken on HDR monitors.
On the same screen, you can Customize the behavior of Screen Recording feature in Snipping Tool by enabling and disable similar options (as above), along with following additional options.
- Include Microphone Input by default when a screen recording starts.
- Include System Audio by default when a screen recording starts.
- Use the Print screen key to open Snipping.