It can be really annoying to find an iPhone coming up with “Verification Failed, There was an error connecting to Apple ID Server” error message.
The Verification Failed error messages on iPhone can occur due to a variety of reasons, ranging from problems with Apple Servers, Corrupted or Incorrect Network Settings to other reasons.
In general, users have reported the following types of “Verification failed” error messages on iPhone.
- Verification Failed – There was an error connecting to Apple ID server
- Verification Failed – connection to iCloud timed out
- Verification Failed – could not connect to server
- Verification Failed – request timed out
Steps to Fix “Verification Failed” Apple ID Error on iPhone
Before going ahead with other troubleshooting steps, visit Apple’s System Status page and make sure that all Apple Services linked to iCloud are working properly.
If there is a problem, you will have to wait for the problematic service to be fixed by Apple. If there is no problem, move to other troubleshooting steps.
1. Sign Out & Sign Back
The problem could be due to your Apple ID not being recognized.
1. Open Settings > tap on your Apple ID Name.
2. On the Apple ID screen, scroll down and tap on Sign Out.
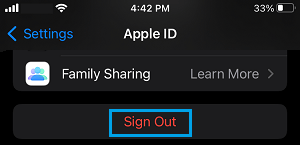
3. After 30 seconds, Sign back into your Apple ID and see if you can now Sign-in to the App Store.
2. Check Time & Date Settings
Incorrect Date and Time settings can lead to error messages on iPhone. Hence, make sure that your iPhone is set to Automatically update its Date and Time.
1. Go to Settings > General > Date & Time.
2. On the next screen, move the toggle next to Set Automatically to ON position.
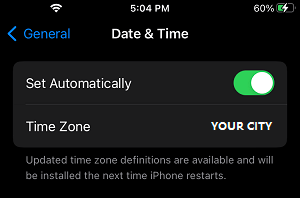
3. Wait for Date and Time to appear on this screen and make sure it is correct. Also, make sure that the “City Name” next to Time Zone entry is correct.
3. Disable VPN
If you are using VPN, disable the VPN service and try to login to iPhone.
1. Open Settings > scroll down and tap on VPN.
2. On the next screen, move the toggle next to Status to OFF position.
3. After disabling VPN, login to your regular Wi-Fi Network and this might fix the problem.
4. Switch to Another Wi-Fi Network
Switching to another Wi-Fi Network (5G or Office Network) might help in fixing this problem.
1. Go to Settings > Wi-Fi > tap on your Wi-Fi Network.
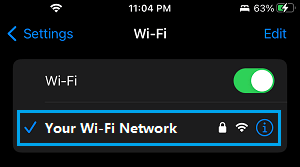
2. On the next screen, select 5G or another available network under ‘My Networks’ section.
5. Forget Wi-Fi Network & Rejoin
Note down the Password for your Wi-Fi network and follow the steps below to Forget Wi-Fi Network and rejoin the Network.
1. Go to Settings > Wi-Fi > tap on your Wi-Fi Network.
2. On the next screen, tap on Forget This Network option.
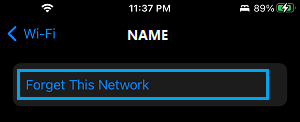
3. On the confirmation pop-up, tap on Forget to confirm.
4. Wait for 30 seconds > tap on your Wi-Fi Network > enter Wi-Fi Network Password to join the Network.
6. Restart Modem/Router
In above steps did not help, restart the Modem/Router unit and this should help in fixing the problem.
1. Switch OFF the Power Supply to your Modem/Router – Use the ON/OFF button (if available) or unplug the power cable from wall socket.
2. Wait for 60 seconds (yes that long!) and switch ON the Power Supply to Modem/Router.
After this, you should find your iPhone working properly and not coming up with any type of verification failed Apple ID error messages.
7. Reset Network Settings
If above steps did not help, the problem might be due to the Network Settings on your iPhone being corrupted. This issue can be fixed by Resetting the Network Settings on your device to its original settings.
You can find the steps to Reset Network Setting in this guide: How to Reset Network Settings on iPhone.